Here in California, most new homes have vinyl windows. Since these units are only a few inches deep, the drywaller or finish carpenter must bridge the gap between the window and the inside face of the wall. On moderately priced homes, this is done by returning drywall into the rough opening and butting it to the window. But on the high-end homes I trim, it means installing wood jamb extensions and then casings.
Early in my career as a finish carpenter, I used wood shims to align jamb extensions with the window. But I stopped using them after learning a trick from an older finish carpenter. At the time, we were installing rabbeted stools across the bottom of window openings that were to be finished top and sides with drywall returns.
Neat Trick
Instead of supporting the stools with shims, the carpenter I was working with installed them over the heads of drywall screws sunk partway into the rough sill in a straight, level row. His method of preshimming stools was much faster than using shims. The method I use now to shim jamb extensions is based on that stool shimming trick — the difference being that I have to preshim all four sides with screws. To do this, I set screws around the inside perimeter of the rough opening so that the heads are in line with the outer edges of the window.
The photos in this article are from a house containing vinyl windows with 1 1/4-inch-wide jambs. The extensions are made from 3/4-inch fir. We build the jamb extensions to the same outside dimensions as the windows so there will be a 1/2-inch reveal where they butt to the vinyl.
We don’t trim anything one at a time; we measure all the windows and then prebuild all the jamb extensions. On this job we picture-framed the casings, so the extensions were four-sided frames butted and screwed at the corners.
While one carpenter measures windows and builds jamb extensions, the other preshims all the rough openings with drywall screws.
Aligning Screws
We set screws so their heads are in line with the outside edge of the window jamb. The idea is to put them as close as possible to the window but still get them in straight. The width of the screw gun prevents us from putting them much closer than 1 1/2 inches away; we can’t get them nearer without putting them in at an angle. I don’t worry about shimming the opposite edge of the extension because it will be secured by a casing.
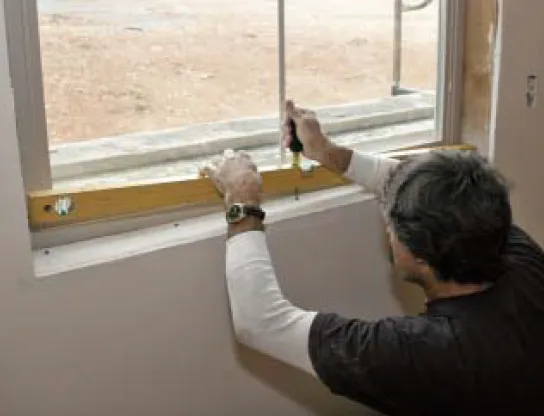
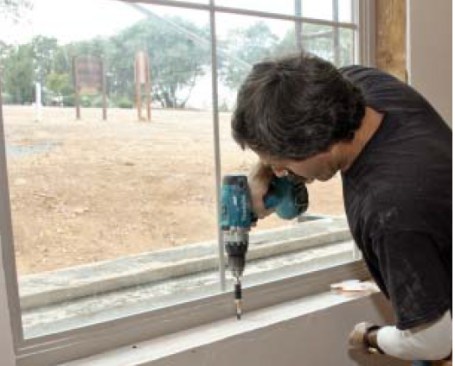
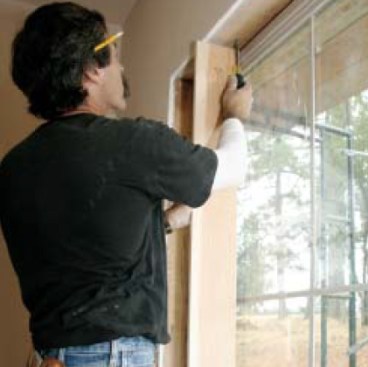
We start by sinking a row of screws along all four sides of the opening — one screw at each end, one in the middle, and enough in between so no two are more than 12 inches apart. Using a square-cut block of wood as a measuring device, I align the bottom screws first. I put the edge of the block against the jamb and land the end of it on the screw. If the screw is installed correctly, the end of the block will be flush to the edge of the jamb. If the block is too high, I drive the screw deeper; if it’s too low, I back the screw out. A screw gun works well for the initial installation, but a screwdriver is better for fine adjustments.
Once the heads of the end screws are aligned with the jambs, I place a straightedge (in this case a level) on top of them. I then raise or lower the rest of the screws so that their heads just touch the bottom of the straightedge. The screwheads now form a straight line that is aligned with the edge of the window. It’s great if the line turns out to be perfectly level, but more important that it be parallel to the jamb. If the screws read badly out of plumb or level, I know the window was poorly installed. If the window is seriously out of whack, the framer needs to come back and reset it so it’s plumb, level, and square.
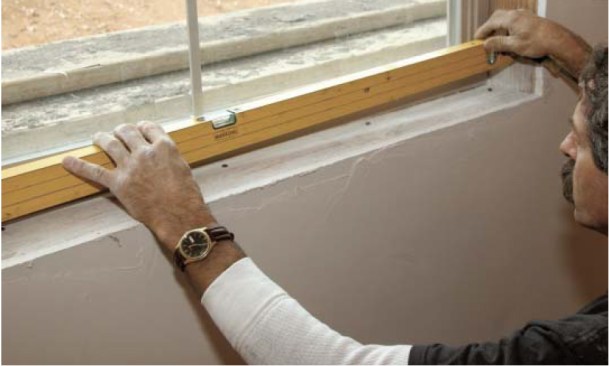
The next step is to repeat this process up one side of the window. This window was too tall for a 4-foot level to work as the straightedge, so we used a straight piece of wood instead.
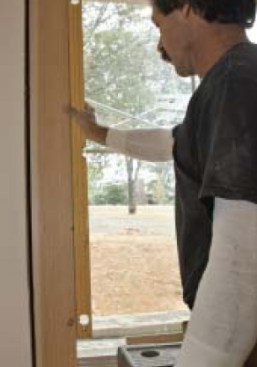
If the window was installed correctly, the level will read plumb when placed against the straightedge.
Spacing Across
Although it’s possible to set the remaining screws to the other two edges of the jamb, it’s faster and more accurate to set them by “measuring” off the screws that are already in. We don’t actually measure; we use spacers that are exactly as long as the extension is wide and high. The spacers are made from off-rips of the jamb stock; since most houses contain multiples of the same windows, we can often use the same spacers over and over.

To set the spacing, we put one end of the spacer against a screw that has already been aligned and run it across to the screw on the opposite side of the opening. The spacer should just barely slip between the screwheads. If it doesn’t, then we have to run the screw on the side that has not been aligned in or out until the spacer fits.
We repeat this process all the way up the side of the opening. When we’re done, the screws on the second side will be perfectly parallel to those on the first side and exactly as far apart as the extension unit is wide.
We adjust the screws at the top of the opening by spacing off the screws along the bottom. A quick and easy way to make the adjustment is to place the bottom end of the spacer on a bottom screw and swing the top end of the spacer off to the side of the protruding screw above. It’s a simple matter to run that screw in or out by hand until the spacer just slips by.

Once this has been done with all the screws at the top of the opening, the jambs are ready to be installed.
Installing the Jambs
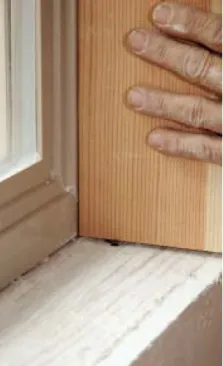
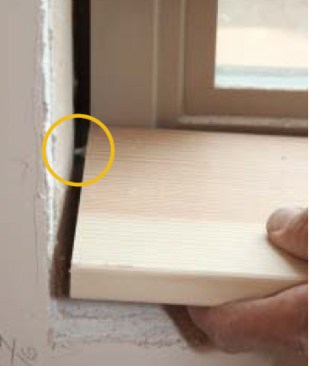
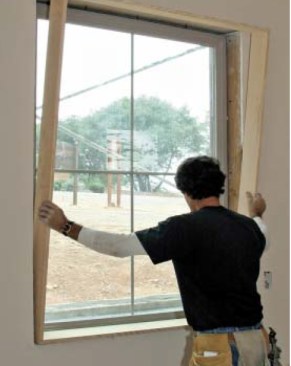
At this point, the screwheads around the opening form straight lines that are aligned with the outside edges of the window jamb. To install the jamb extension, we simply fit it between the screwheads.
If the jamb stock is straight, the jamb unit will slip right in and there will be no slop between it and the screwheads. If the jamb stock is bowed, we might have to tap the unit into position.
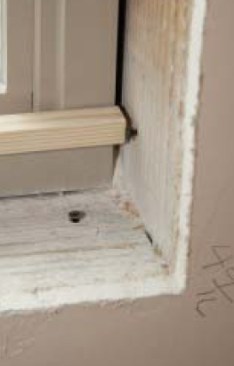
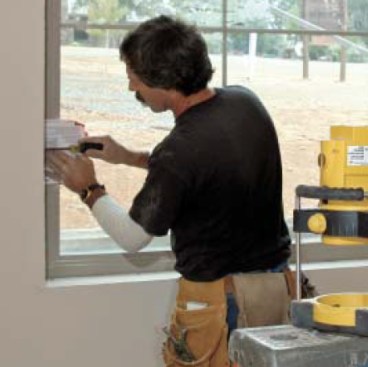
Usually it’s a perfect fit, but if a screw is high the jamb extension will encroach on the 1/2-inch reveal. We fix this by putting a block over the high spot and hitting it with a hammer, slightly burying the screwhead in the back of the extension.
Our last step is nailing off the jamb extension. Since we want to nail near the screwheads, we mark their locations in pencil on the jamb. That way, we won’t accidentally nail where there is no “shim.”
Quick and Simple
Shimming with drywall screws may sound complicated, but it’s actually quite simple. In the time it takes to read this story, I could preshim a jamb extension.
The process takes about 20 minutes per window, which is less time than it used to take me to install jamb extensions over wood shims. It’s nice not having to buy or haul around a bunch of shims of questionable dryness. All I need are a straightedge, a block of wood, a screw gun, a screwdriver, and some 11/4-inch and 2-inch drywall screws in my pouch.
This same basic method can be used with wood windows, though in most cases those units come with the jamb extensions already attached. One thing you will have to adjust for is butting to a narrower jamb. The screwheads might have to be set deeper to obtain the desired reveal.
Laser Method
Sometimes we set the screwheads to a laser line rather than to a block. With single windows, using a laser is no faster than using a block; but with clustered (ganged) windows, it’s a significant time-saver.
Although clustered windows are rarely installed in perfectly straight lines, the jamb extensions on these units must be perfectly aligned; if they’re not, variations will show up in the casing reveal. Since the laser beam can span multiple windows at the same time, we use it to align adjoining jamb extensions.
To begin, we set up the laser so that the horizontal beam lands on — or just clips — the bottom edge of a jamb. The beam represents the top of the screwhead and the back of the jamb extension. If the windows are not perfectly level or aligned, the beam will be high in some places and low in others. We adjust its height until we have a compromise that works for all the windows. Then we set screwheads to this line across the bottom of the openings — much as we do when we use a block, except now we’re gauging the height of the heads with a laser.
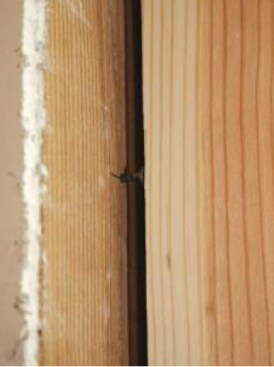
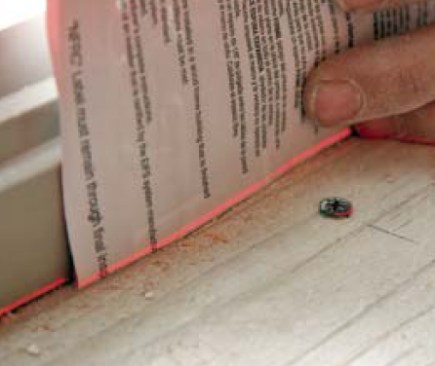
The trick is to make sure that the beam always has something to land on; otherwise it won’t be visible. For example, if the screwhead is below the beam and the window jamb is above it, the beam will disappear into the gap below the window. When that happens, we hold a piece of paper — in this case a window label — behind the screw so that we can see the beam.
We then raise or lower the screwhead until it splits the beam. The lower half of the beam will hit the screwhead and the upper half will be visible on the paper. We repeat this process up the side of the window.


