My company has been building custom sun decks and porches in northern Virginia for the past 17 years. In that time, we’ve developed uniform production methods and selected premium materials that enable us to sell more than 120 projects every year.
Details and custom options not only sell decks but also provide opportunities for increased profit — typically 15% to 50% higher than for our basic specs. We offer many levels of sophistication, from basic railing systems to enclosed gazebos, decorative pergolas, hot tubs, stone masonry patios and walkways, built-in storage and planter boxes, and more. Nearly every option can be quickly estimated by the square or linear foot, enabling us to value-engineer the project during the sales process. I have the unit prices memorized, which encourages the homeowner to come to a quick decision and speeds the process of getting a signed contract.
Whether we’re subcontracting for a builder or working directly with the homeowner, I always consider how the deck will complement the appearance and improve the function of the home. Many homeowners have trouble visualizing an unbuilt project from sketches or plans, so I’ve developed a digital presentation portfolio for my laptop that contains images of over 500 of our projects. Looking over those images often helps customers focus on the types of solutions that might work best for them. The photos also illustrate the importance of matching the style of the deck to that of the home, and how a well-designed outdoor leisure space can unite the house with the landscape.
This approach seems to work well — our closing rate in this region’s high-end market is better than 50%, and after giving a presentation I often find that the budget has taken a lower priority in the overall plan.
Dollars for Details
You don’t make money by building the deck shown on the Yes You Can TV channel. Details sell decks, so I charge for the details as separate line items.
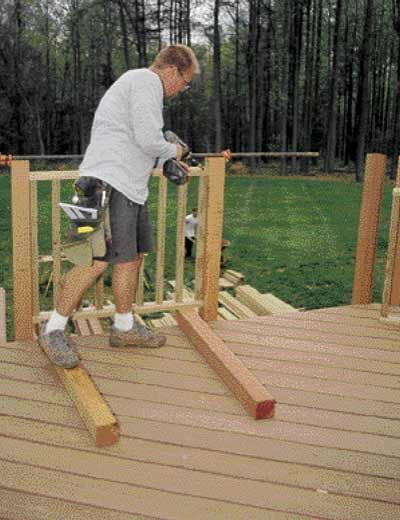
For example, the posts in our standard railing system are visibly bolted to the exposed face of the band joist, but we also offer an optional post detail that embeds their bases in the deck surface (see Figure 1). The square-foot cost of our basic deck is based on the externally mounted posts. If the customer wants to upgrade to the embedded posts, we charge an additional $20 per linear foot of railing. If the customer selects our 6×6 cedar post option, which includes a decorative finial cap, chamfered corners, and a base molding, we charge $180 per post.
Figure 1.In an optional upgrade to the standard bolt-on post system, the deck boards are cut flush with the girder, and 2×4 cleats are nailed between the posts (bottom left). A 2×10 finish band joist is then fastened to the faces of the posts, followed by a 2×8 laid flat and notched around the posts (top). The embedded posts have a strong visual connection with the deck, while the overhang at the band joist creates an attractive shadow line (bottom right).
We also offer a broad range of railing options, from the upscale Chippendale style to the relatively modest Madison Colonial version (Figure 2). The latter isn’t much more difficult to assemble than the base-priced square-baluster-and-rail system, but it provides a higher profit opportunity. If your average markup is, say, 35%, adding such higher-priced options can easily bump it to 50% or more.
Figure 2.The author’s base-priced deck uses a square-baluster-and-rail system, but a broad range of additional styles are available for a variable upcharge, which is calculated by the linear foot. The ornate Chippendale railing (top) is a premium-priced option, while the Madison Colonial (bottom) is a more modest upgrade.


