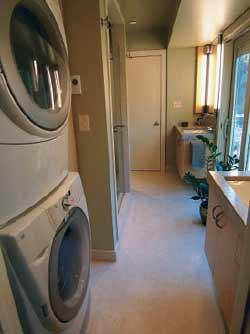
A couple of years back the owners of a 1950s ranch house hired our design-build company to remodel a narrow laundry room. It was a challenging space — 5 feet wide by 12 feet long with doors at each end and another to the exterior. The room served as a pass-through between the family room and the master bedroom and contained a washer, a dryer, a sink, a toilet, and a water heater.
The clients wanted the new laundry to have all the function of the old one, with the addition of a large shower and a second sink. Had we been able to greatly expand the size of the room, the job would have been simple, but the budget — plus the clients’ stated desire to minimize their “carbon footprint” expansion — meant we couldn’t add much space.
We considered several ways to increase the size of the room, including eliminating a fireplace and stealing space from the bathroom on the other side of the wall. In the end, we convinced the clients to push out the exterior wall and replace the exterior door and window with a single large slider.
The Building Shell
We avoided costly changes to the roof and the foundation by cantilevering the new floor area 2 feet, which kept it under the existing roof overhang. This gave us another 24 square feet to work with — not a huge increase, but enough to make the layout work. The clients decided that as long as we were bumping out the laundry, we might as well do the same to the adjacent bedroom too.
The crawlspace under the house was low and damp, so to gain access for sistering to the existing 2×10 joists we removed the subfloor and worked from above. The new joists project 2 feet beyond the mudsills and run 6 feet back into the building. To support the roof load, we installed a triple LVL header in line with the original wall, hiding it within a soffit over the new floor area. This nearly eliminated the roof load on the exterior wall, which protects the new tile by reducing deflection in the cantilevered floor.
Since the bottom of the cantilevered floor is only 3 inches above grade, we framed it with pressure-treated wood and replaced the soil below with a thick layer of drainage stone. The clients’ long-term goal is to remove the house from the flood elevation of a nearby stream by lifting it 4 feet and raising the area around it, so the bay will eventually rest on a foundation.
Exterior finish. We substituted fiber-cement siding for the original brick veneer and used Azek cellular PVC (877/275-2935, azek.com) for the trim boards. The lower edge of the water table is just a couple of inches above grade, but we weren’t concerned, because cellular PVC won’t rot.
Insulation. In our part of the country, cantilevered floors are typically cold. To keep this one warm and prevent the plumbing from freezing, we insulated the lower portion of the joist bays with a double layer of 2-inch rigid foam — sealed at the joints with canned spray foam and topped with R-19 batts.
We framed the walls with 2×4 studs and OSB sheathing and insulated with R-13 batts covered with a poly vapor retarder. On top of the poly, we nailed 2-inch rips of 2-by lumber to the edges of the studs to provide a conditioned space through which we could run plumbing.
Interior Layout
Except for the vanities on both sides of the slider, all the fixtures are against the interior wall. Opposite the slider, we built a 40-inch-by-34-inch shower. To the right of that we framed a niche for a wall-hung toilet, using 2x6s for the back wall to accommodate the in-wall tank. The toilet projects only 24 inches into the room; a conventional model would have prevented the entry door from opening a full 90 degrees.
To the left of the shower we built a narrow storage closet and a space to stack a washer and dryer. A removable wood panel in the soffit above provides access for connecting and cleaning the dryer vent.
Plumbing and Hvac
Since the existing galvanized supply lines were badly deteriorated, we replaced them with PEX tubing, which is more resistant to hard water and less apt to split if it freezes. We also replaced and relocated the drains but kept the existing vent penetrations. To supplement the existing forced-air heat, we installed electric radiant heating under the limestone floor tile.
Tankless water heater. The previous water heater — a conventional model — took up a lot of space, so we replaced it with a high-efficiency tankless unit that fits in a shallow cabinet beside the toilet. Combustion air enters through a louvered door.
The house is on well water, which in this area is exceptionally hard. Because hard water will cause scales to form on the heat exchanger of a tankless heater, greatly lowering its efficiency, we installed a whole-house water softener in a nearby closet.
Vanity sinks. The custom wall-hung vanities, made from prefinished maple plywood, contribute an open feeling without breaking the bank. The depth of the cabinets was so limited and the sinks chosen by the homeowners so large that the faucets had to be located at one corner.
The supply lines and drains run through the conditioned space behind the drywall and close to the subfloor in the joist bays. With foam insulation below and radiant floor heat above, there’s little danger that the plumbing will freeze. The homeowners have been through two colder-than-normal winters without any problems.
To avoid piercing the roof with additional vents, we installed air-admittance valves (AAV) in each of the cabinets. Because our plumbing code is about to change, it may not be possible to use AAVs for this application in the future.
Ed Miller owns E. Miller & Associates, a design-build remodeling company in Cedarburg, Wis.


