During a vacation to Italy several years ago, I was impressed by the intricate vaulted and domed ceilings in the churches of Rome, particularly the coffered dome of the Pantheon, built by the Romans around 126 A.D. I figured if the ancient Romans could build such a spectacular structure with the simple tools of their time, then I could too. So, back home, I decided to build a domed ceiling with elliptical rafters in the center of a 16-foot-by-25-foot family-room addition to my own home.
Framing the Opening
I would have preferred a deeper dome but didn’t have room overhead: Because the addition — an ell off the back of the house — was only 16 feet wide, I was limited to a roof pitch of 6/12. I settled on a diameter of 9 feet and a height of 2 feet measured from the bottom of the ceiling joists to the bottom of the collar ties.
I doubled the joists at each end of the dome area and added perpendicular double 2×12 headers to create a 10-foot-square opening. Because I had interrupted the continuous ceiling joists, I bolted 2×6 collar ties to the rafters above, to make sure the wall plates wouldn’t spread. Next, to create an octagon — the beginnings of a rough circle — I nailed 2x12s at a 45-degree angle at the corners. I then added a second member, a 2×12 ripped to 10 1/2 inches, on all eight sides. The step-up created by the narrower framing members would accept a 3/4-inch plywood ring that would turn the octagon into an accurate circle. Nailed to the bottom of the 10 1/2-inch members, the plywood would be flush with the bottom of the joists. A second plywood ring would go on top, sandwiching short sections of blocking to create a sturdy platform to support the dome rafters.
I used a router attached to a trammel arm to cut the plywood arcs, taking two passes through the 3/4 CDX with a 1/4-inch spiral bit. I installed the top layer of plywood first, using construction adhesive and nails and carefully aligning the sections to form the circle. I made the plywood sections wide enough to catch the tops of two joists along the sides, which added strength to the assembly.
Once the top plywood ring was in place, I used it as a guide to cut the blocks, which were ripped to 10 1/2 inches wide. I placed a block at the midpoint of each side of the octagon, then filled in at about 16 inches on center, for a total of 24 blocks. The length of the blocks varied slightly depending on where they landed in the circle. I beveled the ends of some of them so the inside edge was tangent to the circle.
After gluing and toenailing the blocks to the framing, I added the bottom plywood sections to finish the “sandwich,” trimming the edges as needed to fit into the 3/4-inch step-up around the edge of the octagon. I glued and nailed the plywood in place, making sure as I went that the top and bottom circular edges were in perfect alignment.
Finally, to complete the circle, I ripped 3/8-inch ACX plywood to the height of the sandwich (12 inches) and glued and nailed it to the blocking ends. The plywood was flexible enough to bend in place; I applied two layers, making sure to offset the seams.
Elliptical Rafters
The next step was to lay out and cut the rafters. I decided to make the dome elliptical because it would look more interesting than a simple arc. I considered setting the bottoms of the rafters on top of the plywood sandwich assembly, which I figured would provide better support. But because this would limit the depth of the dome, I decided instead to toenail the bottom of the rafters to the sides of the assembly.
To keep construction simple, I went with 24 rafters to match the number of blocks around the perimeter. Trying to jam 24 rafter ends together at the peak of the dome would have been a headache, so I built a hub — like the hub of a wagon wheel — to catch the tops of the rafter ends. I used the router trammel to cut two 12-inch plywood circles, then nailed short “studs” as close together as possible between them. The finished height of the hub was about 8 inches. I screwed the assembly to a piece of plywood located between the collar ties at the center of the dome.
To lay out the elliptical rafters, I used the tried-and-true wire-and-nail method (see “Simple Interior Arches,” 2/93), first tracing the ellipse on scrap plywood using the full diameter of the dome as a starting dimension. Working with the plywood template, I adjusted the dimensions as needed. I made the top of the rafter 6 inches wide so that the hub would hang down an additional 2 inches, to allow for the thickness of the plaster and to create a flat spot for a center medallion. I subtracted the diameter of the hub to get the final rafter length, and when I was satisfied with the fit, I traced the 24 rafters onto 2×12 stock and then cut them out with a jigsaw.
I toenailed the tops of the rafters into the studs of the hub and the bottoms into the ends of the 2×12 blocks, nailing through the double layer of 3/8-inch plywood. The bottoms of the rafters ended up 2 inches above the bottoms of the ceiling joists; this left room for a low-voltage xenon lighting system to be added later.
Finish
Plaster was the logical finish for the curved surface of the dome. The plasterer bent metal lath to the contours of the rafters and nailed it up with galvanized roofing nails. He applied a base coat of gypsum plaster followed by a smooth finish coat. The entire application took less than a day and turned out great.
I thought about making my own moldings to finish off the dome by bending various materials around the circular opening. In the end, though, I farmed the job out to a local woodworking shop. I assembled the molding profiles on the floor, then lifted the entire assembly into place. I had already drywalled the ceiling at this point, so I used construction adhesive and 3-inch screws driven into the blocking to attach the molding ring.
I looked at medallions in catalogs, but since I had the trammel handy I made my own simple version: I cut an 18-inch-diameter ring and a 6-inch circle out of MDF and routed the edges. I nailed the ring to the hub, plastered the inside, and nailed the smaller circle in the middle of the ring. A leftover stair finial completed the woodwork.
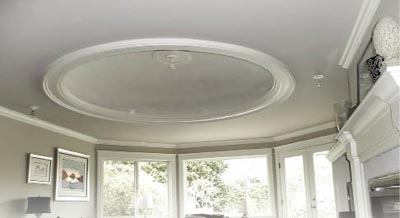
Overall, I was pleased with the finished dome, though in hindsight I might have made it a foot or so smaller in diameter. I sprayed the trim ring with an alkyd primer and satin top coat, but I left the plaster unfinished in hopes of someday finding a budding Michelangelo willing to paint an inexpensive Roman fresco.
Paul MacDuff is a retired renovation contractor in Seattle.


