While it’s usually cheaper to build a roof with trusses, architectural details are easier to add if you stick-frame. We frame roofs both ways, depending on the job; and we occasionally use a third, hybrid approach: trusses for part of the roof and stick-framing for the rest.
That’s how we framed the roof on the house shown on these pages. For the most part it’s a straightforward roof, easily stacked with trusses — but some of its details convinced us that the hybrid approach would work best.
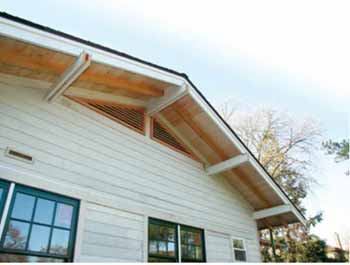
To begin with, the architect’s plan showed several small decorative gables perpendicular to the main roof, which we stick-framed using California valleys. There’s nothing unusual about that, but the plan also showed 4-foot overhangs at every gable, with barge rafters supported on purlins that appear to extend from inside the roof structure. In addition, there was to be a pair of oversized triangular gable vents under each roof peak.
Normally on a straight truss roof, we would simply use gable-end trusses. But the combination of the large louvered vents and the large overhang forced us to stick-frame the gable walls.
The plans also called for 3-foot-wide open eaves with 3×6 exposed rafter tails every 2 feet. To accommodate the tails, we ordered snub-end trusses, which end flush with the top plate. Because the trusses were laid out on 24-inch centers, this would allow us to sister the extended rafter tails onto the truss top chords. In places where the truss spacing differed, we would attach the tails to blocking.
Gable Overhangs
If we’d used gable trusses, we probably would have had to cut through chords or web members to fit the louvered vents and the purlins. Rather than try to special-order a gable truss that would work, we decided it was simpler just to stick-frame the gable walls.
To support the 4-foot gable overhang, we ran the purlin members back to the first truss and attached their ends to solid blocking. For extra strength we added an upside-down beam hanger to resist the upward rotation.
Where each purlin passed through the gable wall, we nailed it to a stud positioned for that purpose. The purlins were built up from three 2-by members — a 2×6 sandwiched between two 2x8s — which permitted us to lap the stud where the purlin pierced the wall and to nail from both sides. We also put cripples beneath each side, for additional support.
On the outside of each gable, we installed a frieze board against the wall, as well as a 3×6 rafter — supported by the purlins — in the middle of the overhang and a 2×8 fly rafter at the outer edge.
Rafter Tails
We cut the false rafter tails about twice as long as their 3-foot projection and nailed them to the side of the truss top chords. We positioned them 1 inch below the upper edge of the top chord so that the 2×6 T&G knotty pine spec’d for the open soffit (thick enough that no roofing nails would stick through it) would be flush with the 1/2-inch radiant-barrier OSB on the rest of the roof.
After the tails were in place, we installed the truss blocking along the top plates, then lapped the wall sheathing up over it.
T&G Soffit
At this point we were ready to finish sheathing the main part of the roof with OSB and install the 2×6 beveled-edge T&G at the eaves and gable overhangs. Like the rafter tails, the fly rafters had been positioned an inch below the tops of the trusses so that the exposed soffit would be flush with the main roof sheathing.


