Most carpenters use routers just for finish work: building cabinets, routing stair stringers, and the like. But on our framing jobs, they’re everyday tools.

We’ve been cutting out door and window openings with them for some time. Cutting through wall sheathing with a flush-cutting bit is quicker and more accurate than snapping out lines and using a circular saw.
When we realized how much time routers were saving us, we looked for other ways to use them. We started flush-cutting the sheathing at the perimeters of walls, and routing off the excess ply at the edges of floors. Marking and cutting the floor sheathing at a bay window takes time; running the sheathing long and cutting it flush with a router is quicker and more precise (1). A nice thing about routing the edge of a deck is you can hook your tape there to pull dimensions and know you’re measuring from the face of the rim.

Before long we were routing stair holes, stair landings, tub-deck platforms, and multiples of plywood pieces — curved or straight. Now we use routers whenever it’ll save time or leave us with a cleaner finished product.
Our increased use of these tools has changed my perspective on round framing. In the past, the thought of building anything round or curved was unappealing. Now I look forward to the challenge. Once we’ve made the original curved pattern, it doesn’t take long to flush-cut exact duplicates with a router. We’ve flush-cut half-round dormer rafters, curved wall plates, and curved pieces for barrel-vault ceilings.
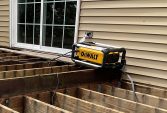
You can rout most kinds of wood-based sheathing materials; Advantec seems to cut more smoothly than traditional CDX plywood. Rather than rout pieces on a bench, as many carpenters do, we fasten each pattern piece to the deck, tack the material we want to cut over it, and then rout flush to the pattern (2,3).


We’ve used all kinds of routers; the best have a half-inch collet and a 2 3/4-hp (at least) motor. When cutting multiples, we rout one piece, tack stock over it, rout another, and so on. That way, we can prolong the life of the bit by extending it farther out for each cut and working different parts of the edge (4,5).


Most carpenters are familiar with the type of flush-trimming bits that have bearings on them: The bearing rides against the pattern without burning or scratching it. Since we’re framers, we don’t care if we scratch the edge of the framing stock; occasionally we’ve had bearings fall off when the screws holding them on came loose.

Lately we’ve been using a panel pilot bit (6). Instead of a bearing, this bit has a solid steel shoulder at the end. You ride the shoulder against the pattern the same way you would a bearing. Because the end of the bit is pointed, you can plunge it through the plywood without cutting a pilot hole. This works fine for cutting out windows and trimming off excess sheathing, but you’ll want a bearing for cutting patterns on the deck; otherwise the point will cut into the floor.
Tim McNamara is a framing contractor in Rochester, N.Y.
Curved Wood Gutter
The contractor who rebuilt this curved portico subcontracted the curved gutter work (1) to Stewart Junge of Landmark Finish in Andover, Mass. Junge’s crew fabricated the 14-foot-diameter gutter in their shop by laminating 1/4-inch strips of mahogany with epoxy. Rather than build a freestanding form, they drew the arc on the floor, screwed cleats to it, and then bent the strips around the cleats. The trickiest part of the job was milling the blank into the shape of a gutter. There wasn’t room to feed such a large piece of curved material through the machines in the shop, so the crew hauled their Williams & Hussey molder into the parking lot and planed and shaped the blank there.


To reduce the amount of material that had to be removed, they used full-height laminations at the back of the gutter, partial-height laminations in the middle, and full-height pieces at the face. Since the gap between front and back meant the gutter would collapse if they tried to clamp near the top, they installed short spacer blocks above the partial-height section in the middle (2). This allowed them to clamp high and low on the gutter and have solid backing all the way back to the cleats on the floor.


After the epoxy cured, they removed the blank from the floor, scraped off the excess glue, and planed the bottom flat by running the piece between curved guides clamped to the bed of the molder (3). Then they used a large round-over bit to cut a lip and radiused edge on the face of the gutter. They couldn’t completely shape the interior because the Williams & Hussey molder couldn’t cut deep enough, so Junge ordered a custom knife that could mill partway in (4). Starting at the top (5), the knife cut a vertical shoulder at the back of the gutter and a rounded edge that dropped to a vertical shoulder at the front. To shape the bottom of the gutter, the crew ran a bearing-over router bit against the shoulders cut by the molder (6). This carried the lines of the front and back shoulders to the bottom of the piece.


The gutter slopes back toward the house and drains to a pair of downspouts. Once installed, it was finished in the traditional New England manner: The outside was painted and the inside was coated with linseed oil. Since mahogany is naturally rot-resistant, the gutter will be durable even if the homeowner forgets to periodically renew the linseed-oil coating. — David Frane