by Harris Hyman, P.E.
The problem usually starts on a nice warm sunny day when your client looks out through the window onto the garden that she carefully planted two or three years ago, now coming into full bloom. As she stands there with a cup of coffee, the thought comes, “Wouldn’t it be nice to just step out through a glass door directly into the garden? A large glass area would invite the garden into the house. Of course, I can still go out the back door and walk around the house, but that would be so much nicer!”
Next you get the call for an estimate to put in a slider or a faux French door. Not too bad a job, but you do have to knock a 6- or 8-foot hole in an exterior wall. And like most exterior walls, it’s probably a structural, weight-bearing wall.
A hole like that can be a real headache. For a small window, you can select a header out of experience, but a hole large enough for a double door can bring the house down. Almost worse than that is a situation where the building load bows the header to jam the functioning of the door, and you have to return to the job time after time to rebuild and patch.
The Hole in the Wall
There are three fundamental problems associated with placing a wide doorway in a wall: cutting the hole so that the building doesn’t fall, building a workable frame for the new door, and installing and finishing the new door. Here we’ll go into the first two problems and leave the finishing to your experience.
The frame around the door consists of two posts and a header. The posts are generally pretty easy. A 2×6 of Doug fir will carry a compressive load of about 5,000 pounds. Typically, there are two jack studs on each side, which means that the doorway can support 20,000 pounds. No worries here.
The header is the problem. When the header is loaded, it sags. If the door frame is attached to the header, it will sag along with the header, jamming the door.
One direct solution is to install the header, then remove all support, and let it sag. The header will deflect into its final position and won’t go any farther. You attach the door frame assembly to the deflected header, which is reasonably stable, and it too remains stable. This arrangement is feasible when the doorway is not in the support path of the live load. If it is live-load bearing, however, there may be problems when the roof is loaded with snow or heavy furniture is placed above the doorway in the bedroom upstairs.
Call an engineer? A second option, the engineered solution, requires an analysis of the structural layout of the house. How are loads transmitted to the ground? Does support for the roof flow through the section of wall to be removed? Do the second-floor joists run parallel with or perpendicular to the wall with the door opening?
In a large public building, it’s appropriate to run this type of analysis, but with a residence, a shortcut is often workable.
A Practical Alternative
The shortcut suggests a look at the worst possible situation and designing a header to match. Most builders overdo headers anyhow, so these will feel okay to most of you.
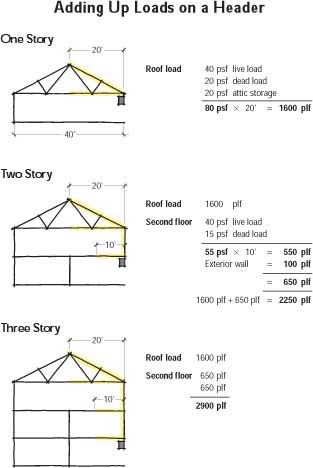
We’ll look at one-story, two-story, and three-story houses. A single-story house with a standard pitched roof has two eaves sides and two gable sides. The weight of the roof usually bears on the eaves side, particularly when trusses are used, and the loads here are more severe than the loads on the gable side.
Consider a fairly wide house, say 40 feet (see illustration below). In most of the country, snow loads are less than 40 psf, roof structure with trusses and insulation is about 20 psf, and the attic is loaded to 20 psf. Each eave supports half of the roof load: 20 feet of roof, for a total of 1,600 pounds per lineal foot on the header. The two-story house analysis assumes the worst case for the second story: that the floor joists run perpendicular to the wall and are 20 feet long. With a code live load of 40 psf, a structure load of 15 psf, and 100 pounds per lineal foot added in for exterior wall (studs, sheathing, and so forth), the header load in a two-story house becomes 2,250 plf. The loading from a third floor would bring the load on the header to 2,900 plf.
These sketches illustrate the loads on a typical eaves-side header in a 40-foot-wide house. As long as the loads on your header are equal to or less than these, you can use the chart on the next page to size the header.
Choosing the Header
The evaluation of a suitable header beam must consider both strength and deflection. Strength is obvious: The beam must have enough meat to accept the stresses on the material. Out of experience, I arbitrarily limit the allowable sag to 3/32 inch. A greater deflection leads to operating trouble later on, while any less requires an excessively heavy beam.
I typically use one of two header materials: steel or V24 glulams. If you use engineered lumber (LVL or Parallam), it has about the same properties as glulams for beams this size.
My suggestion for steel beams in residential construction is rectangular steel tubes with a 1/4-inch wall thickness, rather than angles or W-sections. Tubes are not too heavy to handle, and it’s easy to attach 1-by blocking with Hilti or Ramset powder-actuated fasteners. Plus, the tubes are not too deep to cause a headroom problem: Their 3-inch or 4-inch widths are easy to integrate into frame construction. See the table below for an idea of the size header that you’ll need, depending on the size of the house and the width of the opening.
|
Patio Door Headers
|
|||
GLULAM HEADERS |
|||
|
5′ |
6′ |
8′ |
One-story |
3 1/8 x 9 |
3 1/8 x 12 |
5 1/8 x 12 |
Two-story |
3 1/8 x 9 |
3 1/8 x 12 |
5 1/8 x 15 |
Three-story |
3 1/8 x 12 |
3 1/8 x 12 |
5 1/8 x 15 |
|
|||
STEEL TUBE HEADERS |
|||
|
5′ |
6′ |
8′ |
One-story |
TS5 x 3 x .25 |
TS6 x 3 x .25 |
TS8 x 3 x .25 |
Two-story |
TS5 x 3 x .25 |
TS7 x 3 x .25 |
TS10 x 4 x .25 |
Three-story |
TS6 x 3 x .25 |
TS8 x 3 x .25 |
TS10 x 4 x .25 |
|
|||
STEEL ANGLE HEADERS |
|||
|
5′ |
6′ |
8′ |
One-story |
L6 x 3.5 x 3/8 |
L6 x 4 x 5/8 |
L8 x 4 x 3/4 |
Two-story |
L7 x 4 x 3/8 |
L7 x 4 x 3/4 |
L8 x 4 x1 |
Three-story |
L7 x 4 x 1/2 |
L7 x 4 x 3/4 |
Nothing fits |
You may want to keep the original window header in place, because ripping it out could cause more disturbance to the exterior finishes than necessary. In that case you could use a steel angle under the header, extended to the width of the doorway, as shown in the illustration below. It’ll still take some chopping to fit in the angle, and since angles are extremely inefficient as structural beams, you’ll need a fairly hefty angle (see the table above). Still, in some cases it might solve your problem more easily than a tube or a glulam.
In some cases it may be faster to retrofit a wider header while leaving the existing header in place.
Providing Support
Your problem is not completely solved with the information in the tables; you still have to build the project. When you open the wall to insert the post and lintel, something has to hold up the building. This is worth major consideration, as it’s where a construction failure is most likely to occur.
It’s tricky: You have to leave enough clear space to insert the header while at the same time holding up everything that the header you are inserting is supposed to hold up. (If that’s confusing to read, think about the actual problem.)
I’ve seen three methods of holding the wall in place while constructing the opening. The first is prayer: Just get out the Sawzall and hope everything will be okay. Often it is. Still, an engineer or building inspector who sees you do this will almost certainly invoke the name of a deity. I have. I even pray sometimes, but not for salvation from foolishness.
Somewhat improved method. A slightly better scheme, which I’ve seen used by various contractors, is to drill a row of 1 1/4-inch holes about 12 inches on-center above the doorway opening, then clamp a pair of timbers to the wall with long 1-inch-diameter bolts. This method is largely intuitive in selection of timbers, placement of holes, and tightening of bolts. The problem with this scheme is that it’s difficult to be sure whether you’re properly picking up the loads; I like to do things that can be analyzed as positively safe.
Provide good support before you open up an exterior bearing wall.
Method of Choice
The safest way to hold up the wall is to construct a temporary 2×6 stud wall that extends up to the ceiling, set back from the exterior wall a foot or two to allow you room to work. Use studs 16 inches on-center and diagonally brace the wall corner to corner (see illustration above). You can also provide support from the outside. Each project is different, with its individual problems. Just make sure you study the loads and distribute them to the ground.
The result of the work, inserting a glazed doorway, is grand. It lightens and brightens a room and changes the feeling of a house. From the client’s viewpoint, there’s a lot of real improvement for the money. As I write this, I look at the narrow, windowless back door out of my kitchen to the garden I’m building and think…
Harris Hyman is a civil engineer in Portland, Ore., and a longtime JLC friend and contributor.


