As field representative for the California Redwood Association, and before that as district manager Western Wood Products Association, I have inspected a lot of residential construction sites. For the most part, builders meet building codes and use sound techniques. Yet, even on well-run job sites, I still see framing errors that undermine otherwise well-built structures. Here’s a look at some common problems encountered, along with advice how to correct them.
Undersized Joist Hangers
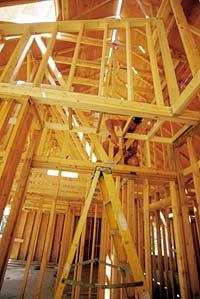
Joist hangers are engineered connectors that will not work as intended if they are undersized or modified on site. If a particular span requires a 2×10 joist to carry the load, for example, then you have to use a 2×10 joist hanger; a smaller hanger doesn’t have enough capacity. The reason they make larger hangers is that a larger hanger provides for more nails, which can support a larger load. The hanger also keeps the joist from rotating at the end, which helps to stiffen the floor. If the hanger is too short, it won’t resist rotation as well as a taller hanger. Proper nailing. You also have to fill all of the holes in the hanger with nails of the proper size and length. All of the hanger manufacturers require 10d common nails to support a single joist hanger, and 16d common nails to support a double hanger; otherwise you have to take a reduction in capacity for the hanger. While it may be obvious that roofing nails, masonry nails, and box nails don’t have enough shear strength to support the hangers, many builders who frame with 16d sinkers also use these nails in their hangers. The problem is that a 16d sinker is the equivalent of a 10d common – it’s the same diameter and it’s only 3 inches long. If you’re framing with 16d sinkers, you can use them for single hangers, but not for doubles unless you reduce the load the hangers will carry. You also have to fill all of the holes in the side of the hanger with properly sized nails. Joist hanger nails – those 1-1/2-inch-long common nails supplied with the hangers – are made for that purpose. They are designed to hold the joist in the hanger and resist the spreading forces that tend to pull the joist away from the carrying member. These nails are short so they won’t come out the other side, but because they’re commons, they are large enough in diameter to resist the tension forces. Again, roofing nails, masonry nails, or box nails won’t do the job. Reshaped hangers. Joist hangers also can’t be modified on site without reducing their loadbearing capacity. I often find joist hangers that have been reshaped to conform to the framing (see Figure 1).
Figure 1.
Bending joist hangers to conform to the framing (photo) weakens the metal and reduces the load the hanger can carry. The illustration below shows how this floor could have been framed without having to reshape the hanger. While this may solve the immediate problem of keeping the hanger flange out of the way, bending the hanger causes tiny fractures that fatigue the metal. This reduces the loadbearing capacity of the hanger and may cause the hanger to fail over time and under full loading. In most cases, framers can avoid having to bend the hanger with better planning. Typically, framing members can be installed in a way that provides enough room to install the hanger as intended. In the case of the double joist shown in Figure 1, the ledger, which is fastened to the stud wall, could have been extended to the corner of the wall and the double joist inset to allow room for the hanger. The double joist could then have been packed out with 2x2s or 2x4s to flush it out with the intersecting wall. Special hangers are also available to solve this problem. Simpson Strong-Tie’s HUC and HUSC series hangers are made with concealed flanges that can be fastened flush with the end of the carrying member. A top-mount model (HUSCTF) also solves the problem.


