Clients, I’ve found, often make requests that force us to think outside the box. In the project shown on these pages, for example, a concrete deck surrounding the homeowners’ in-ground pool had caused their barefoot grandchildren too many stubbed toes and skinned knees. To gain a friendlier walking surface, they wanted to extend their house deck — which had Trex fiber-composite decking — so that it completely surrounded the pool area. Curves would be a big part of the design.
I initially proposed pulling up the existing concrete, which had its share of cracks and other tripping hazards, and installing new footings, beams, and framing to support the new Trex deck. But the cost was impractical, so we elected to fasten PT sleepers to the existing concrete instead, and then attach the new decking to the sleepers.
That part of the job was pretty straightforward. To help get the new 2-by sleepers level, we used a laser level with a remote sensor, shimming where necessary in the low spots before screwing the sleepers down with long Tapcon screws. As we installed the decking with coated deck screws, we heated the mushrooms around the screws with a heat gun and tapped them down with a finish hammer to hide the face screws.
For Tight Curves, Just Add Heat
For both aesthetic and safety reasons, I wanted to avoid sharp miters on the outside corners of the pool deck. While I was comfortable cutting curves in Trex decking, I wasn’t exactly sure how to bend skirts made of this material around these tightly curved corners. But a recent project installing heat-radiused PVC trim gave me an idea.
To curve PVC trim, we use Heatcon’s heat forming kit (800/556-1990, www.heatcon.com), which consists of a pair of 6-foot-long by 6-inch-wide heating blankets with an electronic controller to regulate the temperature. In use, a trim board sandwiched between the two blankets is heated to a predetermined temperature, then bent into the desired shape.
Trex — which is composed of hardwood sawdust and recycled polyethylene — can be heat-formed, too; the company’s Web site offers guidelines and a couple of different techniques. Even though the manufacturer doesn’t mention heat blankets, I thought we could use them in the same way.
To test my theory, I put short decking cutoffs in the blankets and heated them up to see what would happen. I overcooked the first pieces, discovering that the boards expand like marshmallows and aren’t very attractive when overheated. But I reduced the temperature, and after some trial and error determined that 260°F seemed ideal: The Trex became flexible without distorting or disfiguring.
Once I was satisfied I could successfully heat-bend the Trex, my crew and I laid out and installed sleepers for two of the deck’s outside corners, giving them a comfortable 20-inch radius (the other two corners would be treated slightly differently). Then we built a plywood form with that same radius, which we would use to form the corner skirt boards.
Forming the Outside Corners
After ripping the outside Trex skirts to width, we placed a 6-foot-long board on one of the heat blankets and covered it with the other. We let each board simmer under the blankets for about 20 minutes or so, using this time to continue installing the straight sections of decking.
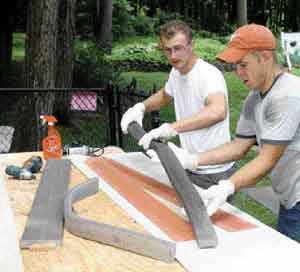
When we removed the blankets, lifted the board, and carried it over to the form, we used the special gloves supplied in the heat kit to protect our hands from the heat.
These outside skirt boards easily conformed to the shape of the form, but we also lightly clamped the ends as they cooled and assumed their new shape. After they reached normal temperature, we fastened the curved corner skirts in place with stainless steel trim screws. Then we fastened the remaining sections of straight skirt, tightly butting them to the corners for a snap fit.
Forming the Inside Corners
I thought the inside curves for the pool corners should be formed to match the pool’s existing coping, eliminating the miter joints that could plague me later on by opening up. To accurately match this shape, I traced the corner coping pattern onto a sheet of plywood, then used this template to build the plywood form.
Ripped to a narrower dimension than the outside corners to fit on top of the pool coping, these thinner pieces bent more easily when we heated them. In fact, it took two men to handle the hot boards, which felt like giant pieces of spaghetti but were easy to mold into shape by hand.
Again, we set these inside corner skirts first, attaching them to the sleepers with stainless trim screws. Then we were able to spring in the remaining straight sections of skirt for a nice tight fit. Because we fit the skirt first, each section of decking that butted into the skirt had to be scribed to fit, a time-consuming process. But scribing each piece and chamfering the cut ends with a router produced a very nice edge detail.
And while creating all these curves was a little more labor-intensive than simply squaring off the ends of the deck with miters, the end result is much more appealing. My clients are pleased: In addition to really liking the finished look of the deck, they’re hoping they’ll recoup some of its cost in fewer Band-Aids.
Mike Sloggatt is a remodeling contractor in Levittown, N.Y.