As part of a recent renovation project, we added a second floor to an existing one-story attached garage. The plan was for a new bedroom suite in this added space to tie into a two-story addition that we would build in conjunction with the garage work. Simply demolishing the garage and starting from scratch would have made more sense but wasn’t an option: Since the garage sidewall was in violation of the local zoning ordinance’s side-yard setback requirement, taking it down would mean losing 5 feet of variance. So, to conform to the ordinance, the new second-floor sidewall needed to be built 5 feet further in from the property line than the existing garage sidewall.
To build the second floor and prepare the garage for the tie-in, we would have to demo the roof, demo the sidewall gable, jackhammer the slab, and lengthen the back of the garage by 2 feet.
We knew that we’d have to pour a footing for the new wall at the back of the garage. What we didn’t know was that we’d also have to underpin the front-wall footing to make it strong enough to support the loads from the new second floor.
Check Existing Footings
Over the years, we’ve learned to carefully check porch and garage footings; they’re often substandard. We don’t want to get a phone call from a client’s attorney a year after project completion because we hadn’t bothered to check a footing before building a second-floor addition. All of our contracts plainly state that footings are assumed to be in accordance with code, making it clear that any work on existing footings is additional.
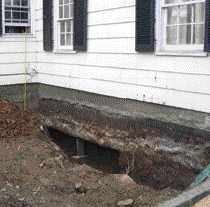
Hence, early in this project, we asked the excavation contractor to dig test holes next to the garage foundation when he was digging the main hole for the new addition. The test holes revealed that while the footing under the sidewall was adequate, the front-wall footing was only 18 inches below grade. Because the plans called for the new second-floor loads to be carried primarily by the front and back walls of the garage, it was clear to me that we would have to do something about the existing front-wall footing when we poured the footing for the new back wall.
We didn’t spend too much time speculating about how to fix the problem: This situation called for a site visit from the project architect. Whatever the solution, we knew that the town would want an architect’s or engineer’s seal on it. The architect turned the problem over to an engineer, who provided us with a design for underpinning the front wall. Then we filed for a permit update and got started with the garage demolition.
Demolition Lightens the Load
Equipped with a five-pack of circular saw blades, we started cutting through the shingles and roof decking, carving the old roof into 2-foot-by-5-foot sections that we could leverage with a digging bar and throw in the dumpster section by section.
Once the decking was removed, we cut the rafters in half with a reciprocating saw and pulled them apart. Then we took the gable wall down in sections, with the studs and sheathing together. All we left standing was the garage’s side and front walls.
Next we busted up the garage slab. Since our electric rotary hammer wasn’t up to the challenge, we rented a compressor-driven jackhammer to quickly finish the job.
Demolition of the garage plaster, ceiling joists, roof rafters, and gable wall removed a considerable amount of weight from the front wall. Just the same, we decided to underpin the existing footing in two steps, doing half of the wall at a time.
Building the Form
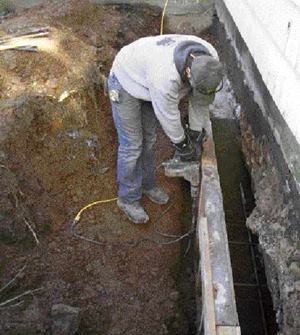
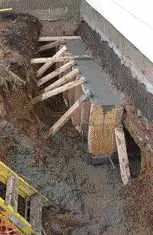
With our rented backhoe, we dug a trench next to the garage foundation for access, then used hand tools to excavate under the footing itself.
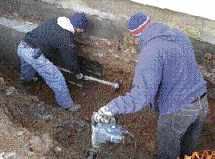
To loosen the soil under the footing, we used a rotary hammer equipped with a chisel, then removed the dirt with a pick and shovel. Because soil would form the back wall of the underpinning, we were careful to square up the excavation under the existing footing as much as we could.
After digging a trench alongside the existing front-wall footing with an excavator, the author's crew used hand tools and a rotary hammer fitted with a chisel to remove the compacted soil under the footing.
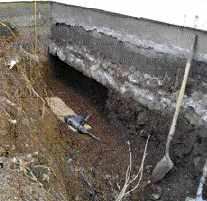
To prevent damage to the foundation, half the wall at a time was excavated and temporarily shored up.
The engineer’s design called for the underpin footing to be a minimum of 36 inches below grade and 24 inches wide, with #4 rebar running continuously throughout, set on chairs. We built the form with 2x4s and 3/4-inch plywood, securing the bottom with 30-inch form pins and bracing the top with 2×4 stakes. Since we planned to do the underpinning in two pours, we extended the rebar 12 inches beyond our first form so that we could tie in later with the second pour.
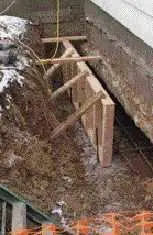
Built with 2x4s and 3/4-inch plywood, the underpinning form was braced with stakes and form pins.
The side of the excavation underneath the existing footing provided the back wall for the poured concrete.
Pouring the Concrete
When we pour concrete, we always try to schedule the first available morning pour. Afternoon pours tend to run past quitting time and into the evening.
For this job, we ordered 7 cubic yards of concrete; I figured we’d use 1.5 cubic yards for the first half of the front-wall underpinning and 4.75 cubic yards for the back wall footing.
Even though I expected an easy pour, I followed my usual practice of handing the concrete truck driver a $20 tip when he arrived. It doesn’t take long to use up the allotted six minutes per yard, and I’ve found that it never hurts to have the driver on your side.
As it turned out, we needed all the help we could get, since the back wall form suffered a blowout during the pour.
Managing a Blown-Out FormTo extend the garage, plans called for a new foundation underneath the relocated back wall (which would contain the new garage door). Rather than pour a footing below grade and then build up the foundation out of block, we formed a 24-inch-wide monolithic block from footing depth to grade, which we felt would make a more attractive transition apron between the asphalt driveway and the garage slab. As we were pouring the last of the 4-plus yards of concrete needed to fill the form (A), though, the form wall on the driveway side began to bulge, then collapsed (B). Since the inner wall remained intact, project manager Danny DoCouto decided to pull the collapsed wall out entirely and spread the concrete into the outer portions of the trench, allowing it to establish a solid, level surface 24 inches below grade that we could build off later (C). To get the form out of the trench — with concrete on one side and form pins on the other — we had to shovel concrete away from the wall, then lift the form by leveraging it with concrete blocks, 2x8s, and our digging bar. Even after the form was removed, we had to work our shovels into the rebar grid to expose more rebar and level out the concrete, a process that took more than an hour. The following day, Danny cut and removed the old rebar so we could rebuild the form. Since the new outside form wall was now sitting on concrete, we wedged it into place with 2×4 stakes along the bottom plate. And this time, we used plenty of stakes to brace it along the top plate (D). After laying in new rebar on chairs and straightening out the bowed inner form, we were ready to pour once again (E). We had to spend five man-hours cleaning up the mess, four man-hours rebuilding our form, and two man-hours on the second pour. We also had to spend about $200 for additional concrete. |
With half our four-man crew working on fixing the blowout, we knew we still had to get the first section of the underpinning poured. To play it safe, we quickly beefed up the underpinning form with additional stakes and 2x4s — we didn’t want a repeat performance. But the front underpinning pour went smoothly, and 15 minutes later the whole crew was working on removing the collapsed form.
The next day, we prepared for the second underpinning pour by stripping off the first form, then excavating under the remaining footing as we had before.
After stripping the form from the first half of the front-wall underpinning, the author's crew finished excavating underneath the remaining wall.
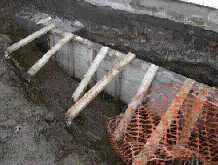
Form pins helped hold the bottom of the form in place.
After building the form and installing rebar, we secured it with plenty of form pins and stakes, making sure that the second underpinning pour would be as uneventful as the first.
Once again, when the concrete truck arrived to pour the remainder of the underpinning and the new back-wall foundation, I greeted the driver with a $20 tip for added insurance. This time, the pour went without a hitch, and soon we were able to start framing up the new garage addition.
Rob Corbo is a building contractor in Elizabeth, N.J.


