Since June of 1999, remodeling contractors have been required to notify building occupants of possible lead hazards before doing all but minor work on buildings constructed before 1978. Under the terms of Rule 406, as it’s commonly known, the contractor must give each household an EPA pamphlet entitled “Protect Your Family From Lead in Your Home” and obtain signatures to prove that the notification requirement was met (see “Get Ready for the Lead Information Rule,” Notebook, 6/99). Not surprisingly, receiving and signing for the pamphlet produces some anxiety on the part of many remodeling customers. To put them at ease — while protecting both their health and that of our workers — our company, Design Plus Kitchens and Baths, follows a series of on-the-job safety procedures that we learned from a lead-safety consulting firm. It took some time and effort to get started, but the out-of-pocket cost was very reasonable. Apart from training costs, we spent about $2,000 to come up to speed originally, and yearly operating costs are a few hundred dollars at most. That small investment provides several benefits. It practically guarantees that our customers and workers won’t suffer from work-related health problems caused by lead exposure, and it protects us from associated legal and medical costs. Because lead-safe practices result in a clean, well-managed work site, it leads to happy customers and good referrals. Finally, it’s a valuable marketing tool. I know of at least two jobs we got from competitors last year because their only response to customers who asked about lead containment was to tell them not to worry about it. If you can provide specific answers to people’s concerns, you’re adding value to your whole operation.
Laying the Groundwork
Unless a potential client brings it up, I don’t say much about lead safety during initial sales calls except to mention that all of our people have been trained in lead-safe work practices. That prevents clients from being alarmed when you pull out the lead-safety pamphlet at contract time and ask them to sign off on it. The real discussion usually takes place at the preconstruction meeting, a week or two before we start work. Our operations manager and the lead carpenter get together with the homeowners and brief them on the specific lead-control measures we’ll be taking. We let them know where we’ll be setting up dust-control partitions, which define the areas of the house they are free to use and those that are off limits to them during work hours. We’ve been telling clients those things for years, but when we explain them in terms of lead safety, people actually seem to listen. It’s important for the customer to understand that lead-safe practices are not the same as lead abatement, even though some tools and techniques are common to both. In lead abatement, the objective is to clean up and remove a known lead hazard. This is a specialized discipline that requires extensive training and certification. The lead-safe remodeling practices we use are intended only to prevent paint particles and dust generated in the course of a job from contaminating the work area or spreading to other areas, including the outdoors.
Setting Up
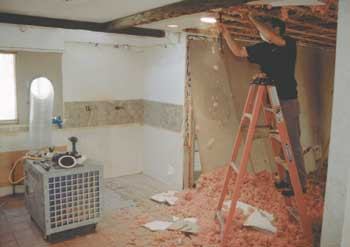
Because lead was removed from paint in 1978, any house built after that date can be assumed to be lead free. In practice, though, we follow the same lead-control measures no matter what the age of the home is. That prevents our crews from developing bad habits that might carry over to other jobs. And because lead safety is largely a matter of thorough, systematic dust control, it means that all of our customers — not just those with pre-1978 homes — are rewarded with a virtually dust-free job site. Our average job runs for 10 weeks or more, so it’s worth the time it takes us to build a good solid partition that will stand up for that time. None of the manufactured barrier wall systems that we’ve seen look rugged enough to stand up to long use, so we don’t use them, even though they’re faster to set up and take down. Instead, we make our partitions from 6-mil poly and 1×3 wood strapping. If we’re sealing a doorway or window opening that will later be refinished, we’ll squeeze the edges of a poly sheet between four pieces of strapping, screwed to the jambs, with a gasket of foam sill-seal material between the strapping and the jambs to ensure a good tight fit (see Figure 1). At the end of the job, we putty the screw holes before painting. Where there’s no need to worry about the existing wall finish, the poly can be taped directly to the wall.
Figure 1. The work area is separated from the job site with site-built partitions of 1x3s and 6-mil poly. Closed-cell foam sill sealer between the strapping and door jamb provides a good seal. |
If we can’t drive screws into the finish, we cut the strapping to fit tightly and tap a few slightly oversized crosspieces into the opening to exert enough pressure to hold everything in place. When the work area is negatively pressurized during work hours, the poly will tend to bulge into the room, so it’s important to apply it to the outside of the strapping instead of the inside. Air pressure will then hold it against the framing, rather than pushing it away. We don’t use staples, which weaken the poly by making holes. Zipper doors and tee locks. To provide limited access between the work area and the living space beyond, we use self-adhesive zipper doors we get from a local supplier (Zip-Up doors from Pro-Tect). They’re easy to use — you just peel off the backing, stick the seven-foot zipper to the poly, unzip it, and slit the poly with a utility knife to make the opening (Figure 2).
Figure 2.Self-adhesive zipper doors are easily applied to poly partitions, providing access while maintaining negative pressure in the work area. Minor holes in the poly partition can be repaired with tape. |
Zipper doors are convenient, but it’s difficult to carry material and debris through them. For our main access point, we use a poly “tee lock” that workers can push through when their hands are full (Figure 3).
Figure 3. The “tee lock” that serves as the main entrance to the work area starts as a double layer of poly stretched across a doorway. The outer layer is then cut loose on the sides and bottom, forming a flap. The inner layer is slit across the bottom and up the center, in the shape of an upside-down letter T. It admits needed makeup air when the air handler is operating but not so much that the work area loses its negative pressure. |
We try to plan the job so that the homeowner doesn’t have to pass through the work area to reach other areas of the house, but sometimes it’s unavoidable. When it is, we’ll sometimes mount a poly-covered screen door in a partition, allowing for easy passage after we’ve vacuumed the site and gone home for the day (Figure 4).
Figure 4. A poly-covered screen door on spring-loaded hinges can be useful if the homeowner has to pass through the work area during off hours. The poly should be applied to the living-space side of the partition, so air pressure sucks it inward against the framing. |