Photo Tips
- If you have a composition you like then make it a little wider. This will give you some room for cropping.
- Use flash or add lights if needed. Cheap work lamps with clamps can make a big difference.
- Shoot the same scene at different times during your shoot. Light changes constantly.
- Avoid large areas of sky, which are normally a lot brighter than the rest of the scene. The camera will try to compensate for this brightness, resulting in under-exposed photos.
- Bracket your pictures in high contrast areas, such as inside a porch or under a pavilion.
- Shoot plenty. To get a great picture, you have to take a whole lot of bad ones. Shoot a lot, learn a lot.
When I started building decks in the early 1990s, I was also a semi-professional photographer with a 50-pound bag filled with medium- and large-format cameras, tripods, light meters, and filters. I made the mistake of leaving my gear behind when it came to taking finish shots of my deck projects, however, thinking my simple 35mm point-and-shoot camera would do the job. But once I realized how useful professional-quality photos were for selling deck jobs, I began devoting more time and effort into getting good shots of my work.
With digital photography, the process of taking deck photos and sharing them with my clients has become a lot less complicated. It’s possible to get great shots without investing in a lot of expensive equipment, since most photos are now viewed on a computer monitor, tablet, or smartphone. Unless you plan to have your work published or do some serious printing, you don’t need a lot of megapixels to share your photos. Less can be better, in fact, since nobody likes to wait while downloading a picture from a photo gallery.
Equipment
Digital single lens reflex cameras—or DSLRs—with an optical viewfinder and a mirror are the workhorses for most pros. I sometimes still use my older Sony A700 and A900 DSLRs, but my got-to camera for everyday use is my mirrorless Sony a7R. It’s small and light, has interchangeable lenses, and offers full manual control. But the biggest advantage of a mirrorless camera is that what you see in the electronic viewfinder—depth of field, exposure, post-processing, and more—is what you get.
I own both Sony a7 and a7R cameras, which have full-frame sensors (more on that below). Mirrorless (but not full-frame) models from other manufacturers include the Olympus OM-D EM1 or EM5, the Fujifilm X-T1 or X-E2, and the Panasonic GH3 and GH4. Canon and Nikon are a little late to the mirrorless camera game, but I suspect it’s just a matter of time before they introduce competitive models of their own.
When choosing a camera, don’t forget about video. Video recording capability—which all the cameras mentioned above have—will be crucial in the coming years to run your business. Sure, you can also shoot video with your cellphone, but the image quality won’t be as good. Smartphones are handy and easy to use while working on the job, but I always have a camera with me, so I rarely use them for either photos or video.
More important than the brand of your camera is that you have some control over its functions. To control the lightness and darkness—or exposure—of the image, for example, you’ll need to be able to manually set the lens aperture and shutter speed. To avoid “grainy” images, you should also be able to adjust the light sensitivity of the image sensor by changing the ISO setting.
Sensor. The image sensor is the heart of any digital camera. Its pixels capture light and convert it into electrical signals. Pro-level digital single-lens reflex (DSLR) cameras typically have what are called full-frame sensors, which are the same size as the 36mm x 24mm film frame of a standard 35mm film camera. Your smart phone has a smaller—or ‘crop’—sensor. The size of the sensor plays a more important role than sensor resolution—as measured in megapixels—in determining image quality. A full-frame sensor may contain the same number of pixels as your smartphone, but the pixels themselves will be larger and capture more light, so the images will be cleaner with more dynamic range.
Lens. The angle of view and the magnification of an image are determined by the focal length of the camera lens. For shooting outdoor projects with a full-frame camera, the ideal focal length should be between 15mm and 70mm. A 50mm lens will produce an image that will be similar to what the human eye sees. Use shorter, wide-angle lenses to capture more of the view, especially in tight areas, though the subject will look farther away. Longer telephoto lenses can be handy, but it’s usually easy to simply take a few steps forward to zoom in on what you want to show.
If I had to recommend one all-around lens for a full-frame camera, it would be a 24mm–70mm zoom lens, preferably with a relatively fast f/2.8 fixed aperture. My second choice would be the lens I currently use the most, a Carl Zeiss 16mm–35mm f/2.8 zoom lens.
Most lens specs are based on full-frame sensors, which can get confusing if you have an APS-C camera (with a 1.5 crop factor). If you buy a lens with a focal length of 50mm, then you are really getting a 75mm lens. If your camera has a 4/3 sensor (with a 2.0 crop factor), the 50mm lens would be the equivalent of a 100mm lens; a better full-frame lens choice for this camera would be anywhere between 10mm and 50mm. Many lenses are now designed with shorter focal lengths and smaller image circles that are optimized for smaller sensors.
Tripod. I probably use a tripod 90% of the time. With a tripod, I can slow down and take a good look at my composition, making as many adjustments as I need to. In low-light conditions, the shutter speed will be slower, so a tripod is essential for stabilizing the camera and avoiding a blurry image.
The best tripod is the one you have with you. A good choice is a “travel” tripod; they’re lightweight, sturdy, and relatively inexpensive. I use a Gitzo GT 531 carbon fiber tripod with a ball head, which is more expensive but weighs less than a pound. I also have a Gitzo GT1541 with Novoflex ClassicBall 5 head.
Filters. When I first started in photography, I used to carry a bag full of screw-on filters. Now, most filtering can be done with photo editing software. But there are still a couple of filters that I can’t do without. When there is glare on water, it can be removed with a circular polarizing filter (great when you’ve just cleaned the deck and it is still wet). This filter will also saturate the colors and make the scene more vibrant. To have the most effect, the filter should be oriented at a 90-degree angle to the light source.
I also often use a graduated neutral density filter to darken a bright sky by a few stops, which improves the exposure of the image. The same filtering can also be done with editing software, but you run the risk that the sky will be over-exposed or even clipped.
Camera Settings
On a DSLR, settings are often controlled with dedicated buttons. Mirrorless point-and-shoot and some camera phones may have actual or virtual controls for basic settings, but often will require selections from on-screen menus.
Program mode. In this mode, the camera uses algorithms to automatically set shutter speed, aperture, and ISO to get a proper exposure. If you are in doubt, leave your camera in program mode; cameras are getting so smart they will do an outstanding job.
Aperture mode. You set the desired aperture (f/stop), and the camera will choose the proper shutter speed and ISO. Use this mode to control the amount of light that comes in and increase or decrease your depth of field.
Shutter mode. Set the desired shutter speed, and the camera adjusts the aperture and ISO to get the proper exposure. This is a good mode to use when there are moving objects and you want to increase the shutter speed to freeze the action. As a general rule of thumb, try not to use a shutter speed that is slower than the focal length of your lens. For example, don’t use a slower speed than 1/60th of a second if you’re using a 50 mm lens, or below 1/125th of a second when using a 100 mm lens.
Manual mode. Here you have full control. You will need to set the aperture, shutter speed, and the camera’s ISO.
ISO. The lower the ISO setting of your camera, the more light will be required for a proper exposure. Low ISO settings are generally used with bright outdoor lighting, resulting in an image with less noise and finer ‘grain’. As you increase the ISO, the sensor becomes more light sensitive, so high ISO settings are generally used indoors and in low-light situations. Since the higher the ISO the noisier or grainier the shot, I usually try to keep the ISO setting between 100 to 400. If you’re in doubt, you can use your camera’s AUTO ISO setting.
Exposure
Your camera has a metering system that creates an average reading of what you see through your viewfinder that is not too dark and not too bright. Based on that information, the camera will determine the settings needed for a correct exposure (if it’s in an automatic mode). But sometimes you need to fool the camera a little bit. For example, when the sun sets and the backyard gets darker, I will underexpose the image, adjusting the f/stop a half stop, a full stop, and by a stop and a half as it gets darker.
Most digital cameras now have an AEB (auto exposure bracket) setting. When you press the shutter, the camera takes multiple pictures: typically one with the correct exposure, one that is underexposed, and one that is overexposed (usually in 1 stop increments). This function is useful when there is a high degree of contrast between light and dark areas. Editing software can later be used to combine the three images to produce a photo with the proper exposure. iPhones and many other smartphones perform this task automatically when you turn the HDR (High Dynamic Range) setting on.
To see if the exposure reading is accurate, I check the image’s histogram. The histogram is a graphical representation of the tonal distribution in a digital image, with the left side of the graph showing the dark areas or shadows, the right side showing the bright areas or highlights, and the middle area showing the mid-tones. The peaks in the graph show how many pixels are being used to represent each particular tone.
An image is well-exposed when there aren’t peaks (too much information) or gaps (missing information) on the left or right sides of the histogram. As a general rule, I try to shoot for the highlights—the brightest areas of the image—so that my photos are slightly underexposed, since it is easier to recover shadows than highlights in post-processing.
Another way to check exposure is to turn on your camera’s “blinkies,” or highlight warnings. In this mode, any area in the photo that is blinking is overexposed. To compensate, I reduce the brightness of the picture by decreasing the aperture opening, typically 1/3 of a stop at a time.
Raw or JPEG?
Every time your camera takes a picture, it creates an uncompressed “digital negative,” or “raw file.” To view, share, or print the image, the camera has to “develop” the raw file and convert it to a standardized format that can be read by other devices—usually JPEG (an acronym for Joint Photographic Experts Group). But there are a few advantages to working with unprocessed raw files.
Raw mode. While raw file sizes are larger and require more memory, you’ll have much more control over how your image looks. For example, you’ll be able to correct mistakes you may have made when you took the photograph, such as with the exposure, white balance and color temperature control, or sharpness. And since a raw file isn’t compressed, you won’t lose information or degrade the file every time you work on it and save it.
Eventually, you’ll have to convert a raw file to another format. Each manufacturer has their own software for developing their raw files that is included with the camera purchase. My Sony raw files (which have an .SR2 extension) files cannot be opened by Nikon (.NEF) or Canon (.CR2) users, and vice versa, even though all are based on the TIFF file format.
JPEG mode. If you cannot or do not want to do any post processing, then simply shoot in JPEG. In this mode, the camera wants to know a few things like the white balance setting so it can determine the exposure as accurately as possible (in raw mode, you can keep the white balance setting at AUTO and make changes later).
I usually shoot in raw/JPEG mode, where the camera creates both a raw and JPEG file, especially when I think the photos will be important later on either for printing or for publication. I use the JPEGs for viewing and sharing, and keep the raw files for future use. When I want to work on a JPEG file, I make a copy and leave the original intact. Otherwise, some information is lost each time the file is opened and saved, and the file becomes smaller.
Software. If you like the way a JPEG looks, no further developing is needed and the file is ready for printing and sharing. Raw files require a few more steps. While this can be done with the camera manufacturer’s software, I prefer to use Adobe’s Photoshop Lightroom editing software. One reason I like Lightroom is that I can process one photo file, and then synchronize all the others that were shot in the same light conditions without saving each one individually, which speeds up the post processing. Lightroom processes files non-destructively (by retaining the original file) and is capable of doing 99% of what needs to be done with a picture.
For most of the work I do, there is no need to invest in the full version of PhotoShop. And for 20% of the cost of Photoshop, Adobe Elements can do almost any editing that you’ll need, though you will need to save each file after you are done working on it.
A popular editing program with Mac users is Aperture, though I understand it is being phased out in favor of a new Photos app for OS X, expected in 2015. Of course, Adobe software is compatible with Mac, and there are many other editing programs as well. No matter what brand of camera you are using, they all most likely can read your raw files.
Getting Great Deck Shots
Photography is all about light. I find the best time to shoot an outdoor project is two to three hours before sunset until twilight. Depending on the season and your location, prime time is anywhere between 3:00 and 8:00 pm. Of course, the light is just as good in the morning as in the evening, and if the deck is completely shaded in the evening then I’ll come in the morning and set up a breakfast table. But I prefer evenings, because I can set up the table for dinner, and because I’ll have more time for the set-up. I always bring a few cheap construction lamps with 3500K daylight bulbs just in case I need some extra light.
To prevent harsh shadows, I prefer to shoot on a slightly overcast days. Most digital cameras aren’t equipped to handle bright sunny days with deep shadows easily, which typically results in areas that are either over- or under-exposed (this is where functions like AEB and HDR come in handy).
Props. Instead of taking photos of the deck or outdoor structure immediately after you’ve finished it, plan to come back on another day when the weather is good. This way, you can dress up the area you are going to photograph.
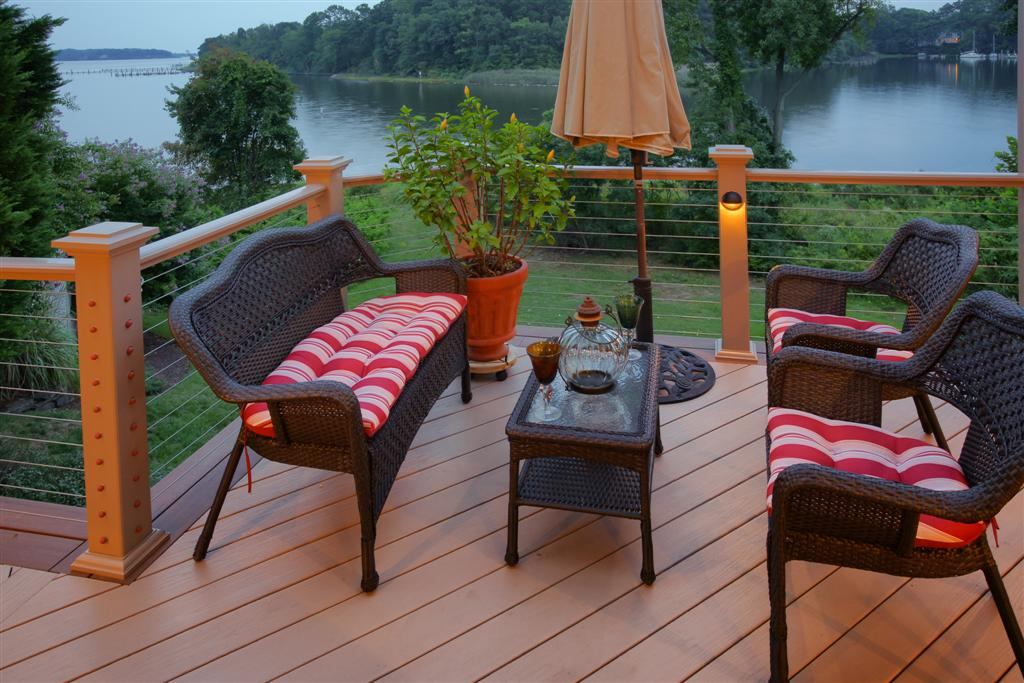
I like to add furniture, such as a dining set or a coffee table, perhaps a grill, and often some plants to make a space look like it’s being used for the purpose that it was originally designed for.
What to shoot? I try to capture at least one image that covers the entire project. Sometimes this means climbing up on a ladder to get a better view. I also like to shoot the image at different times—about every half-hour or so—to take advantage of the light, as it changes quickly.
If I can’t capture the image in one shot with the lens I’m using, I sometimes try to get multiple shots, each overlapping the other, and stitch them together on my computer. It can get a little tricky to stitch with editing software, though many cameras and phones now have a built-in stitching function that simplifies the process.
I also like to take individual shots of each section of the deck, like the dining, grilling, and relaxing areas. I try to set up the shots so that the areas look inviting and tell a story. Your clients may not be able to tell you exactly what they are looking for, but they can usually point to a photo and say, “That’s it!”
Detail shots—post or stair lights, graspable handrails, borders, and trim work—are useful too. I take lots of photos, since I’ve invested a lot of time getting to this point, and find it very rewarding and enjoyable to capture my work.
Once I’ve edited my pictures and am happy with the results, I’m ready to share them with others, mainly to promote my business either through social media, on my website, or in my blogs. My photos are also used by a number of manufacturers for marketing purposes and advertising, and magazines, like PDB and Fine Homebuilding, as well as local publishers and deck builder books use my photos as well on a regular basis.
Clemens Jellema owns Fine Decks, Inc. in Calvert County, Md. You can take a video tour of one of his recent projects by clicking here, or see more photos of his decks on Houzz.com.