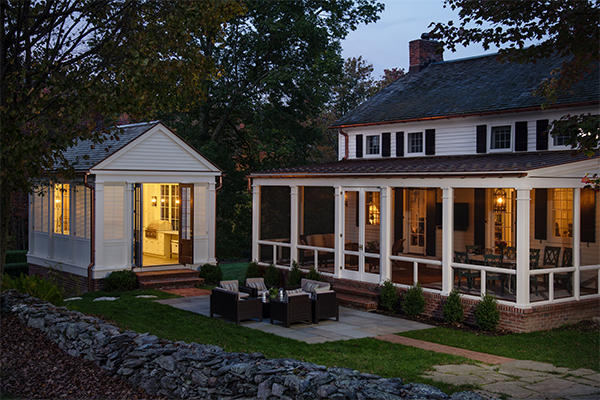
A couple of years ago, a past client contacted our company, New Dimension Construction, with plans for an outdoor living project on his property. The homeowner—an architect—wanted to match the exterior of a late 19th-century farmhouse with a nearby guest house, both of which he owned with his wife. His idea was to build screened-in porches for both the main and guest houses with similar materials and provide outdoor stone patio areas with connecting walkways made from brick. Central to his plans would be an outdoor kitchen—the highlight of his ambitious project.
Our client, who grew up in the Carolinas, selected brick, reclaimed hand-hewn timber, copper, and open screening for materials, giving the project a mid-Atlantic, early Americana feel that blended in nicely with the farmhouse. His design called for a free-standing, 13-1/2-foot-by-20-foot outdoor kitchen featuring a brick oven, grill, and plenty of storage space—everything you would need to whip up a summer meal for friends and family.
The structure was sited near the main house on a sloping grade steep enough to allow for a walk-out basement, which the homeowner was glad to put to good use. A wine lover, he had always wanted a wine cellar, but the home’s existing basement was not conducive to storing wine. The walk-out basement offered a perfect opportunity to locate a wine “cellar” below the kitchen.
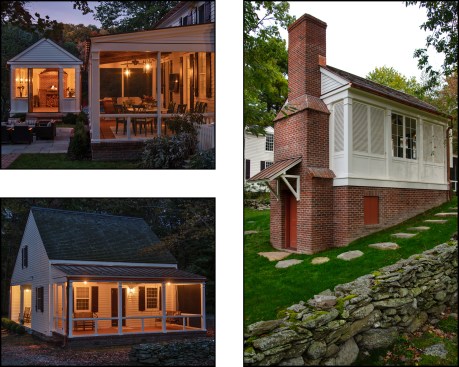
A stone patio and brick walkways connect the project’s main elements: the summer kitchen, a new, screened-in porch added to the back of the main home (top left), and a new porch built on the front of a nearby guest house (bottom left). The site’s sloping grade allowed for a walk-out basement, which houses a wine “cellar” below the kitchen. The wine cellar has an inswing door covered with a Craftsman-style copper roof, providing sheltered access to the wine during snowy Taconic mountain weather (right).
Building the Structure
The kitchen’s foundation was a hybrid block-and-poured-concrete wall with brick veneer. On the upslope side, the mason subcontractor formed and poured concrete foundation walls with 6-inch stepped brick shelves on the side walls that followed the sloped grade. On the downslope side, the foundation wall was 8-inch block on the interior and 4-inch brick-shelf block on the exterior. Two-inch XPS rigid insulation was sandwiched between the inner and outer masonry wythes in the walk-out area (fit around the brick ties) and applied to the exterior face of the poured walls, which were backfilled.
With the structural part of the foundation completed, the masons began laying up the brick veneer while we compacted the gravel base, installed a 10-mil vapor retarder membrane, and placed the 4-inch-thick basement slab.
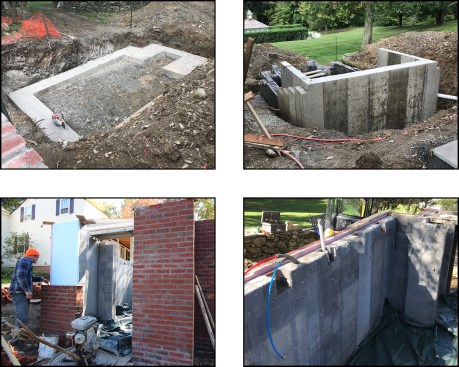
After the footings are set (top left), a hybrid block-and-poured-concrete wall foundation is installed with stepped brick shelves that follow the sloped grade (top right). Here, mason Justin Money of Irish Rock Art lays up brick veneer on the downslope block portion of the foundation over 2-inch XPS rigid insulation sandwiched between the brick and block (bottom left). Beam pockets are made in the wall’s top course to let-in 8×8 oak kitchen floor support beams (bottom right).
The client planned to use the outdoor kitchen from late spring through mid-fall. The basement, however, would be storing wine year-round and was the building’s only conditioned space. So, our thermal envelope ran up the XPS-insulated foundation wall and horizontally in the insulated kitchen floor above. The target temperature for the wine room was a constant but relatively low 55°F, so we didn’t install sub-slab insulation.
The floor assembly was fairly unique, given the structure’s design, use, and size. From the bottom up, we first installed 8×8 oak timbers, which run the width of building, in beam pockets 3 feet on-center. On top of the beams, we then ran 4×4 oak purlins 2 feet on-center the length of the building. Next, we installed rough-sawn 1-inch pine planking perpendicular to the purlins; the timber and planking gave the wine room’s ceiling a vintage, Old European look.
On top of the planking, we installed 2×4 joists 16 inches on-center across the width of the building. After filling the joist bays with 3 inches of polyiso rigid foam, we glued and screwed a layer of ¾ ‑inch AdvanTech subflooring to the 2x4s. The resulting floor system was plenty rigid for the tile finish planned in the kitchen.
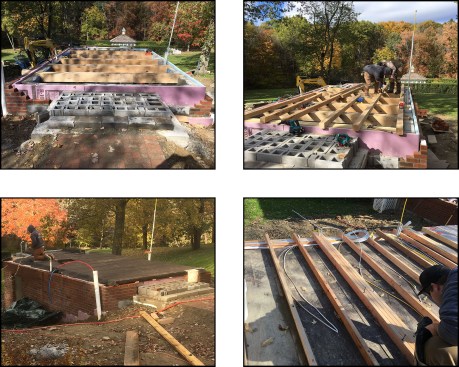
For the floor system, the 8×8 oak beams are first installed the width of the building (top left). Then, 4×4 oak purlins are run the length of the building (top right); the purlins are installed to support the cellar’s plank ceiling. Rough-sawn 1-inch pine planking was installed perpendicular to the purlins, then covered with building paper to hide gaps in the planking (as viewed from below) and to temporarily dry-in the deck (bottom left). Then 2×4 “joists” are installed across the width of the building (bottom right). The joist bays are later filled with 3 inches of polyiso rigid foam and 3/4-inch AdvanTech subflooring is glued and screwed to the joists.
Moment frame. The kitchen’s exterior wall design called for mostly large louvers, windows, and doors with little sheathing, so a moment frame was needed to resist shear forces. We built the moment frame out of 5 1/4-by-5 1/4-inch PSL posts and triple 1 3/4-by-9 3/4-inch header stock and connected it together with custom-fabricated steel corner and T-shaped brackets. We lag-screwed the brackets into the posts and headers according to our engineer’s specifications and secured the bottom of the posts with base connectors. Later, we trimmed out the moment frame’s engineered lumber with Lifespan treated radiata pine.
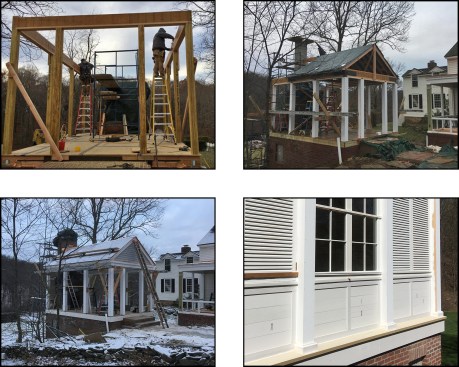
NCD crew members build the structure’s moment frame out of engineered lumber and custom-fabricated steel brackets (top left). The moment frame is trimmed out with Lifespan treated radiata pine, the roof isframed with 2x8s and sheathed with Zip System sheathing (top right). The chimney’s brick veneer is completed and the roof covered with pressure-treated cedar shingles (bottom left). Louvers, windows, and doors are centered between the radiata-pine-clad columns to create a “pilaster look.” At the rim joist-brick veneer juncture, 2×12 Boral water table trim with beveled Boral cap trim is installed (bottom right).
At the roof, we site-built a couple of trusses from salvaged hand-hewn timbers and installed them at intermediary column locations (at one-third points of the room); the trusses made a visual connection to the reclaimed timbers we installed on the main- and guest-house porches. We framed the roof around the two trusses with 2x8s at 16 inches on-center, then sheathed the roof with Zip System sheathing. Completing the roof, we installed pressure-treated cedar shingles over a cedar breather membrane and capped the unvented roof off with a copper ridge.
The Kitchen
The focal point of the kitchen interior was the wood-fired oven. Manufactured by Mugnaini, the Prima-100 oven kit arrived on site in sections. Mason Justin Money of Irish Rock Art put together the precast pieces on a small reinforced concrete slab poured within the block and brick wall assembly, then applied refractory mortar over the joints. A metal flue manifold (later connected to a metal liner run through the brick chimney) was attached to the arch with masonry screws, then the oven’s core was wrapped with two layers of thermal insulation blanketing. The mason finished the interior masonry surround, then later the exterior brickwork of the chimney—a handsome feature in its own right.
The client wanted a “pilaster look” for both the exterior and interior façades. This was achieved by centering the louvers, windows, and doors between the radiata-pine-clad PSL columns. Starting on the exterior, we ran 2×12 Boral poly-ash water table trim around the perimeter and capped it off with horizontal Boral trim, which we beveled and kerf cut to drain. On top of the beveled cap trim, we installed 1 1/2-inch-deep by 3-foot-high panels made with shiplap pine. We trimmed out the interior with primed finger-jointed pine.
The structure’s large louvers, windows, and doors were custom-built off site out of mahogany. The client wanted the louvers and windows to open out like a casement, so we installed casement adjuster and locking hardware by Ives to operate them. The solid brass ball-bearing hinges were installed using a Porter-Cable hinge template and a router. A minor drawback to outswinging louvers and windows, of course, is that our clients have to forego insect screening in order to operate them.
Fitting out the space. We installed porcelain tile that simulates hardwood strip flooring over a Schluter uncoupling membrane on the floor and beadboard on the ceiling. After installing our finishes, we fit out the kitchen with a stainless steel built-in gas grill, a single propane burner, a pot sink, and a warming drawer, all by Viking. Custom-fabricated base cabinets and stainless steel open shelving support Carrera marble countertops.
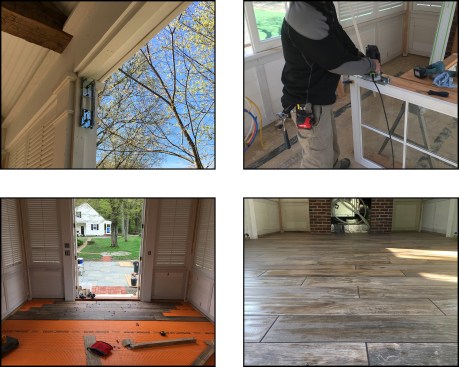
The custom-built windows and louvers are fitted with casement-window-style operable brass hardware. A Porter-Cable hinge template helps with routing out the hinge locations (top left, right). Porcelain tile mimicking hardwood strip flooring tops a Ditra uncoupling membrane (bottom left, right).
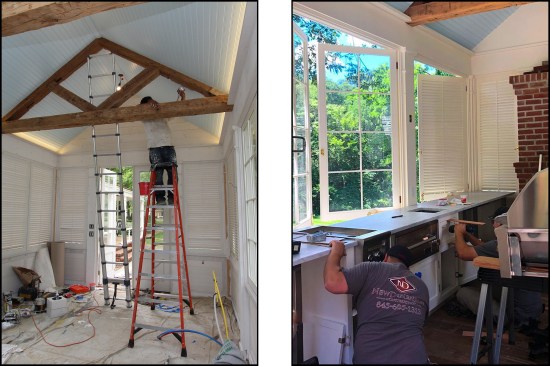
Beadboard is installed between trusses made from salvaged hand-hewn timber (top left). NCD crew members install Carrera marble countertops on custom-fabricated base cabinets and stainless steel shelving (top right).
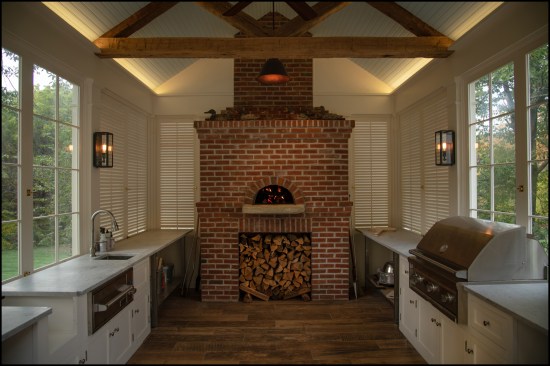
In the completed interior, the wood-fired oven serves as the focal point of the summer kitchen.
The wine room. The foundation walls were finished with a three-coat stucco finish. HVAC equipment needed to condition the wine room’s air (a constant 55°F to 57°F with an average 60% relative humidity is required) was housed behind the wood storage box below the oven, with an AC condenser unit installed outside on a pad. Finishing up, we built the homeowner-designed wine shelving out of walnut-veneer plywood with walnut face frames.
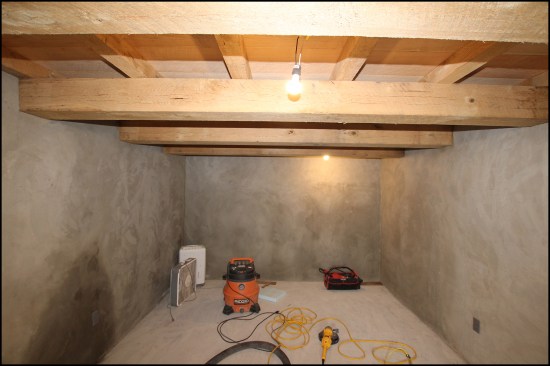
The wine-room walls are finished with a three-coat stucco finish. The rough-sawn timber beams and planking give the wine room’s ceiling a vintage, Old European look.
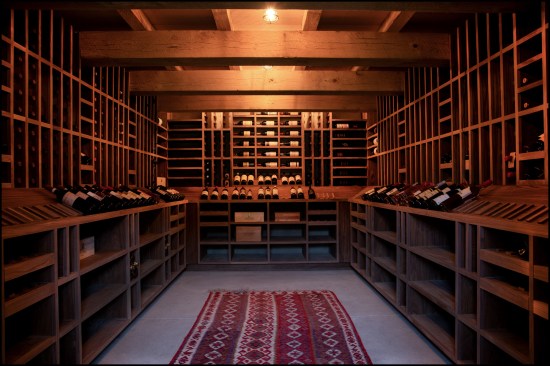
Designed by the architect-client, the wine shelving was built by NDC crew members using walnut-veneer plywood with walnut face frames.
Photos by New Dimension Construction and Tim Healey