There’s a saying in the remodeling industry that the best customer is the one you already have, meaning someone who calls you back for multiple jobs. Few people buy more than one deck, but another way to capitalize on that principle is to build accessories like pergolas, trellises, privacy screens, arbors, and accents.
They make great up-sells and can add to your bottom line. Plus, they have multiple selling points — they can define an outdoor room or an entry, screen an unpleasant view (or frame a pleasant one), set an ethnic tone (such as Japanese or Tuscan), picture-frame a bench, provide a structure on which to hang a swing, support climbing plants, give height to the deck, or just plain add fun to a deck design.
Presenting a client with two or three reasons for having one of these structures verbally paints a picture of the benefits and eases the sale: “This deck faces west and will be hot in the afternoon. A shade structure would let you use the deck more often and set your deck apart,” or “Your neighbor’s deck is pretty close. A privacy screen would look good and give you some separation.” Once the purpose — shade, privacy, looks — has been decided, the design of the project begins.
Basic Structure
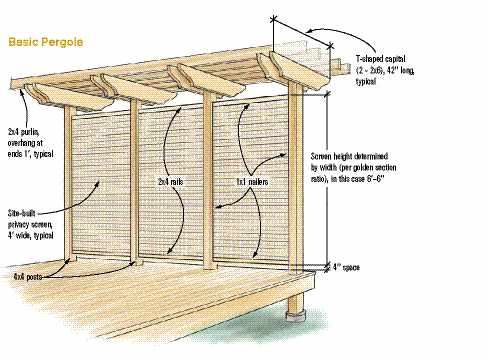
I believe in the KISS (keep it simple, stupid) principle when it comes to designing pergolas and arbors; most of mine spring from one simple design (Figure 1). My basic pergola usually runs along one side of a deck, appears T-shaped when viewed from the end, and is filled in with vertical lattice panels, which create a privacy screen. This last feature in particular is an easy sell, as it goes a long way toward distinguishing a deck while offering shade and privacy.
Figure 1. The author uses the golden section, a classic ratio of 1.618 to 1, to calculate the dimensions of the privacy screens. He custom builds the trellis from materials that match the decking.
Adding a second basic pergola and bridging between the two with longer rafters creates a more elaborate structure. This approach works well with modular pricing, too. I already know what one basic pergola costs (broken into 4-foot-long modules), so it’s simple enough to double that and add in the cost of rafters, which I also know from past experience.
My standard pergola is built from cedar, with four 4×4 posts four feet on center. When designing a pergola or privacy screen, care must be taken to provide a good foundation and lateral load support.
A privacy screen will have to resist about 10 pounds per square foot of lateral load in an 85-mile-an-hour wind, which is a typical design requirement in my area. A 12-foot-long privacy screen that’s 61/2 feet high, for instance, would generate 780 lb. of lateral load in those conditions.
On a second-story deck, I would typically build such a screen using four posts attached to the rim joists. Each center post has to resist a 260 lb. wind load, and each end post, a 130 lb. load.
To attach the posts to the rim joists, I block behind each post to transfer the load to two or more joists. These blocks are screwed in with a strap on the top and bottom (Figure 2). Turning the corner with the pergola and adding at least one 4-foot bay also helps to stiffen things.
Figure 2. Privacy screens can be subject to considerable wind loading and must be stoutly anchored. On low decks, anchoring directly to the footings is recommended. On high decks, the author uses blocking to transfer wind loads to multiple joists.
On a lower deck, I can anchor the posts to the footings. I screw the posts to the rim joists to gain lateral support from the deck. When pergolas and privacy screens are stand-alone items, I use a Simpson CBSQ44 (Simpson Strong-Tie, 800/999-5099, www.strongtie.com) embedded into a concrete footing that has been dug down a minimum of 2 feet.
Superstructure
I make the capitals for the posts from two 2x6s, each about 42 inches long. I usually cut the bottom corners off the ends at a 45-degree angle (Figure 3).
Figure 3. The bottom corners of 42-inch-long 2x6s are cut off at a 45-degree angle to make the capitals.
To determine where to cut, I apply the golden section, a ratio of 1.618 to 1 that’s been used for centuries to create rectangles with pleasing proportions. Dividing 5 1/2 inches (the length of the end of the 2×6) by 1.618, I get 3 3/8 inches. I start the 45-degree cut this distance from the bottom corner, and remove a right triangle with equal sides of 3 3/8 inches.
Occasionally, I make decorative scroll cuts instead of 45-degree cuts on the ends of the capitals. Sixteen-penny stainless steel nails or 3 1/2 inch stainless screws secure the capitals to the top of each post.
Five 2×4 purlins run the length of the pergola and overhang 1 foot on each end. One purlin is centered over the posts, and the outer purlins align with the 45-degree cuts at each end of the capital blocks. The remaining two purlins are evenly spaced between these three. All are secured with stainless screws that are toed into the capitals.
I install the privacy screen between the posts, starting with a 2×4 installed 4 inches above the decking. The space allows clients to easily clean their deck off with a blower, hose, or broom.
The height of the top 2×4 is determined by applying the golden section: Multiplying the 4-foot width by 1.618 equals about 6 feet 51 1/16 inches, which rounds up to 6 feet 6 inches. So, I make the 4-foot-wide panels in the privacy screens 6 1/2 feet high.
The space between the 2x4s is filled with a grid made from 7/16-inch by 1 1/2-inch strips of cedar, which I rip from D clear-grade 2x6s (Figure 4). It’s important to use clear material not just for appearance, but because knots would weaken these thin strips too much. To create a nailer, a 1×1 is nailed into place on each of the horizontal 2x4s and to each post. I use a layout stick about 7 feet long with lines every 1 1/2 inches on center to mark the locations for the upright grid pieces on the 2x4s.
Figure 4. Site-built privacy screens add a custom touch. They’re made with the same material as the deck, and assembled with stainless steel staples.
After the vertical strips are cut to length, they’re are fastened to the nailer using 1-inch narrow-crown stainless steel staples. The layout stick is then temporarily nailed to one side of the opening for aligning the horizontal strips. I hold a torpedo level on each strip, line the strip up on the layout stick, and staple it to the nailers on the posts.
Once all the strips have been affixed to the nailers to make the grid, each overlapping piece is stapled from both sides with 3/4-inch stainless steel staples. I shoot the staples to run with the grain of the strip, and their holes blend right in.
Some clients like the look of angled lattice instead of the up-and-down screens I usually make, but I never use store-bought lattice. I build my own in my shop so I can match the deck material, be it cedar, mahogany, cambarra, or redwood. First, I build a lattice jig (Figure 5), using a sheet of plywood as a base. Whatever you have lying around will work — mine is 1 1/8-inch plywood, but 3/4-inch ply would be fine.
Figure 5. When a client wants a diagonal lattice, the author builds one using a jig made from plywood and guide blocks glued and stapled in place.
It’s tedious, but the next step is to lay out a 45-degree grid on the plywood with a straightedge and a pencil or a chalkline. I space the lines 31/2 inches apart, then cut out a bunch of 2-inch square blocks. These are glued and stapled along the layout lines all the way around the outside edge, creating stop blocks for aligning the strips. The 2-inch blocks are 1 1/2 inches apart, exactly fitting the lattice strips.
You can use the other side of the same piece of plywood to build a second lattice jig with larger spacing. You can also lay your strips out using every other block to get an even larger grid. When laying up lattice using a jig, hold the strips to one side of the spacing blocks, and check that the lattice looks evenly spaced along the lines before stapling the overlapping strips together.
Log Posts
Peeled-log posts supporting a pergola create a rustic look that’s popular in the Northwest (Figure 6). I usually use Douglas fir, but nearly any locally available species will do. Rot-resistant species are best, of course, but no matter what the wood is, it’s important to detail the post to shed water and minimize the chance of rot.
Figure 6. Pergolas can be built from a variety of materials including locally available logs.
I prefer to support logs on concrete footings, going through the deck surface if necessary (Figure 7). I use Sonotubes to form footings that rise about 6 inches above the ground. These are smaller than the base of the log, with the aim being for the log to overhang the concrete by about an inch on all sides.
Figure 7. Log posts are supported on concrete footings that are slightly smaller than the post, encouraging water to drip. A hold-down anchor fits in a pocket that’s chainsawn in the log, and countersunk bolts complete the connection. High-quality caulk helps seal moisture from the beam saddle, whose sides are chamfered to drain.
I cast or epoxy a foundation bolt in place to secure a Simpson HD10 hold down (Simpson Strong-Tie, 800/999-5099, www.strongtie.com). This hold down will fit inside a slot cut into the base of the log with a chainsaw. Cutting the slot calls for caution, as there may be a tendency for the nose of the chainsaw bar to kick back when making the initial cut.
All of the cuts to the log are made with a chainsaw, and to align this inherently imprecise tool with the irregular surface of the log, layout lines are needed on the full length of the log. To make them, I first find the approximate center of each end of the log. Then, with the log horizontal and blocked to prevent rolling, I use a level to draw a plumb line and level line through each centerpoint. I snap lines down the length of the log between where these lines hit the face of the log. I use white chalk for this, as it doesn’t leave permanent stains.
The reference lines are used to align a square so the log can be trimmed to height and square, top and bottom. You’ll have to find the center points again after trimming, which can be done by reconnecting the reference lines across the cut ends of the log.
Mark the location of the hold down slot on the bottom of the log, being very careful — there’s no adjustment with this system. Make the plunge cut, lining the bar of the saw up with one of the reference lines so the cut will end up plumb.
Next, I cut the beam saddle (saddles for the corners) atop the post, again using the layout lines. So water can drain, I chainsaw the sides of the saddle at about a 45-degree angle. When I set the beams in the saddles, I run a good bead of DAP Side Winder caulk (DAP, 800/543-3840, www.dap.com) all around the perimeter of the saddle to prevent water from reaching its end grain.
It can be challenging to raise a heavy log and place it accurately over the HD10, but with a couple of helpers it’s not bad. Having measured the height of the bolt holes in the HD10 beforehand, and again using the reference lines as a guide, I drill holes for the bolts that will secure the log post to the hold down. Countersink these holes so the bolts don’t protrude from the sides of the logs. Once the log posts are set, building the rest of the pergola proceeds pretty much like any other.
Material Options
Pergolas and arbors can be built from a variety of materials. Kits are available even in fiberglass (Figure 8) and aluminum. I tried out an aluminum pergola once. The brand I used was made out of a very thin aluminum; it was hard not to damage it during construction and my client wasn’t happy after the first windstorm. Perhaps it’s not fair to judge all aluminum arbors based on one bad experience, but I’ve avoided aluminum ever since.
I just installed my first fiberglass pergola, which came from Arbors Direct (800/930-7495, ww.arborsdirect.com). All the pieces were precut and finished to perfection. The assembly time was about six hours with a two-man crew, but after building one, I’m sure assembly time could be cut in half.
The columns anchor using an all-thread that runs through the center of the column to the deck’s substructure. Once the columns were placed, the beams, purlins, and runners were easily installed. Angle brackets reinforce the joints. My client loves it, and I was impressed, so I will definitely be selling more of these. The only caveat I have is that you need to allow a four- to six-week lead-time.
Figure 8. Fiberglass arbor and pergola kits are available to create a classical or Tuscan look. These hollow columns anchor to the deck framing using a length of all-thread.
Another material I’ve used for pergolas is polyethylene-coated wood from Woodguard (800/521-3633, www.wood-guard.com). The size of the materials — 2×6 and 4×6 are the largest sizes available — limits how far you can span between posts. Decorative caps are used to finish the ends. This product was easy to work with and my clients like the end results.
I’ve tried laminating composite deck boards to build pergolas, but they sagged with time. However, TimberTech is coming out with a composite 2×4 for fencing (888/336-2352, www.fencescape.com). A steel structural member embedded in the 2×4 will allow it to span 8 feet.
Kim Katwijk is a deck builder from Olympia, Wash., and a founding member of NADRA.


