
Over the past few years, my company has been aggressively adding hardscape features such as patios and retaining walls to our deck projects. This is partly in response to our clients’ expectations, which have been influenced by what they’ve seen done by their neighbors or on YouTube and TV, and partly due to the rolling hills of our area and the need to get creative with maximizing backyard spaces. Not only has this kept us busy, especially during the early stages of the COVID-19-related shutdown as we were deemed to be an “essential service,” but it has also added a growing repertoire of tools and building techniques to our formerly deck-centric construction company.
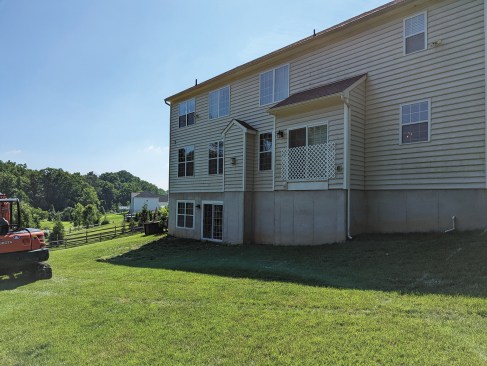
With a walk-out basement and a sliding door on the main level, this Pennsylvania home was the perfect candidate for a multi-level outdoor living space incorporating an elevated deck, patio and walkways, a firepit, and an enclosed storage area.
The project featured in this article offers up a good example of our approach. Our client’s home, which sits at the back corner of a development, has a yard that slopes in every direction. While that is fine for letting the dog run around, it’s not so great when there isn’t anywhere level to set a few chairs for family time or social events.
The core of our design was an elevated deck on the back of the house that would provide usable living space easily accessed from the main level via a 6-foot sliding door. But the home also had a fully finished walk-out basement with another 6-foot slider leading to the backyard, so we designed an outdoor living space that would allow our clients to entertain on multiple levels with maximum accessibility and functionality. Incorporating hardscaping elements into the design ensured that our clients’ needs would be met and that the elements would work together cohesively, not just during the construction phase, but long-term as well.
Site Work
On a project like this, erosion and sediment (E&S) controls are typically dictated by local township regulations. E&S regs, in both their interpretation and engineering/paperwork requirements, depend on the municipality, ground-coverage rules, and overall project size. Generally, over the course of 50 to 100 projects a year, we may have two or three that require outside engineering or E&S documents, and maybe five to 10 more that can be handled by a discussion with the building code official or a clarifying in-house drawing while applying for the building permit.
The first stage was to clear out all of the unneeded dirt, or spoils, from the work area. Though when we quickly glance at a backyard to assess a job, it typically doesn’t look like much dirt will need to be moved, we’ve learned that it’s worth taking measurements and running a few calculations on larger projects. This one generated about six tri-axle dump-truck loads, or about 90 cubic yards of “junk dirt,” of which we retained about two loads on site to help reshape the yard around the new spaces.
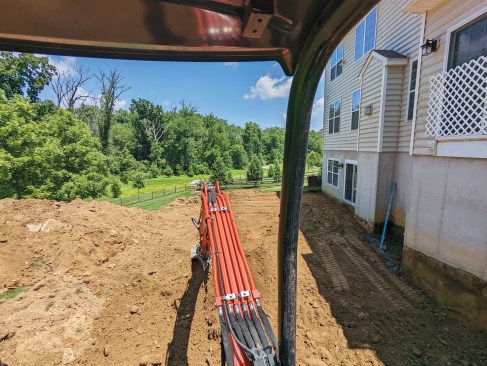
The author's company owns a bulldozer, Kubota SSV65 and SCL1000 skidloaders, Boxer mini-skidloaders, a GMC Kodiak 6500 dump truck, a small tractor, and a Kubota KX040 compact excavator, which he uses for the site work on his projects.
The junk dirt created some logistical concerns because it needed to be stockpiled outside the work area without risking runoff into a protected reserve and without blocking access from the driveway to the jobsite. In addition, as specified in the E&S drawing for this project, we had to install a silt fence.
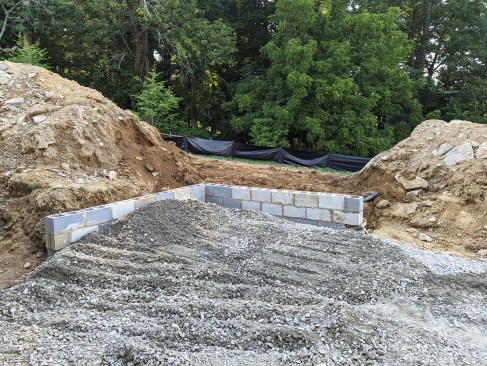
Once the area was cleared, we used a Kubota KX040 mini-excavator to dig a 4-by-4-foot footing for the deck post that would support the corner of the deck. While there is a second support post, it is integrated into the front framed wall of an under-deck storage room that was part of the project, and we incorporated the below-grade footing for that post into the footings for that wall.
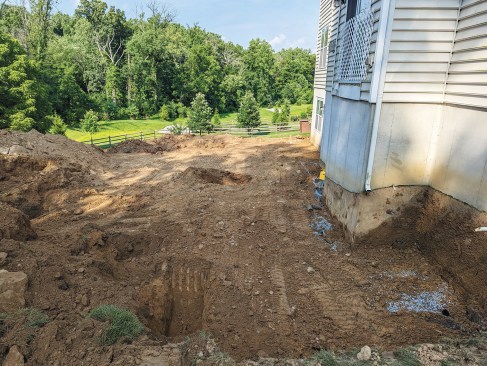
After the site was leveled, the author used his Kubota excavator to dig for the footings for the deck and storage-room walls, and for the sitting walls at the corners of the patio.
The soil on site was primarily a mix of rock and clay, which meant that we were able to dig a simple rectangular hole into the hillside for the storage room. To protect workers in other types of soils and deeper excavation depths, we often have to step back the excavation a couple of feet for every 4 to 6 feet of dig depth to prevent the sides of the excavation from collapsing.
Concrete
Most of our jobs don’t require a lot of concrete; for example, a typical 12×12 patio slab requires only about 2 yards of concrete. While that’s too much to mix by hand, to avoid short load fees we generally order from metered concrete service providers that mix up exactly what we need on site, rather than ordering by the yard from a ready-mix plant. This eliminates most of the clean-out waste on site and makes ordering more accurate and efficient, since there are no wasted overages.
On this project, we ordered 6 yards of concrete to pour the deck footing, the storage-room wall footings, and the footings for two sitting walls on the patio all at the same time. Because the concrete company shipped us a “stump,” which was left over from a prior government-building pour, this concrete had a pink color. While this was acceptable for the buried footers, it showed up “hot” and set up almost immediately once placed in the trenches, requiring substantial effort to get it to properly fill the forms.
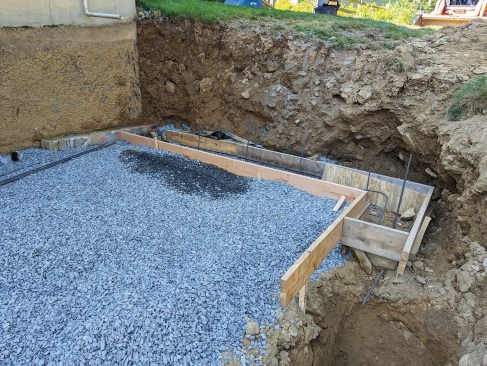
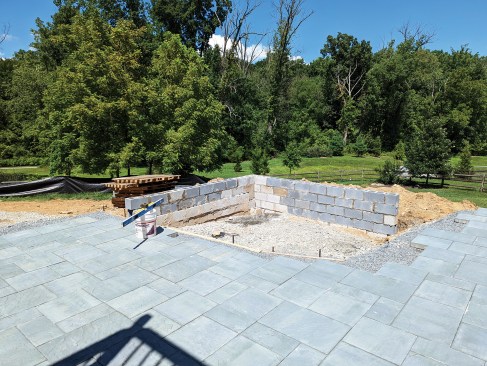
Shown here is the formwork for the footings that will support an engineered block retaining wall needed to partially enclose a dry storage area underneath the deck.
Per the engineered plans for the storage-room footings and block walls, vertical and horizontal rebar reinforces the footing and wall, as well as the connection between the wall and the slab floor. As we laid up the block work for the storage-room wall—which acts as a retaining wall—to bring it up past grade, we carefully backfilled with clean, crushed stone. On the exterior, the crushed stone around the footing drain and between the block wall and the dirt facilitates drainage and limits freeze/thaw pressure against the blockwork. On the interior, we used the crushed stone to provide a sub-base for the concrete slab floor.
After we built the block walls, we filled the cores with concrete at the same time we poured the interior floor slab for the storage room.
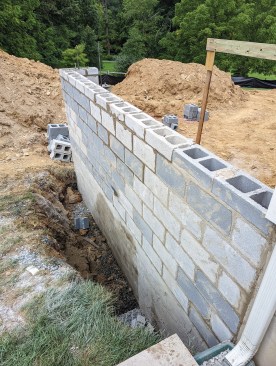
Here, the block retaining wall is under construction. To reinforce the wall, the cores will be filled with concrete and rebar.
Deck
The storage-room walls needed to be completed before we could finish framing the deck. Because we weren’t subcontracting either aspect of the job, we were able to partially build the deck’s frame as the block walls were being built. In addition, having our excavation equipment on site allowed us to easily lift the deck’s heavy engineered laminated beam into position, with one end supported by the block wall. This in turn allowed us to quickly finalize the deck frame shortly after the block walls were finished, which helped move our project schedule along.
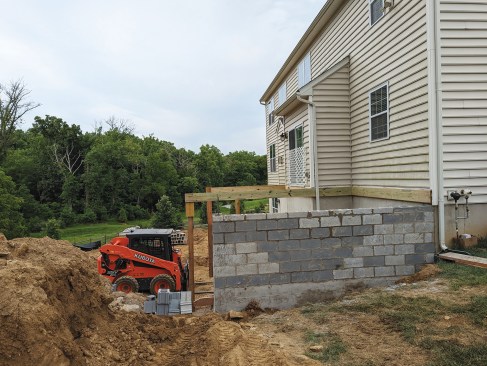
After the retaining wall was built, the author used his Kubota SSV65 skid loader to lift the heavy deck beam into position, so that the crew could begin framing the deck.
After we framed the deck, we installed an EPDM rubber under-deck drainage system to protect both the storage room and the open-air living space below the deck. For spaces that are sealed, such as the storage room, it’s essential to water-test the drainage membrane and provide good ventilation.
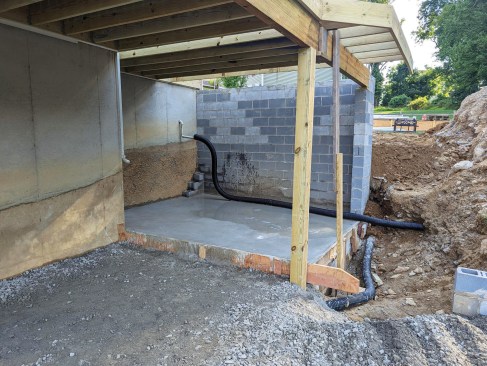
Workers poured the concrete slab floor for the storage room while the rest of the crew worked on the deck framing.
Patio
Because of the overall size of the patio and the slope of the yard, we opted to partially build the outside sitting walls at the corners of the patio prior to finalizing the patio elevation and installing the pavers. This allowed us to adjust the wall heights as needed for uniform and consistent seating. While this approach required more patio protection in the form of drop cloths to limit mortar and foot-traffic dirt and added post-project cleanup, such as a heavy scrubbing of the masonry dust that is inevitable on a project like this, these extra efforts kept us from having to redo any work.
The block sitting walls at the corners of the cast-stone-paver patio are supported by full below-frostline footings.
Visually, our goal was to have the sitting walls to appear parallel with the patio (which has a slight slope away from the house for drainage), but the walls also need to appear level from the outside as well. For L-shaped walls that extend around corners (as the ones on both sides of this patio do), this requires a little fudging both during the patio installation and while establishing the wall heights; a 12-foot-long sitting wall next to a patio with a ¼-inch-per-foot slope would generate a 3-inch seat-height difference, which is noticeable.
The corner footings prevent heaves and cracks in the sitting walls and stabilize the edges of the patio.
Generally, we can absorb an inch of height difference in a sitting wall over 10 to 12 feet of length, as long as we stay between 16 to 18 inches in height—any higher or lower, and we’ve found that people will notice the difference when they sit down. We can also adjust the patio grade so the patio stops pitching out toward the yard, and is installed level along the wall, and then pitches toward the center of the patio, before pitching back to the front yard edge. Basically, it’s a multipitched patio that still drains, rather than a flat, single-slope patio.
The block sitting walls are supported by poured concrete footings below frostline and finished with manufactured stone veneer. The walls are capped with manufactured pavers that match the step edge and cap used along the sunken fire-pit area. For the patio, we used oversized Cambridge cast-stone bluestone-blend pavers in a three-piece pattern.
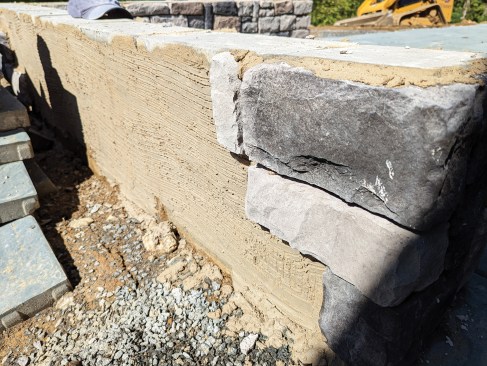
The block walls are finished with manufactured stone veneer.
We installed a built-in fire pit using natural stone that our clients had selected from a local quarry. To provide access from the patio area in front of the storage room to the side yard, we installed stone steps using manufactured stone treads. These steps also help to retain the hillside and let us adjust the ground height between the deck and the steps, and then from the steps out to the yard, for a more natural look.
The final grading around a project like this is extremely important. Bringing the dirt up high enough to properly support the patio and walls while gently grading it away from the project helps to divert rainwater away. Having extra dirt on site allowed us to finesse the grading; once we were finished, we removed one final load of spoils and debris.
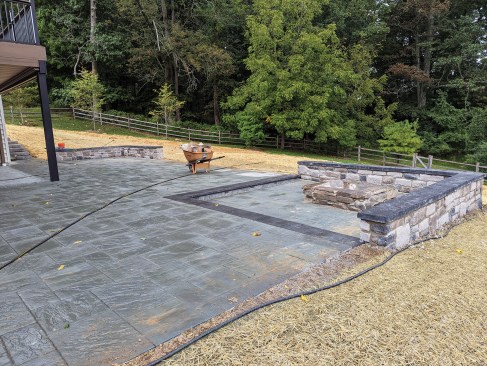
The sitting walls are capped with manufactured pavers that match the edging around the sunken fire pit. A layer of straw helps protect the newly-graded and re-seeded lawn from erosion while the grass takes root.
Finally, we raked out the site, first by machine and then by hand, adding top-dressing soil as needed. To prevent the newly seeded dirt from washing away in heavy rain, we used a mixture of straw bales broken down and spread by hand, finely-chopped straw with a tackifier added to keep it from blowing away, and rolls of straw netting. ❖
Photos by Matthew Breyer


