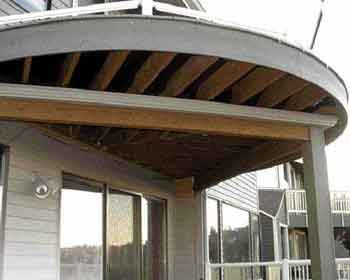
Because the drainage troughs run between the joists and can be made to fit any space, this below-deck drainage system works with any deck, including custom-shaped ones.
As a deck builder in the Pacific Northwest, I often get requests to waterproof second-story decks to make the space below useful for leisure or storage. My standard approach used to be to build the deck with a slope, put plywood decking down, and apply a textured coating system over the plywood. Not only did this look bad and get dirty quickly, it puddled easily and leaked in a few short years. So I started looking for a long-lasting, problem-free product I could install easily and cover with good-looking decking, for any shape deck I dreamed up. I also wanted a great profit margin.
After doing some research, I found a geomembrane that was waterproof, inexpensive, and flexible, and rated to last 25 years in direct sun (Figure 1). I now use this membrane to create drainage troughs between the joists, and with some off-the-shelf aluminum or plastic gutter, I form the system I describe below.
Figure 1. Caulked and stapled to the joists, polypropylene geomembrane forms troughs that drain into a gutter.
It works like a champ — and generally costs less than 50 cents per square foot for the membrane system and $5 per lineal foot for gutter and downspout. As added benefits, the membrane protects the joists from moisture, so the deck framing will last a lifetime; and the deck surface can be built level, because the slope for drainage is between the joists.
While I designed the system for new construction, it also works fine on pre-existing decks, with just a few alterations.
Overview
In brief, the process goes like this. After framing the deck but before installing the decking, I cut the membrane into pieces long enough to cover the length of the joists and lap over the ledger board and up the wall; and wide enough to droop down between two joists to create troughs.
The slope is created by increasing the amount of “droop” in the membrane from one end to the other. Lay the upper end of the membrane (usually next to the house wall) in place with only a small droop in the middle of the membrane. Droop the lower end of the membrane all the way to the bottom of the joist. A second installation of membrane starts at the outer rim joist, draining back over the support beam and into the first run of membrane.
The troughs drain into a gutter, which I place against the outside edge of the support beam, tight against the bottom of the joists.
Cutting the Membrane
I use a 20-mil polypropylene membrane (Layfield Plastics, 800/796-6868, www.layfieldfabrics.com), which commonly comes in 10-foot-4-inch-wide rolls of just about any length you want. I chose this product because it’s strong enough to span a 16-inch or 24-inch joist layout and it’s durable. Readily available and inexpensive, it costs around 30 cents per square foot at a local landscape supplier.
To determine how much membrane you need, drape a string over two joists (Figure 2). At the low end of the drainage system, the middle of the string should droop to the level of the bottom of the joists; at the high end of the system, the string should droop about an inch down from the tops of the joists. Overhang the ends of the string about 1 inch down the outside of each joist so you have a little extra to play with. Simply measure the strings to get the widths of the two ends of the membrane.
Figure 2. Use a string to measure the span of the membrane. On the gutter end, it should droop almost to the bottom of the joists. On the house end, it should droop down only an inch or so.
Find a flat, solid surface, such as a concrete slab, on which to lay out and cut the trapezoidal-shaped pieces of membrane. Then determine how many pieces you need and lay them out — alternating the wide and narrow ends — across the 10-foot-4-inch-wide sheets of membrane (Figure 3). I can usually get about five pieces out of a roll. The length can be as long as you need, although 20 feet is the longest I’ve ever needed. Be sure to allow for enough excess membrane on one end to go up the house wall 3 inches, and on the other end to run to the center of the gutter.
Figure 3. The string measurements are transferred to a layout, alternating wide and narrow ends across the width of an appropriate length of membrane. Cut lines are snapped with a chalkline.
I use a lumber crayon to mark the measurements on the membrane, and a chalk line to mark the cut lines. I score the membrane along the chalk lines using a utility knife; by not cutting all the way through, I save the point of my knife blade from being worn off by the concrete under the membrane. Once scored, the membrane easily rips along the score lines (Figure 4). I fold and roll my pieces for easy handling and set different sizes into different piles.
Figure 4. After the polypropylene membrane is laid out on a concrete slab and scored with a utility knife, the membrane tears easily. It’s best not to cut all the way through, to preserve the knife’s sharpness.
Installing the Gutter
Before I install any membrane, I install the gutter; this sequence gives good access to the top of the gutter. If the gutter is short enough to be carried on my truck, I have it made to length at the gutter supplier’s shop and install it myself. I also supply the shop with the location and measurement of the downspout, and have the hole for it punched. I usually have no problem matching the gutter to the ones already on the house, and this approach is much cheaper than having the gutter supplier come to the job site.
To make gutters and spouts less noticeable, I place the gutter against the outside edge of the support beam, tight against the bottom of the joists (Figure 5), and I run the downspouts down the support posts. If you build a deck with a flush beam that’s on the same level as the joists, you may need to install a board under the beam to mount the gutter to, unless the beam is thicker than the joists.
Waterproofing Existing DecksTo install this system under an existing deck, cut the membrane pieces with a shallower droop, no more than 4 inches, and staple the membrane to the underside of the joists, caulking each seam as described in the following pages. Screw 2x2s to the joists over the membrane as in the drawing below. |
Figure 5. Traditional aluminum or plastic gutter affixed to the main beam carries away the water from the membrane troughs.
Installing the Membrane
At the ends of troughs that are more than about 6 feet long, you’ll need to install baffles to catch any water that may shoot out past the gutter. Baffles are simply scraps of membrane that span between the joists, running several inches higher than the trough, and lapping into the gutter. I attach the baffles to the joists using stainless steel staples.
One person can install the membrane, but it’s much easier with two. Start the installation of the main troughs by running a bead of caulk along the top of the first joist (Figure 6). I usually use black Dap (Dap Products, 800/543-3840, www.dap.com) or Vulkem (Tremco, 800/321-7906, www.tremcosealants.com) urethane caulk to match the color of the membrane. Both brands are good quality, flow well in hot or cold, and are readily available. They adhere to polypropylene well enough to produce an effective seal.
Figure 6. Polyurethane caulk seals the membrane to the joists.
With one person on each end of the joist bay to be covered, place the membrane over the caulk flush with the outside edge of the first joist. Leave enough excess membrane on the house end to go up the wall 3 inches (Figure 7), and to run to the center of the gutter on the outer end.
Figure 7. The siding and tarpaper on the wall of the house is peeled back to allow the membrane to be integrated into the ledger flashing system.
Staple the membrane along the first joist about every 2 feet to hold the membrane in place until the decking is screwed down over it. I slide the stapler over the membrane on top of the caulk to flatten it out and get rid of any lumps (Figure 8). Tighten the membrane as needed to create a smooth trough for the water — make sure, though, there is adequate slack at the wall end to allow the membrane to lay flat over the ledger board — and staple the other side of the membrane to the top of the second joist.
Figure 8. A stapler is used both to attach the membrane and to smooth out the caulk under the layers of membrane.
The steeper the slope, the more easily rainwater can carry out any debris that falls through the gaps between the decking boards. Also, placing the low end of the membrane at the top of the gutter minimizes splashing.
Next, run a bead of caulk along the second joist on top of the membrane you just stapled in place. I always take care to cover the staples with caulk so there is no chance of a leak there (Figure 9). Put the next piece of membrane on top of the caulk, stretching it tight and placing it as before. Overlapping and caulking the pieces on top of each joist prevents leakage caused by wicking between the layers. Staple it in place, locating the staples over the caulk so it will fill the staple holes.
Figure 9. A bead of caulk atop the first piece of membrane seals the joint. Be sure to caulk over the staples to prevent leaks.
Stretch the membrane into a nice trough, paying attention to the wall junction, and staple the other side of the membrane in position just as you did the first one. Repeat this procedure with all the remaining pieces.
The final touch is to cover each membrane seam over the joists with a self-sealing tape such as 4-inch Vycor Deck Protector (Grace Construction Products, www.graceconstruction.com). This tape seals around the decking screws to prevent leaks from occurring where the screws penetrate the membrane (Figure 10).
Figure 10. Grace Deck Protector caps the joists and the polypropylene membrane, adding a layer of protection that self-seals around the decking screws. Note the Deck Protector continuing up the wall, lapping the joint between the pieces of membrane.
One important note is that this system may occasionally need maintenance in the form of debris removal. Usually, flushing the troughs with a garden hose is enough, but you need access — a strong argument for screwing down the decking. When the gutter needs to be cleaned out, access is easy from the underside of the deck. If you’ve installed soffit under your deck, it’s wise to install the last board with screws, so it can be easily removed for gutter cleaning.
Return Troughs
A return trough is required from the support beam, whether the joists hang from it or are cantilevered beyond it (Figure 11). Typically, the main trough from the house drains to a gutter mounted on the outer edge of the beam. To drain the cantilevered portion of such decks, I install a shallower return trough from the outer edge of the deck to a point overlapping the main trough by about 6 inches (Figure 12). The water from the return trough will simply drop into the deeper trough and flow into the gutter.
Putting Water in Its Place
Cantilever
No Cantilever
Figure 11. Main and return troughs work in tandem to drain the deck. The main return feeds directly into the gutter, aided by a baffle stapled to the main girder to prevent overshooting runoff from soaking the beam. The return trough passes over the main beam and drains to the main trough.
Figure 12. Just a slit between the troughs and the baffle shows water’s path into the gutter below. There are a couple of inches of clearance between the main trough and the return to prevent debris from hanging up and clogging.
The return trough is the secret to doing angled, round, and cantilevered decks. Return troughs can be as short as a few inches or as long as needed. Just be sure to leave at least a couple of inches of clearance between the return trough and the main trough so that debris in the main trough doesn’t hang up on the return trough. Install the return trough the same way you did the main trough, with caulk, staples, and seam tape.
Joining to the House
The junction of the deck to the house wall is a delicate and important area. It’s a common place for leaks to occur, and if the seal isn’t tight, the house can suffer a lot of damage. You will have to get the membrane over the ledger and at least 3 inches up under the siding and housewrap or tarpaper to insure it will catch all the water blown against the wall in a driving rain. You may need to cut into the siding of the house to do this (Figure 13). I use Deck Protector seam tape to seal the membrane to the sheathing. Place a trim board or replace siding as appropriate after the membrane is run up the wall.
Details Keep Framing Dry
Figure 13. To insure a watertight deck-to-house connection, the trough membrane and Deck Protector tape integrates with the ledger flashing.
Deck Protector is also great for detailing around posts and steps (Figure 14).
The final step is to screw the decking down to the joists over the membrane. It is harder to find the joists when they are covered with the tape and membrane, but to avoid leaks, care must be taken to be sure the deck screws hit the joists. If you miss, fill the screw hole you just made with a little caulk so a leak doesn’t develop.
Figure 14. To waterproof around details such as posts (right) and steps (below), the author stacks the layers with the upper over the lower, just like roofing, and uses Deck Protector as flashing.
You can install soffit under the deck now, and even can lighting. If you install can lights, try to get the shorter versions and tell your customer to use only fluorescent bulbs, to keep the cans cool and not melt the membrane. I buy IC-rated lights, and place double foil-faced insulation over them to provide a heat barrier — in case someone forgets and puts a flood light in the can.
Scott Smith is a deck contractor in Bonney Lake, Wash.


