Electrical Rough-In
First, go through a structure and mark the locations of all devices and fixtures on the framing members. Then install all electrical boxes so their faces are flush with the finish surface of the wall or ceiling.
Most houses are wired in type NM cable (Romex). All wiring should be neat and align with vertical and horizontal building lines (Figure A and Figure B). One exception is in inaccessible attics where diagonal wiring paths may be acceptable (Figure C).
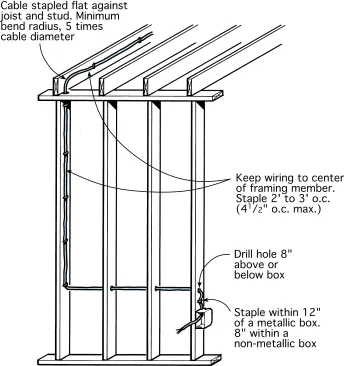
When running cable along the length of studs or joists, keep the cable to the center of each, leaving a 1 1/4-in. minimum clearance on each side of the framing member. When running cable through studs, drill all holes at the same height so that the cable is run level to the floor. Drill holes 6 to 8 in. above or below all switch and receptacle boxes.
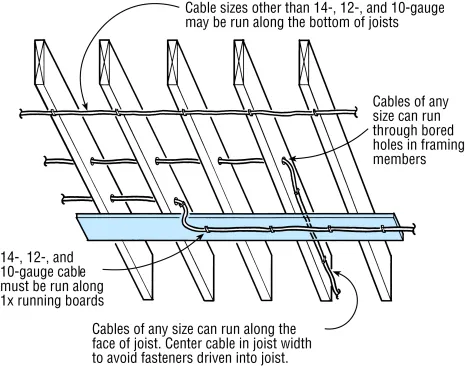
Do not run No. 14-, 12-, or 10-gauge cable across joists or along the bottom edge of joists. They should run along the sides of joists, through bored holes, or along a continuous 1x attached to the joists.
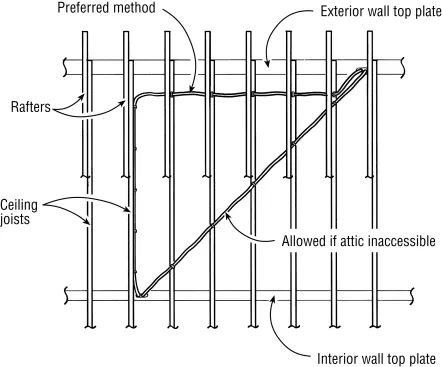
Accessible attics with permanent stairs or built-in ladders require board protection throughout the attic on floors and walls/ceilings. In accessible attics without permanent ladders or stairs, such protection is only required within 6 feet of the access opening. In attics less than 30-in. high, no access is required. Where there is no access whatsoever, there are no requirements for protection.
Drilling and Notching
With the layout and boxes in place, drill out the studs (or punch them out, if metal) before beginning to pull in wire. If any nonmetallic cable, such as Romex, is installed in metal studs, penetrations in the framing must be protected by approved bushings.
Rules for drilling and notching studs are covered in Figures D and E.
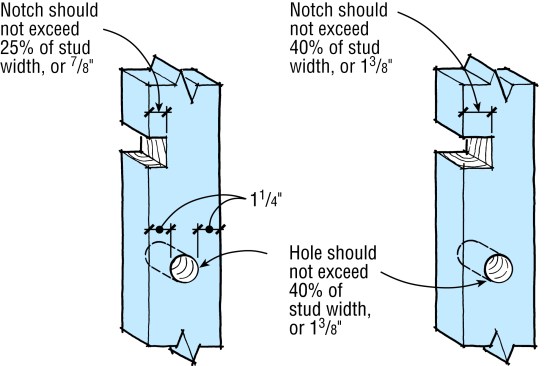
Holes for cable should be 1 3/8 in. maximum and drilled on the stud’s centerline to avoid fasteners penetrating the cable. By code, no hole should be closer than 5/8 in. to edge of stud. Notches and any holes drilled too close to the face of a stud require protection with a steel plate.
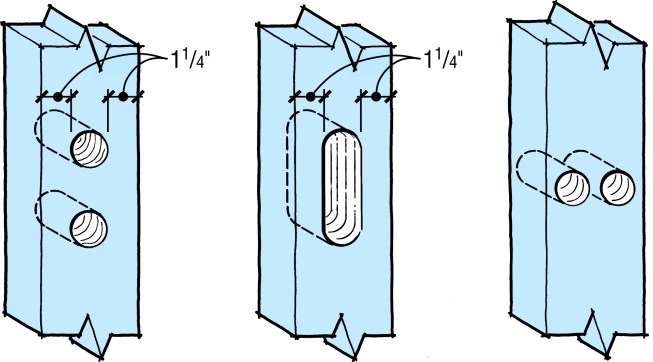
If multiple holes are needed, bore holes along the centerline of the stud. Boring holes side-by-side weakens the stud and requires steel protection plates on both faces.
Running Cable
Romex must be stapled at least every 41/2 ft. and within 12 in. of a box with clamps or a connector, or within 8 in. of a nonmetallic box that requires no connector or clamps (Figure A). Cables that are run through holes in wood or metal framing members are considered supported. Cables passing through holes or stapled along studs and joists must not be closer than 11/4 in. to the face of the framing unless they are protected from nails and screws by a steel plate (minimum 1/16 in. thick), such as a junction box cover (Figure F). Be sure to recess the plate so it is flush with the face of the stud; otherwise, it will cause the wallboard to bulge. This can be especially noticeable along the floor where the protective plate may not allow the baseboard to sit flat against the wall.
Type AC cable (BX) is stapled or fastened at the same intervals as NM (Romex). If BX is run through metal studs, no protective bushings are required (but may make installation easier).
EMT (Thinwall®) in sizes up to 11/4 in. can be bent by hand. Although its walls can easily crush and flatten if not supported while it is bent, a properly sized EMT bender will hold the conduit’s shape as it is formed into the required angle. EMT must be fastened every 10 ft. and within 3 ft. of any box or fixture. This type of raceway is bent into a precise sequence of offsets, kicks, and saddles, using bends of 90 degrees and less to conform to the structure and planes along which it is installed.
EMT in sizes larger than 11/4 in. needs to be bent with a hydraulic bender, although it is possible to purchase 90-degree elbows.
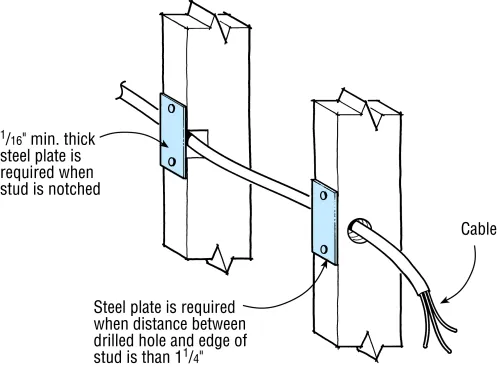
Steel plating at least 1/16 in. thick is required as follows: where studs are notched; where the clearance between the edge of the drilled hole and the face of the stud is less than 1 1/4 in.; or where the wiring has to be routed around roughed-in plumbing, duct work, or other obstructions and the 1 1/4-in. clearance cannot be maintained.
Splices
Any wire-to-wire connections or splices must occur in an approved electrical box that remains accessible when construction is complete. All such connections must be made with approved fittings, such as wire nuts (soldering is also allowed). When using wire nuts, it’s advisable to twist the wires together first, and then twist the nuts as tightly as possible.


