Terry Nordbye
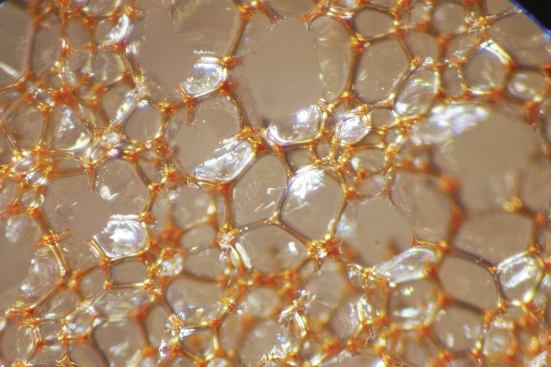
The gas-filled bubbles that give foam its cellular structure are…
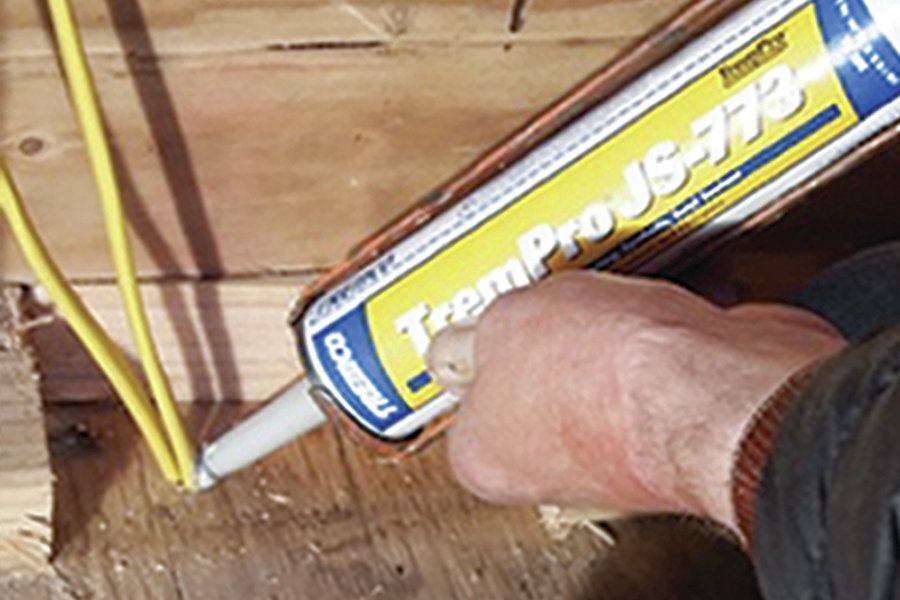
When it comes to air-sealing, canned spray foam is often seen as the perfect material for plugging medium-sized holes and gaps, mostly because it’s inexpensive and easy to apply. I’ve used a lot of canned foam for air-sealing over the years, and I even wrote a JLC article that described some of my methods for working with it and other sealants (“Air-Sealing Tips and Tricks,” 1/12).
But as time passed, I began to have questions about canned foam’s durability. I noticed in particular that pipes and wires would often break loose from the surrounding foam. I dissected foam samples and studied the material’s fragile structure under a microscope. My conclusion is that air-sealing a building with canned foam may provide an initially low blower-door number — but that number may not hold up in the longer term.
I now equate using foam for air-sealing with the now-discredited practice of sealing ducts with duct tape: It builds future air leaks into the system. And because air-sealing is often deeply buried, failed air-sealing will go on leaking for decades. I’d rather do the job just once and use the longest-lasting materials available.
Finding the Best Caulk
Because it’s somewhat flexible, caulk is a better bet for long-term air-sealing than canned foam. In theory it should be better able to resist the stresses of thermal expansion and contraction, structural settling, lumber shrinkage, and — in my seismically active neighborhood — the odd sharp shake from an earthquake.
But because I couldn’t find any good data on which caulks perform best in air-sealing applications, I decided to do some rough-and-ready materials tests of my own. The testing I was able to do was necessarily limited, and I didn’t have access to a Consumer Reports–style laboratory. But in many ways, that was best: The test procedures I used closely reflect actual job-site conditions in my area.
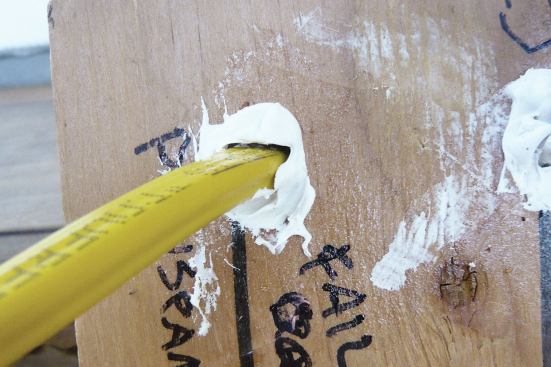
Setting up the test boards. I chose to test the caulks and sealants on simulated wire penetrations, because they typically represent a worst-case situation for air-sealing. Wiring is often foamed or caulked after the boxes have been roughed in, but before the electrician has made the connections at the switches and receptacles. When those final connections are made, there’s always a lot of bending and yanking on the cable, which puts a lot of stress on the sealant, especially if it’s close to the box. I already knew that canned foam won’t remain intact under that kind of treatment, so I didn’t include it in my tests.
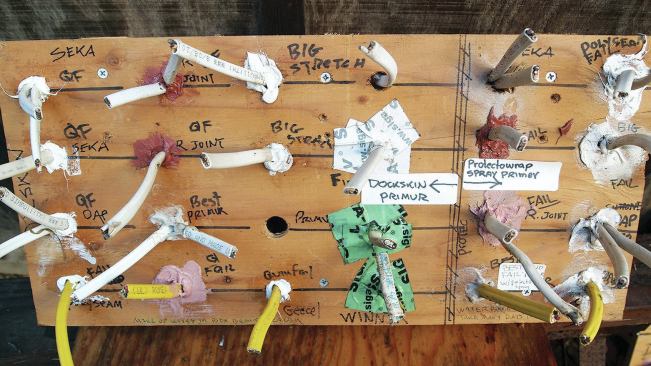
I set up my test boards with #12 and #14 Romex cable passing through 5/8- and 3/4-inch holes in 1/2-inch plywood, fixing the wiring in place by stapling it to scraps of framing lumber screwed to the backs of the test boards. I then caulked around the wires, with most caulks applied to several different holes, and let the samples set up indoors for 48 hours. Conditions during curing were the same for all the caulks and were typical of this area — sunny, dry, 70°F days and damp, cool nights.
Once the samples had cured, I jiggled the Romex and bent it slightly (up to 45 degrees) right and left to simulate the kind of movement one would create when working a box with new or retrofit wiring.
Outcomes
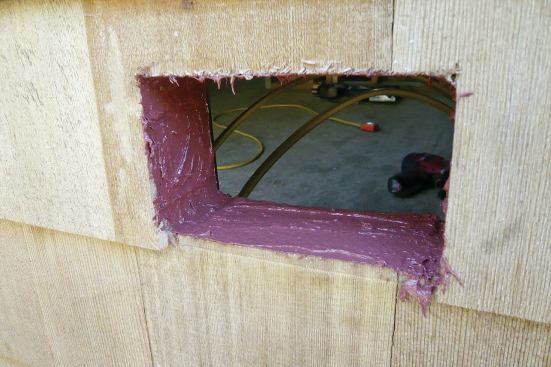
In evaluating the samples after working them, I looked for any visual separation of the caulk from the cable, or light leaking out around the hole. If that type of separation occurred more or less immediately, I recorded it as a “quick failure.” Failures that took place only after repeated manipulation of the wire were recorded as “numerous movement failures.” Some caulks failed because the material hadn’t fully set up within 48 hours, so I tested those products again with a longer setting time. I did not count any failures from improper set times. A complete breakdown of the results appears in the chart.
Do primers help? Out of curiosity, I repeated the initial tests with two manufactured primers — Siga’s Dockskin primer and ProtectoWrap spray-on primer. I applied each to the test boards as directed by the manufacturer. Although both products are formulated for use with the manufacturer’s own sealants, it’s not unusual for builders to combine different materials in the field, and I wanted to see if the primers would improve performance across the board.
The results suggest that mixing and matching primers and sealants usually doesn’t pay off. The Siga Dockskin primer made all connections worse, except in the case of Siga tape. (Siga tape sticks extremely well even without primer, but I would recommend using the Dockskin primer on concrete or any surface that is dirty, rough, or waxy.) The ProtectoWrap primer worked well with Siga’s Primur caulk but otherwise didn’t seem to affect adhesion one way or the other.
Slippery wiring. Most of the failures I observed in my tests were caused by the inability of the caulks to stick to the Romex cable. Speculating that this might be caused by their friction-reducing coating (designed to make it easier to pull wiring), I called Southwire — which manufactures Romex brand wire — to see what sort of solvent I could use to remove it.
The representative I spoke with wouldn’t provide that information, but after some trial-and-error I found that the anti-friction coating seemed to be soluble in denatured alcohol. After treating a section of the wire, I noticed that it felt appreciably less slick when I passed it through my fingers. I wondered if the alcohol might damage the vinyl cable sheathing itself, so I took the precaution of soaking a piece of Romex cable in a solution of denatured alcohol for two days to see what would happen. When I saw no change in the cable, I decided not to worry about it.
To see whether caulk would adhere better to sections of cable that had been spot-treated with alcohol, I made an additional test board and ran the flex tests again.
Adhesion did seem to improve slightly, but not enough to justify the effort of treating the cable, which would be difficult and time-consuming to do on the job site.
The Bottom Line
I didn’t try every caulk on the market, but my testing program did convince me that any caulk will fail if it’s stressed before being fully cured. Depending on thickness and weather conditions, a 3/8-inch-thick blob of caulk can take many days to set.
The clear winner in my tests was the Swiss-made Siga tapes. (Other European-made tapes designed specifically for air-sealing are beginning to appear on the market, but I wasn’t able to test them.) Tape has the huge benefit of sealing on contact without any curing time, and it remains flexible indefinitely. No matter how much I flexed the wires on my test boards, the tape seals remained undamaged.
I’m convinced. Going forward, I’ll try to eliminate canned foam altogether, and use a reliable caulk where necessary. But wherever possible, I’ll rely on tape for my primary air-seal.
Terry Nordbye is a building contractor in Point Reyes Station, Calif.
Terry Nordbye
To prevent air from leaking into penetrations along the planes o…
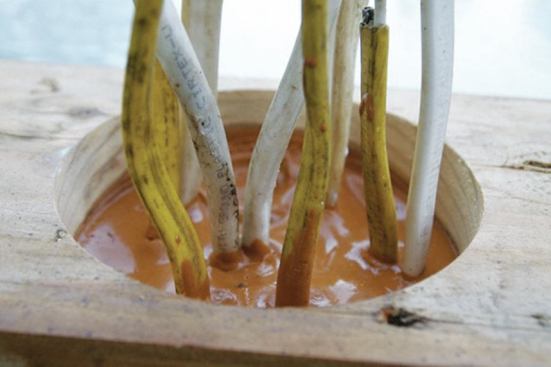
Foam-Free Test Case
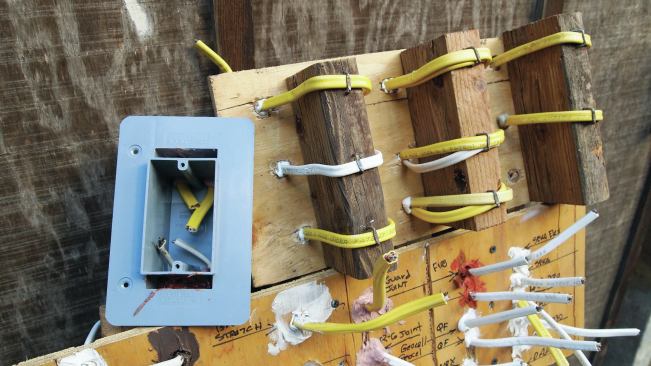
Soon after performing the caulk and sealant tests described here, I was hired to do the air-sealing on a new 1,500-square-foot residence, which I decided to make into a test case for foam-free air-sealing. As part of the process, I took pains to seal all air-leakage pathways, not just the obvious ones.
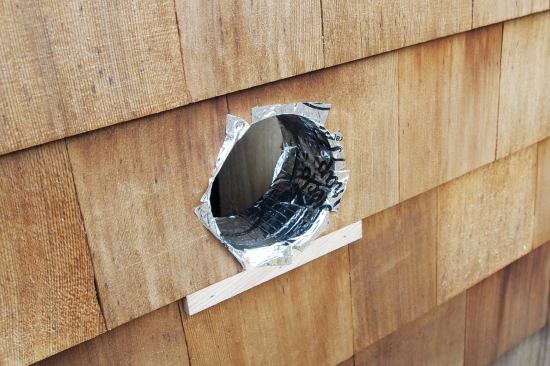
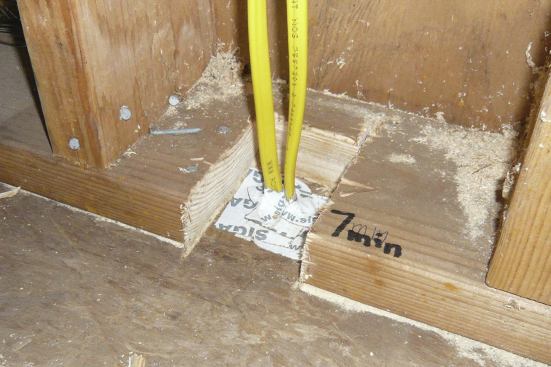
The exterior wall, for example, consisted of half-inch plywood over the framing, followed by two layers of taped polyiso board, an additional plywood nailing base, and cedar shingles. To prevent air from leaking into penetrations along the planes of those varied layers, I sealed edges with Prosoco R-Guard Joint & Seam Filleror tape. After the plumber, electrician, and sprinkler installer had finished making holes in the shell, a helper and I spent two full days sealing the wire and pipe penetrations with more caulk and tape. To prevent air from leaking between the subflooring and the bottom plate, we used a Sawzall to expose the holes in the subfloor, then sealed the pipe or wiring with tape. As a reference for future estimates, I timed how long it took to seal each penetration; dealing with the pair of wires pictured here — including cutting the plate — took seven minutes.
It’s best to have the electrician drill individual holes for each wire wherever possible, since single wires are much easier to tape-seal than holes with multiple wires. Where closely spaced wire penetrations are unavoidable, another option is something I call “puddle sealing,” which I first saw on a tour of a European Passive House. This involves using a 4-inch hole saw to make a hole in the bottom plate where multiple wires will run through the subfloor, and pouring a fluid sealant around them. My preferred material for this is Prosoco R-Guard Cat 5, which is much more liquid than the company’s Joint & Seam Filler. The advantage to this approach is that is simplifies communication with the electrician — the plate openings provide well-defined wiring zones that are hard to overlook.


