In the Ocean State — where wind-swept rains aren’t restricted to nor’easters, tropical storms, and hurricanes — I count on a vented rain screen coupled with carefully detailed flashings to keep water out of walls.
A rain screen is a cladding system with a vent space (or a series of vent channels) between the back side of the cladding and the weather-resistive barrier. Openings along the top and bottom of the vent space let air flow freely. This vent space provides a channel for any water that gets past the cladding surface to drain out, and the air flowing through this space carries away moisture vapor that dries off the back side of the siding. In both instances, the vent space reduces the chance of water and moisture vapor being driven into the wall cavity by wind or sunshine.
Installing any cladding as a vented rain screen is the best way to make the cladding last. However, it’s easier to do with lap sidings than with shingles. Lap siding, such as cedar clapboard and fiber-cement planks, easily bridges air channels between vertical furring strips nailed over studs. But a vented rain screen with sidewall shingles requires horizontal furring, which presents some complications.
Rain-Screen Options
I’ve built cedar-shingle rain-screen sidings in three ways. The differences mostly involve the material that forms the vent space, but this inevitably affects other details as well.
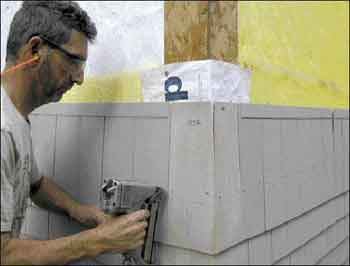
Vented furring strips. The first time I built a cedar-shingle vented rain screen, I laid shingles over a series of back-kerfed 1×3 furring strips (Figure 1). These back kerfs are essential for allowing drainage and airflow between the horizontal strips, but they take a considerable amount of cutting and time: I mounted a dado blade in a radial arm saw and cut 3/8- by 3/8-inch kerfs a few inches apart along what seemed like thousands of 12-footers. I then nailed the furring strips over the housewrapped wall sheathing, positioning each strip above every butt line on each course of shingles. The shingles went up fine, but I didn’t plan my window, door, and corner trim details very well. Shingle butts stood proud of some trim elements, and I cobbled together less-than-perfect solutions to mask other problems caused by the 3/4-inch furring thickness.
Figure 1. The author’s first experiences with venting shingles relied on back-kerfed 1×3 furring strips. These back kerfs are essential for allowing water to drain out and air to flow between the horizontal strips, but cutting the kerfs with a dado blade in a radial arm saw proved too labor intensive.
Fortunately, there are now a couple of commercial products available for creating vented rain screens with shingles. I’ve used both nylon spacer mats and plastic battens over the past few years and found advantages and disadvantages with each. I also worked out details for windows, doors, and trim for these rain-screen systems, as described below.
Spacer mat. Home Slicker by Benjamin Obdyke is the best-known spacer mat available. It’s marketed specifically for use with sidewall shingles and lap siding, though other companies make similar products for EIFS and masonry walls that will also work with shingles (see “Resources,”). Home Slicker is a corrugated matrix of nylon strands about 3/8 inch thick that comes in approximately 40-inch-wide rolls. It gets applied with staples or cap nails over housewrapped walls, and the matrix compresses a little when the shingles are installed on top, leaving an effective 1/4-inch air space. The corrugations should be oriented vertically for the best drainage and airflow, and the edges of the mat should not be overlapped.
A spacer mat such as Home Slicker goes up quickly with no special layout, creating a 1/4-inch ventilation gap behind shingles. It is important to cut Home Slicker close to trim such as window casing and corner boards: If you leave a space wider than about 3/4 inch, the unsupported shingle edge is likely to split.
On the plus side, Home Slicker is only 1/4 inch thick — not nearly the 3/4 inch my furring strips padded out the shingles. The butt lines of each shingle course laid over Home Slicker flush out with 5/4-inch corner boards applied directly over the housewrap. And the butt lines come close to, but not past, most flanged window jambs. The sheets go up quickly with no special layout, but it is important to cut Home Slicker close to trim such as window casing and corner boards. If you leave a wide space (3/4 inch or more), the unsupported shingle edge is likely to split.
On the downside, fastening shingles over Home Slicker takes a deft hand. The bottom few shingle courses are the hardest to install. The matrix is spongy, so hand-driving nails is a challenge, and pneumatically driven staples or nails easily overdrive even with the air pressure set low. You’ll end up splitting more shingles in the first two rows than on the rest of the wall. Subsequent courses are supported by the shingles beneath, so the going gets a little easier. There’s a noticeable cushioning of hammer blows when hand-driving nails into shingles applied over Home Slicker. The bounce makes it hard to start nails in the shingles. You must also use fasteners long enough to pass through the vent space and penetrate all the way through the sheathing.
Plastic battens. Corrugated plastic battens offer a good alternative to my furring-strip rain screen. These have hollow channels that let water and air flow through them (Figure 2).
The only ones I’ve found marketed specifically for shingle installation are those from DCI Products — CedarVent and RafterVent — but similar products are available (see “Resources”). Standard CedarVent comes in strips 3 feet long. The four-ply version is 3/4 inch thick by 2 3/4 inches wide. But a two-ply version that’s just 3/8 inch thick (my preference) and a three-ply version that’s 9/16 inch thick are also available. While 1 1/2-inch-wide strips can be special ordered, I typically just rip the two-ply version in half (from 2 3/4 inches down to 1 3/8 inches) to save material and expose more of the shingle back to the air. CedarVent is wrapped with a thin fabric to keep insects out, so it’s great along the undercourse at the bottom of the wall and last course at the top. RafterVent can be used instead of CedarVent in the field of the wall. It’s essentially CedarVent without the fabric wrap.
Battens require precise placement, so they aren’t as fast to install as spacer mats, but they do provide solid support for nailing. I lay out a story pole for shingle course exposure and use it to mark locations for the battens. After I transfer these layout marks onto window and door trim and corner boards, I snap chalk lines on the housewrap between my marks. The battens get applied above the lines. Since shingles are nailed about 1 inch above the butt line of the overlapping course, the battens are positioned perfectly behind the nail line. Extra battens are needed under windowsills and horizontal band- board trim elements to support the top edges of the shingles.
Figure 2. Plastic battens have hollow channels that let water and air flow through them. Shown here is the two-ply version of CedarVent, which the author rips to 13/8 inches wide to save material and expose more of the shingle back to air.
Other than selecting longer fasteners, there’s no special precaution to applying shingles over battens.
Trim Details
The devil is always in the details. Corner boards, woven corners, window and door trim, band boards, and other trim elements must be planned to account for the extra thickness of the rain-screen “sandwich.” I address some of the challenges this presents here, but this is by no means an exhaustive list. It will, however, give you a foundation to come up with your own solutions for those yet-to-be-encountered trouble spots.
Pests and nests. Wasps and hornets love to make nests in rain-screen spaces, so along the bottom (intake) vent slot and the top (exhaust) vent slot you need to block bug entry. Simple strips of insect screen wrapped around the edge of spacer mat or battens are all you need. Slicker Screen is a companion to Home Slicker, and DCI’s CedarVent already has an insect-blocking fabric covering. When I’m not using those products, I staple 3- or 4-inch-wide screen to the bottom edge of the wall before installing battens or spacer mat (Figure 3). After the vent material is applied, I wrap the screen onto the face and staple it in place. Once the trim or shingles are applied, the screen is trapped securely.
Figure 3. Wasps and hornets love to build their nests in the vent space of any rain screen, so exposed edges (at the bottom and top of walls and over windows and doors) must be protected with screening.
Weaving shingle corners. Hand-weaving outside and inside corners over Home Slicker is a challenge. The shingles drift a little when planning, because the fastener shanks flex in the air space and the sponginess of the matrix makes it hard to keep the shingles from moving around. Rather than get frustrated, I avoid the issue by wrapping outside and inside building corners with 6-inch strips of 1/4-inch plywood. The plywood gives solid support for fastening and provides crisp lines to plane the shingle edges to. For extra weather resistance, I staple 16- to 24-inch-wide strips of housewrap or building paper over these plywood backing strips, letting it lap over the edges of the Home Slicker.
SHINGLE SPECS Fastener selection: Use hot-dip galvanized, stainless steel, or aluminum — not electrogalvanized — fasteners, especially in coastal areas. I prefer stainless staples or nails for the best performance, and they eliminate the chances of streaking. Staples (16 gauge with 7/16-inch to 1/2-inch crown) and nails (box type with blunt points) are both acceptable. The fastener must penetrate through the shingles, vent space, and all the way through the sheathing. Fastener location: Place two fasteners per shingle about 1 inch above the overlying course line and 3/4 inch in from each edge. If the shingles are wider than 10 inches (Cedar Shake & Shingle Bureau) or 8 inches (IRC), apply an additional pair of fasteners spaced 1 inch apart near the middle of the shingle. Orient the pair of fasteners so the 1-inch space between them is not within 1 1/2 inches of a shingle joint below. Keyway spacing: When shingles are wet or green when applied to the wall, it’s okay to butt the shingles edges together. Dry shingles must be spaced apart to prevent buckling when they absorb moisture and swell. As a rule of thumb, I space shingles up to 6 inches wide with a 1/8-inch keyway. I space shingles that are between 6 and 9 inches wide 3/16 inch apart. I space shingles wider than 9 inches 1/4 inch apart. Joint offset: Joints in successive shingle courses must be offset by a minimum of 11/2 inches (IRC and CSSB). Keep in mind that if there are any defects in the top lap of a shingle, you should space joints 11/2 inches away from the defect. — M.G. |
Plastic battens don’t pose the same trouble because they’re more stable. I run the battens around the corner and weave the corners like normal. The only tricky part is starting the first two courses at the bottom; but once they are secured, the rest of the corner shingles go fine.
Corner boards. Ideally, corner boards and other trim elements should be applied over the rain-screen space. They benefit from the drainage and “back-venting” just like the shingles. Plus, installing the trim over the vent material keeps it in the same plane as the shingles. However, this is practical only over battens. Over the less stable spacer mats, the corner boards are hard to line up.
One way to deal with this is to apply 1/4-inch plywood or OSB spacers to the building corner, which provides solid nailing and a vent space (Figure 4). I use 4-inch-wide plywood or OSB spacers positioned 12 to 24 inches apart up both sides of each building corner. I cut the block width 1/2 inch greater than the corner-board width and snap vertical plumb chalk lines over the blocks that give me a reference for aligning the corner boards. These spacer blocks are easier to install before the matrix mat is installed. There’s no need to cut the mats around the blocks either — just trim at the outside edge.
Figure 4. Corner boards should be applied over a rain screen just like the siding. While this is relatively easy with battens, installing trim over a spacer mat is more difficult because the pliable mat doesn’t provide a stable nailing base. To make it easier, the author installs 1/4-inch OSB spacers to the building corner before the matrix mat is installed.
Horizontal band boards or skirt boards present a similar challenge. I treat them the same as corner boards. With battens, I run one strip at the bottom and one at the top, which is placed so half the batten supports the top edge of the board and the other half is exposed to support the first course of shingles. When using spacer mats, I install blocking as a base for the band boards, just like the corner boards (Figure 5, page 5).
Figure 5. Skirt boards over a spacer mat also get 1/4-inch plywood or OSB blocks (far left), while battens are simply spaced so half the batten is above the top edge of the skirt board (left). In both cases, a drip cap flashing must be installed over the horizontal trim board, but this flashing should not extend to the sheathing so it will not disrupt airflow.
Regardless of the material used to create the vent space, you still need to install drip cap flashing over horizontal trim. But don’t run the drip cap all the way to the wall sheathing over the band boards. Doing so will break the continuity of the airflow. Instead, treat the cap flashing like a Z flashing, as shown in Figure 5. Its main function is to redirect water that enters at the siding/trim joint back out and protect the top edge of the band board. Run the “wall” leg of the flashing over the face of the rain screen so air can freely flow from intake to exhaust.
Windows and doors. Over windows and doors, the flashing practice is different. Run cap flashings all the way to the wall sheathing and integrate with the housewrap (Figure 6). Any water draining in the vent space will drain out over the drip cap. Be sure to leave a 3/8-inch air space between the bottom of the shingles and the cap flashing for air circulation. And remember to provide insect screens on the rain-screen material.
Figure 6. The best way to handle the exterior trim is to mount the window flange on furring strips (far left). The alternative is to fur out for the window trim after the window is installed (left), which works with a 1/4-inch to 3/8-inch spacer material.
Keeping the vent space thickness down to 1/4 to 3/8 inch doesn’t pose much of a problem. However, if thicker drainage mats or battens are used (3/4 inch, for instance), the windows and doors will need to be padded out. The simplest fix is to mount spacer blocks around the rough openings that equal the thickness of whatever spacer material you’re using. Some builders don’t like this solution because it requires extension jambs to pad the window and door jambs flush with drywall on the inside. But if you’re framing 2×6 walls, or using windows with 2 1/4-inch-deep jambs in a 2×4 wall, then you’re ripping extension jambs anyway, so there’s no extra labor and minimal materials.
Bark Side: Face In or Face Out? While most red cedar shingles are milled vertical grain, white cedar shingles are usually cut flat grained. Many installers like to face the shingles “bark-side out” hoping that the shingles will be less likely to curl at the outside edges and stay flat on the wall. Checking every shingle’s growth rings is an extra time-consuming step, though, and I’ve given up on the practice. Although I don’t have a study to back up my position, I’ve noticed that I end up with many fewer curled shingles since I began applying them over vented rain screens. I speculate that shingle curling has more to do with the concentration of moisture inside a shingle than with the ring orientation. Shingles will tend to curl toward the “dry side.” When shingles are applied directly over a sheathed wall, the sun will drive moisture toward the back (cooler) surface. Shingles applied over a rain-screen space will be able to dry more readily, reducing the excess moisture built up on the back surface and thereby reducing curling. — M.G. |
Exhaust-Vent Detailing
Don’t forget to provide a route for the rain-screen vent space to exhaust along the top. I’ve used two different details:
Frieze-board vents require only a little advance planning and can be incorporated after the soffit board has been installed. Leave a 1/2-inch space between the last batten and the soffit board, and cut the top of the shingles about 1/2 inch short of the soffit as well (Figure 7). Then use blocks approximately 3/8 inch thick to space the frieze board off the surface of the shingles. In order to keep the frieze plumb, I rip tapered blocks to apply over the shingles at 16-inch centers. Air flows freely between the rain-screen space and the space behind the frieze.
Figure 7. The vent space in a rain screen needs an air exhaust along the top. This can be detailed in two ways: (1) by venting the space into the soffit (above left), or (2) by using a vented frieze board (above right).
Vented soffit. With a little more planning, you can eliminate these tapered spacers, and just let the rain screen exhaust into a vented soffit. Cut the soffit board 1/2 to 3/4 inch narrower than the fascia-to-wall dimension, so there’s a gap between the back edge of the soffit board and the wall sheathing. This allows you to run the rain-screen material right up to the soffit space, and the frieze board will conceal the gap. Air can then flow freely from the rain-screen vent space and into the soffit. ~
Mike Guertin (www.mikeguertin.com) is a custom home builder and remodeler in East Greenwich, R.I., and a member of the JLC Live Construction Demonstration Team leading sidewall shingling workshops. All photos by the author. Illustrations by Chuck Lockhart.
RESOURCES Spacer Mats Enkamat, www.colbond-usa.com Home Slicker, www.benjaminobdyke.com Waterway, www.stucoflex.com Plastic Battens Battens Plus, www.battensplus.com Cor-A-Vent, www.cor-a-vent.com CedarVent & RafterVent, www.dciproducts.com/html/cedarvent.htm |


