I have worked in the construction industry for 40 years, in several regions of the country. During my career, I have sometimes worked with a crew, and sometimes without. For the past 13 years, I have been in Maine, and for that time, I have worked alone, apart from an occasional helper. I also farm part-time; working solo means that I can stay with a sick animal in the morning without worrying about an employee needing guidance on a jobsite.
Working single-handed also means that I tend to take on smaller projects that let me get in and out in a week or less. Once in a while, however, a project comes along that I can’t resist, even though it will take a longer commitment.
The project described in this article is one of those exceptions. I have been installing Endless Pools around the state of Maine since 2005. Recently, I met with a customer who had a more extensive vision than I was expecting. Besides the pool, the customer wanted a large deck with an outdoor kitchen, plus a lower patio area with stone paving and a fire pit.
The real challenge: She wanted to use the outdoor pool year-round in central Maine. I knew that there are rolling, telescoping covers for such an application, but I had never seen or installed one. After shopping around, I chose a shelter that is manufactured in the Czech Republic and supplied in the U.S. by Pool and Spa Enclosures (based in Monmouth, N.J.). Once I had selected a model whose dimensions matched the proposed pool, we worked out the design details for the pool and deck. The client involved an architect, David Merritt, who was able to take her vision and my details and create some drawings that allowed all of us to see what we were talking about. The local building official approved the plans, and I began the project.
FOUNDATION WORK
My plan was to create a small “basement” around the 10-by-15-foot Endless Pool. This would have the same dimensions as the retractable enclosure. I would insulate both the pool walls and the “basement” wall, to try to conserve heat in the pool water and the enclosure air space.
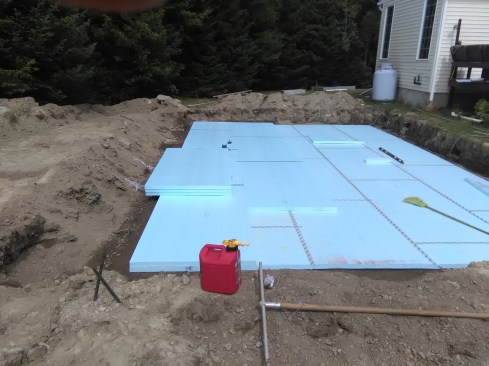
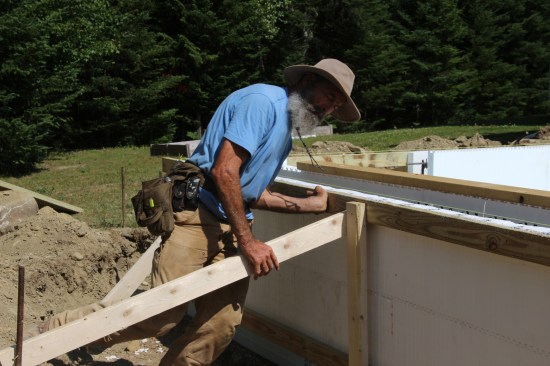
I taped the XPS panels together using the manufacturer’s specified tape
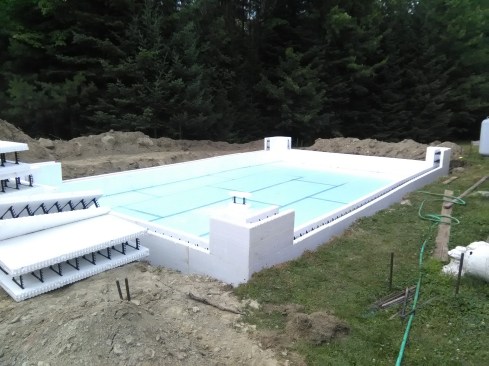
I decided to “glue” the bottom course of ICF directly to the XPS using spray foam.
To match the existing deck and door heights to the 54-inch height of the pool wall, I would have to excavate about 30 inches. This would allow for the 12 inches of compacted stone, 4 inches of extruded polystyrene (XPS), and 4 inches of concrete that the pool would rest on. I decided to use my compact Kubota farm tractor, which has a backhoe. I excavated about 50 yards of soil to create the pit I needed, then I put in about 30 yards of compacted stone before setting the sub-slab insulation foam and the ICF stem walls.
I set out one layer of XPS on the compacted stone. I taped the XPS panels together using the manufacturer’s specified tape. For the second layer, I offset the joints in both directions. I decided to “glue” the bottom course of ICF directly to the XPS using spray foam. Once the ICFs had been set, I placed and tied off the steel. I bent 4-foot lengths of rebar into equal legs perpendicular to each other and poked these into the ICFs from inside the space and then tied them to the slab rebar with the appropriate overlap.
Once the ICFs had been set, I placed and tied off the steel.
The 2x4s, placed inside and out, protected the top edge of the form from damage during the pour. I then ran a diagonal brace off the outside 2×4 about every 4 feet to a form stake driven in the ground.
The next step was to brace the forms so that they wouldn’t move during the pour. Even though I was just two courses high, I didn’t want any surprises. I screwed 2x4s flush to the top edge of the ICFs, attaching to the integral plastic brackets embedded in the forms. The 2x4s, placed inside and out, protected the top edge of the form from damage during the pour. I then ran a diagonal brace off the outside 2×4 about every 4 feet to a form stake driven in the ground.
The last step was to put any necessary penetrations and sleeves through the forms. I ran conduit to the adjacent house basement so that electrical from the house electrical panel could be run into the pool basement area. I also ran sleeves that could accommodate water and gas into the basement, to allow for possible future needs. At one end of the basement, I left out a 41-inch section of ICF block. I screwed one 38-inch-tall treated 2×12 to either side of the space created by the missing block section. These 2x12s served as jambs, creating a doorway to the basement space. All of the mechanical equipment for the pool would be placed on the doorway end of the basement.
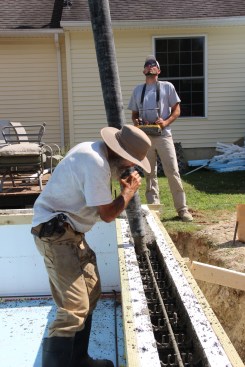
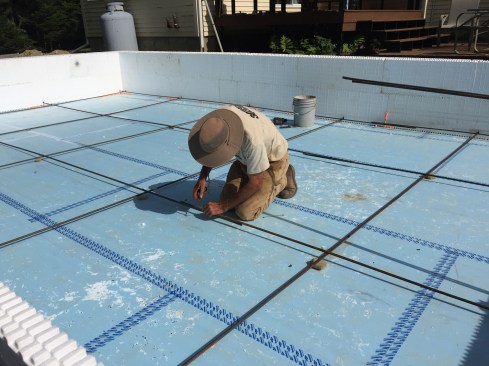
When the day came to pour the slab and walls, I did have a helper, and I was glad for it. We went around the walls in two lifts.
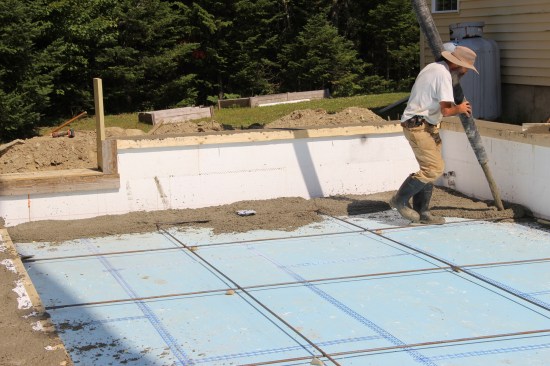
With the slab, I went around the edge and placed a foot-wide ledge of concrete before filling in the rest.
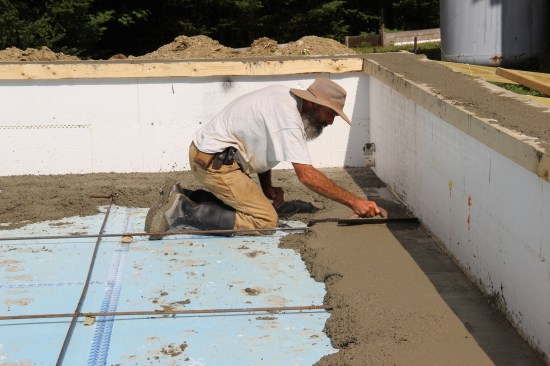
I troweled the ledge even with the level line I had snapped around the ICF perimeter.
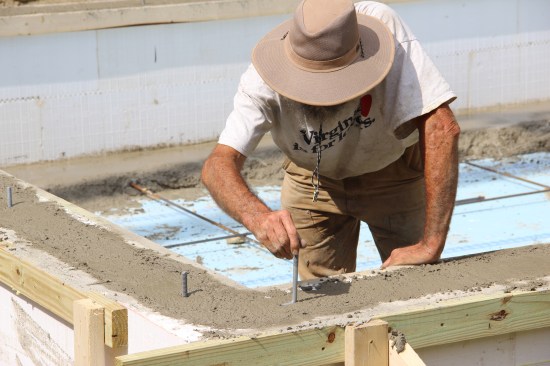
My helper took care of tamping the walls (our version of a vibrator), and together we placed the anchor bolts.
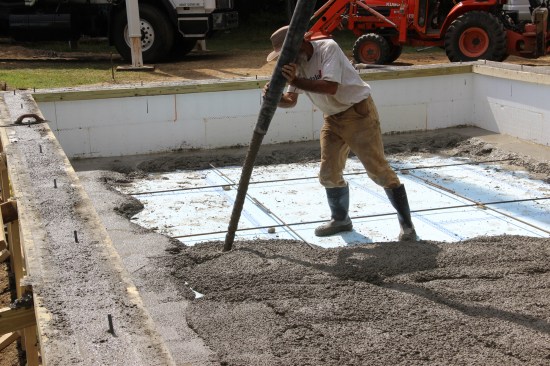
When the day came to pour the slab and walls, I did have a helper, and I was glad for it. We went around the walls in two lifts, and then got to the slab. I guided the pump hose for both parts of the pour. My helper took care of tamping the walls (our version of a vibrator), and together we placed the anchor bolts. With the slab, I went around the edge and placed a foot-wide ledge of concrete before filling in the rest of the slab, troweling the ledge even with the level line I had snapped around the ICF perimeter. When this ledge stiffened up a little, it gave us a surface to guide our screed board, and we poured and struck off the rest of the slab. I sent the pump truck on its way and started to bull-float the surface. By the time I was done, there wasn’t much light left in the day.
When this ledge stiffened up a little, it gave us a surface to guide our screed board.
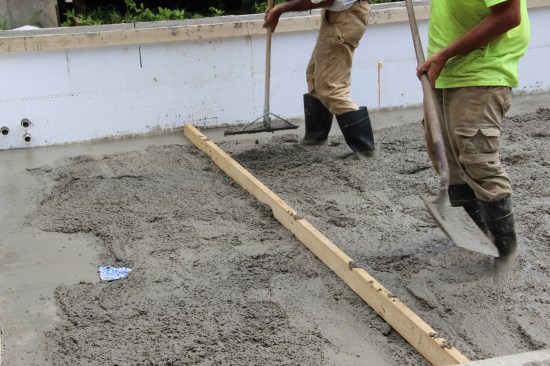
Then we poured and struck off the rest of the slab.

I sent the pump truck on its way and started to bull-float the surface.
ASSEMBLING THE POOL
With the insulated foundation slab and walls ready, I had the pool panels delivered and laid them out around the foundation wall perimeter. The top edge of the pool would sit up above the insulated foundation, at about the same grade as the home’s existing deck, and I would have to build short cripple walls on top of the foundation to support the new joists for the extended deck that would eventually surround the new pool. But at this point, I held off on this framing step, aside from capping the concrete wall with a treated-wood 2×12 sill plate. Once the pool panels were installed, I would have the exact height in front of me that the small cripple wall would need to be.
With the insulated foundation slab and walls ready, I had the pool panels delivered.
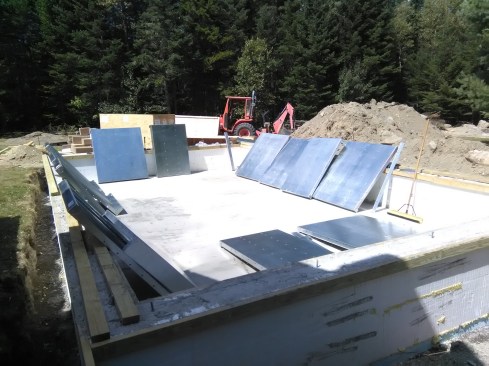
I laid them out around the foundation wall perimeter.
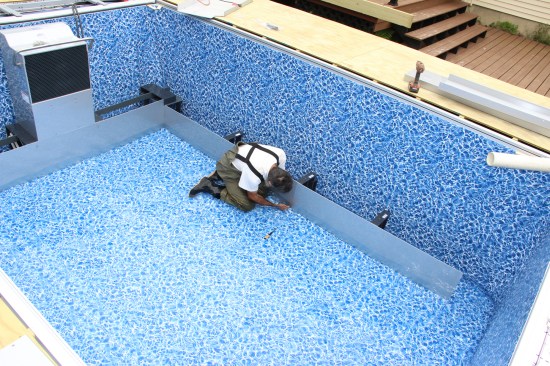
The galvanized-steel pool-panel sections bolt together. Once the panels are bolted together, steel channel sections slip over each side, stiffening the pool wall and limiting the amount of deflection the wall will experience when the pool is full, with a volume of water 51 inches deep pushing outward.
This particular pool is equipped with an automatic below-deck security cover. With the cover in place, the pool is secure and considered by code to be as inaccessible as if a chain-link fence were set up around the pool. The cover is opened and closed by a hydraulic motor. The extruded aluminum frame for this cover has a groove that serves as the liner hanger for the pool. Once the cover was operational, I was ready to install the vinyl liner.
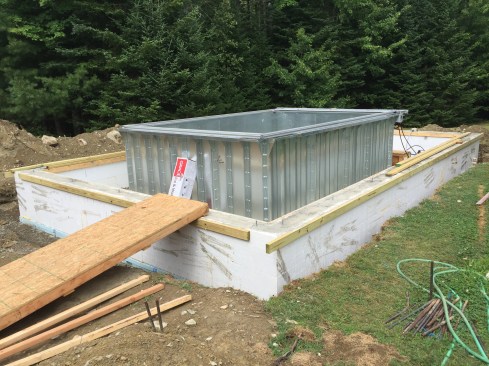
The galvanized-steel pool-panel sections bolt together.
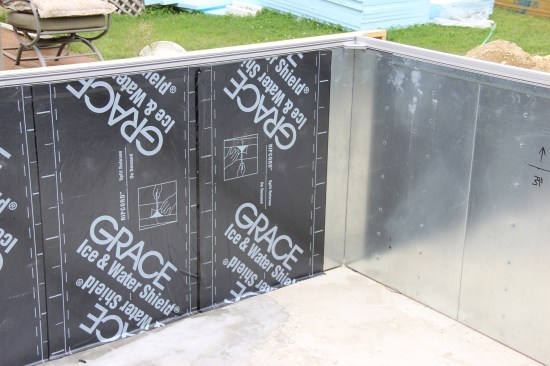
I installed a layer of Grace Ice and Water Shield on the pool panel walls before I set the liner.
When I do a pool, I add one more step that isn’t specified by Endless Pools. I have found that moisture frequently gets trapped between the outside of the liner and the inside of the steel pool panel. This may lead to some corrosion on the steel pool wall. In order to eliminate that risk, I install a layer of Grace Ice and Water Shield on the pool panel walls before I set the liner, or I paint the wall with Sherwin-Williams Macropoxy coating. I have talked to other installers from around the country, and this corrosion seems much less common in drier climates. But in Maine, waterproofing the galvanized panels is cheap insurance.
Before the liner is slipped into the groove in the cover extrusion, a thin layer of foam underlayment is glued to the slab with contact adhesive, and foam corners are glued into each corner where two pool panels meet. The foam corners create softer corners.

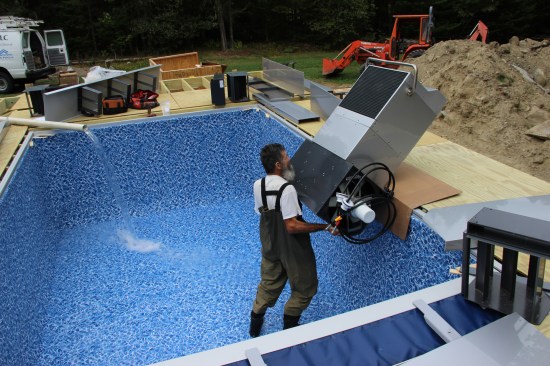
With the liner placed, I start filling the pool with a few inches of water. For this job, I trucked in 4,800 gallons of water.
The next step is to place the liner in the groove, working my way around the perimeter of the pool. Often, I find that the liner needs to be stretched a bit (a heat gun helps). With the liner placed, I start filling the pool with a few inches of water. For this job, I trucked in 4,800 gallons of water —even before the drought that Maine experienced this year, the customer’s well would not have been up to the task. To avoid wrinkles, I feed the hose from a shop vacuum through a pool-wall penetration between the liner and the panel wall. The vacuum pulls the liner against the steel wall and floor, and I can slowly work the wrinkles out. Water pressure will eventually hold the liner in place and the vacuum hose can be removed.
The pool components now get placed inside the pool around the perimeter.
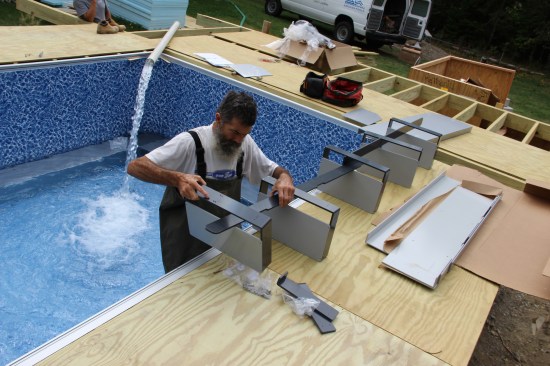
The pool components now get placed inside the pool around the perimeter. These components, when tied together and when the power unit is turned on, will create a loop current in the pool with a continuous flow. With the pump operating, you can swim for as long as you like in the same direction (thus the name “Endless Pool”). After these components are set, the water level can be raised until it reaches the through-wall penetrations required for any options the customer has chosen.
Outside the pool and generally attached to the “front” wall will be the water-quality system (a pump and possibly an optional ultraviolet filter), as well as the water heater and control unit that serves as the brains for the system. A hydraulic-power unit that spins a propeller to create the current inside the pool is also set up somewhere outside the pool. (This can be set in a separate area if the customer wishes. I have set it as far as 85 feet from a pool and run hydraulic hoses in a chase to poolside.)
The controller to the pool is supplied by a 30-amp GFCI-protected circuit, through a disconnect, usually set up within 5 feet of the power unit. In an outside setup like this one, the pool is generally heated by a separate propane or natural-gas heater, rather than the electric heater that comes as part of the control unit. With this pool, all of these components are set up in the basement area at the head of the pool and just inside the doorway. The gas heater is set up outside also, because with the vent installed, the assembly was too high to fit inside the basement area.
To use the pool, the swimmer starts the current and adjusts the rate of flow of the water out of the propulsion unit by means of a hand-held remote control (which is made to withstand moisture, so that it can be kept poolside). The user can dial the current up to a rate that most of us can’t swim against (there are also upgrades that allow for athletic training). Therapeutic jets, underwater lights, and several different water depths are additional options that a customer could choose.
BUILDING THE DECK
Once the pool was installed and functional, I moved on to framing the deck and placing the decking, so that I could get to the step I had been focused on since the start: installing the telescoping cover. I ordered the cover as soon as we were clear on the details, and it was delivered about 10 days before I was ready for it.
This turned out to be perfect timing. With the shelter and its track on hand, I was able to actually lay the track down, and the customer could consider different decking layout patterns before I started to screw down the material.
The customer chose DuraLife composite decking, which is made here in Maine out of wood fiber and recycled plastic bottles. We had considered a PVC deck, but the DuraLife had two advantages. For one, the plastic will not stain or discolor from pool chemicals or food spills the way some products do. Also, the golden-teak style the customer chose has a nice variability in color, giving it a more natural look than the some of the more uniform PVC decks that we considered.
BUILDING THE SHELTER
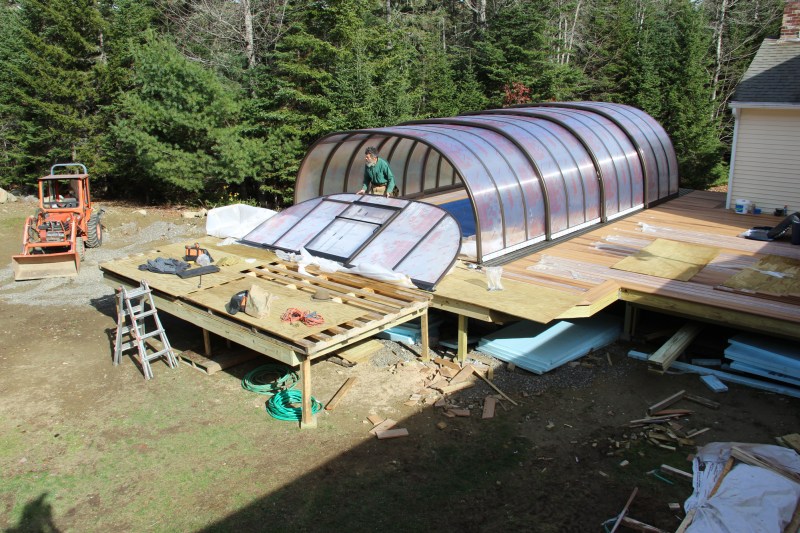
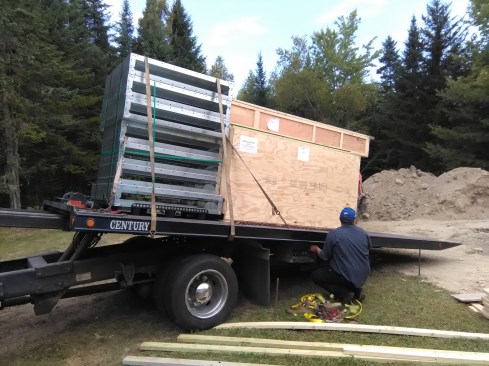
The telescoping shelter arrived at the jobsite in a 53-foot box trailer on an 8-by-19-foot shrink-wrapped pallet, with the components packaged by element and individually shrink-wrapped. I had a tilt-bed wrecker on hand to offload the pallet. The driver hooked his cable to the pallet and slid it onto the tilt bed, then drove to the pool area and offloaded it.
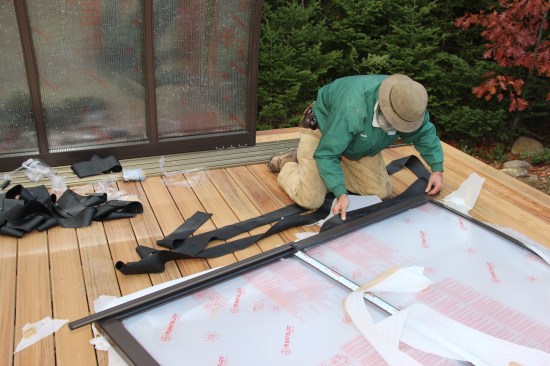
The sweeps and gaskets are substantial, and I expect the unit to perform well.
Once I had inventoried all the parts and pieces and set the track, I was ready to install the enclosure. I built an elevated, temporary platform adjacent to the deck, set slightly below the finished deck height so that the enclosure sections would offload from the pallet right onto the 1/2-inch plywood that I had placed temporarily to protect the finished decking. I called the wrecker back, and the driver pulled the pallet back onto his truck.
Next, I installed the retaining pins that hold each element in its closed position, and then I applied the ends.
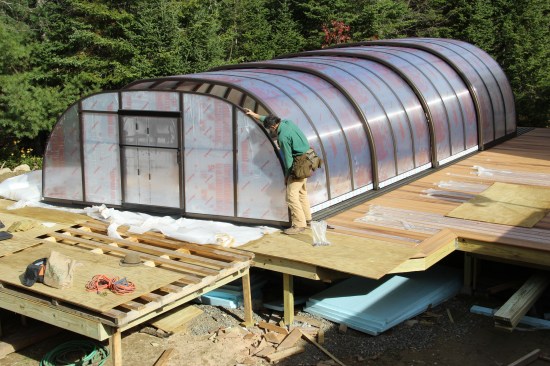
The tilt bed backed up to one end of the staging. I drove my Kubota to the opposite end and slowly dragged the one-ton pallet onto the staging. I removed the shrink wrap protecting the outer element, and slid it onto the plywood and then into the end of the track, slipping its four metal casters (two on each side) into the slots on the track. Walking from side to side, I worked the casters into the tracks. Once I had the technique figured out, the remaining three elements were unwrapped and installed in less than an hour. They operate very easily, and one person has no trouble advancing them on the track.
Once I had the technique figured out, the remaining three elements were unwrapped and installed in less than an hour. They operate very easily, and one person has no trouble advancing them on the track.
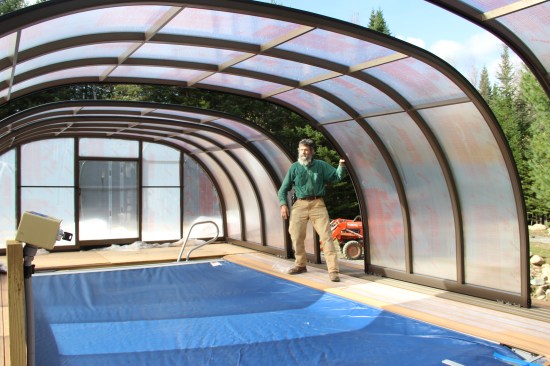
Next, I installed the retaining pins that hold each element in its closed position, and then I applied the ends. Everything was predrilled and fit perfectly. I am impressed with both the engineering and the finish of the product. The sweeps and gaskets are substantial, and I expect the unit to perform well. On a sunny day with November temperatures below 50°F, one needs to open a door or slide an element out of its closed position to not feel overheated. Even on a cloudy, cool day, the heat from the pool is captured and one can still be comfortable in shirtsleeves.
I had hoped I would have the enclosure in place before the snow came for the season, and I have done that. Once the hand railing, the steps, and the kitchen area are in place, I’ll leave this project until the spring, when the patio and fire pit can be completed.


