A few years ago, a client asked me to install an Endless Pool on a project I was working on for her. Much smaller than typical gunite concrete pools, Endless Pools feature a submerged, hydraulically-powered fan to create a current that allows you to swim in place instead of back and forth as in a lap pool. As I researched the modular-style pool she wanted, I decided to take advantage of the free training course the manufacturer offers at its Pennsylvania headquarters. When I contacted the company, I was asked if I was interested in becoming an approved installer; when they told me the company would send me leads to prequalified customers if I were, I said, “Yes.”
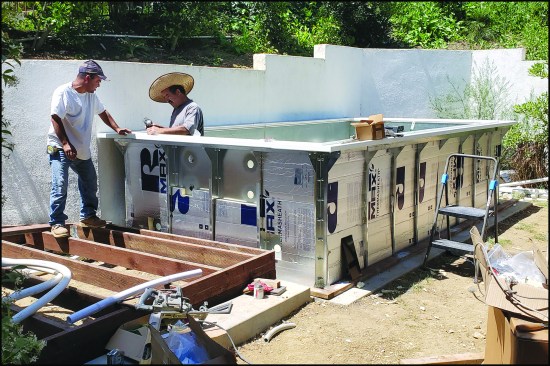
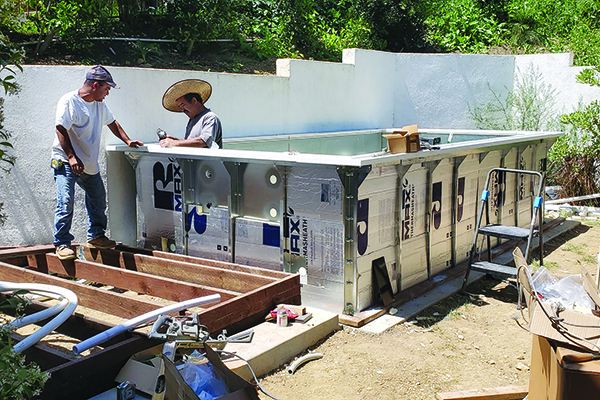
Figure 1. A work crew assembles a modular Endless Pool kit. The kit’s galvanized steel panels are bolted together, then insulated with rigid insulation.
Training
I attended the company’s three-day weekend course, which provided an overview of Endless Pools’ various product lines, assembly tips, and shipping requirements. It also included hands-on training, such as how to patch holes in the pool’s vinyl liner, and while it wasn’t particularly in-depth, I enjoyed the training as well as meeting the company’s representatives.
I’ve been a builder-remodeler in the Los Angeles area for 40 years, and my experience with lead-generation companies has been pretty so-so. The Endless Pools opportunity, however, is a more reasonable approach that eliminates cutthroat dealing with rival bidders and nearly impossible-to-hit response times to the leads.
Installing these pools has turned out to be a viable additional profit center for my remodeling business. Also, as I near retirement, the thought of working on smaller, more manageable projects has become increasingly appealing to me.
Endless Pool Options
The pools come in three basic types: the “original” Endless Pool, which is available in a variety of sizes and arrives on site as a modular kit that needs assembly; a preassembled, preplumbed “Endless Pool Fitness Systems” jacuzzi-style unit, which is an all-in-one spa and fitness pool; and the Fast Lane, a hydraulically powered fan unit retrofitted into an existing pool. In this article, I’ll mostly focus on installing a modular unit, and, to a lesser degree, a preassembled jacuzzi-style unit.
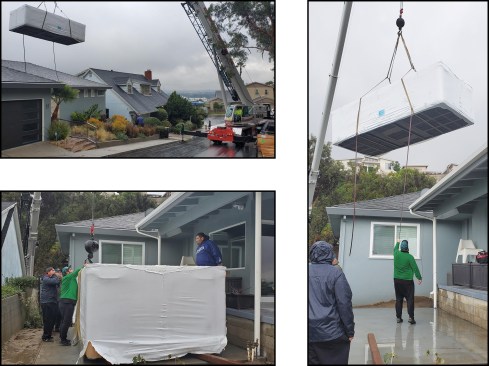
Figure 2. In the hilly Los Angeles neighborhoods where the author works, the lots are tight and preassembled units are often craned into place (top left). The rigging crew guides the unit onto the slab (right; bottom left).
There are three basic scenarios when it comes to the modular-style pool—above ground (as shown in Figure 1), partially in-ground, and fully in-ground. It has a few essential components: a remote hydraulic pump that needs 220-volt power; two hydraulic lines that conduct the hydraulic oil to and from the propulsion unit in the pool; the metal pool frame; the propulsion fan unit itself; a water-quality controller unit and filter; “benches” that serve as return channels to funnel the current from the back of the pool around to the propulsion unit; and a vinyl pool liner. Upgrade options include hydrotherapy jets, underwater treadmills, manually-operated or powered “security” covers, and LED lights. See illustration (Figure 9), below.
The manufacturer’s modular product line can be purchased in different sizes, from the smallest, 5-foot-square “therapy” pool (that you stand in and exercise against the current) to larger, 16-foot-square sizes with dual hydraulic fan units (sufficiently sized for a health club).
Support slabs. The pools can be installed on an existing slab, such as in a garage or basement, provided it is sufficiently strong to carry the weight of the pool, the water, and some people in the spa. Water weighs 8.34 pounds per gallon or approximately 62.42 pounds per cubic foot, so when dealing with pools, the weight can add up quickly. Endless Pools recommends allowing 75 pounds per square foot (psf) for each foot of the pool’s depth. So, for a 4-foot-deep pool, you would need to plan for 300 lb. psf. If the pool is, say, 7 feet by 14 feet (98 square feet), then the slab needs to be able to support 29,400 pounds, or approximately 15 tons (about the weight of four Chevy 3500 dually Silverados). So, when I install support slabs, I use plenty of rebar and 3,000-psi concrete.
Though I prefer to have an engineer design the slab (since they have the design experience and insurance), it is not a requirement in the jurisdictions I work in, as long as the soil conditions and designs will support the loads of the chosen pool.
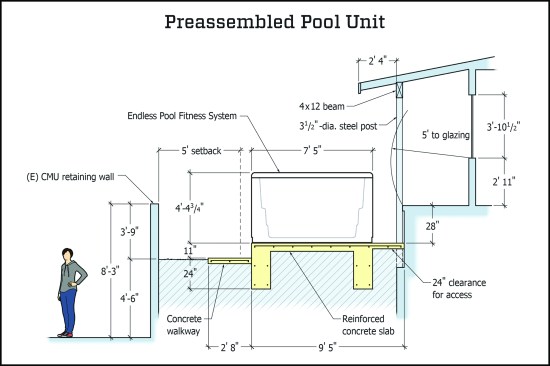
Figure 3. Retaining walls are common in tight Los Angeles lots. Here, the author used SketchUp modeling to locate and design the support slab for the E-2000 preassembled unit shown in Figure 2 …
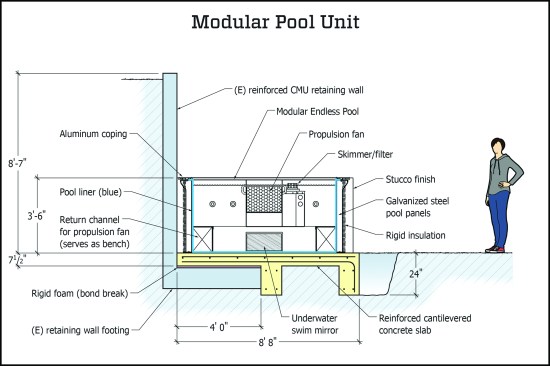
Figure 4. … and the modular unit shown in Figure 1. He notes critical dimensions and clearances on the drawings.
Design. The multitude of options such as decks, patios, trellises, interior pool rooms and other auxiliary features that can be centered around the pool allows you to exercise your artistic side and create some awesome outdoor living experiences for your clients. When planning the installation, though, you need to realize that the pool manufacturer’s dimensions are typically inside dimensions. A 7×14 pool requires a space larger than 7 feet by 14 feet; you have to account for the width of the metal panels and the type of pool cover you want. For instance, I repaired a pool in Malibu after the fires there last year, and the original contractor had built a 6-inch CMU wall around the pool and covered that with a stone veneer, so the 7-foot-by-14-foot pool occupied about 10 feet by 17 feet.
Pool security covers. While you can get a pool without a cover (or use a floating cover), installing a manual or powered security cover is a common requirement for safety reasons. Both the manually operated and power security covers are strong enough that a person can walk on them without falling through.
The manual cover has a crank and roller at one end, a track on each side of the pool the cover slides in, and an aluminum bar the cover is attached to. You pull the bar with a rope to close the cover, and use the crank to wind it around the roller to open it. So you have to plan for the room the crank will need to operate. (Also, you’ll need the manufacturer’s documents to know how to properly attach it.)
The power cover is another animal altogether. To prevent electrocution of pool users, the electric hydraulic pump motors (which hydraulically power the submerged propulsion fan unit and the cover motor) are located away from the pool. There is a remote 220-volt pump for the swim current propulsion fan, and a separate, smaller, 110-volt pump for opening and closing the power cover. The cover motor, which is activated by a remote key switch, is mounted on the end of the pool with a cable system that opens and closes the cover. Because this mechanism adds to the length of the pool, a power cover takes up more room than a manual one. Also, it has more robust hardware and cover slides than the manually operated one that will need to be accounted for (you’ll need the manufacturer’s design documents to design this aspect of the pool).
Installation
What is nice about the preassembled fiberglass pools (Figures 2, 3, and 5 through 8) is their simplicity. You dig the footings, form it up, and place the rebar, then the electrician does the Ufer ground, you have the inspection, and you pour the slab. Then you crane the pool over the house onto the slab, the electrician wires it up, you fill it up with water, and you’re done.
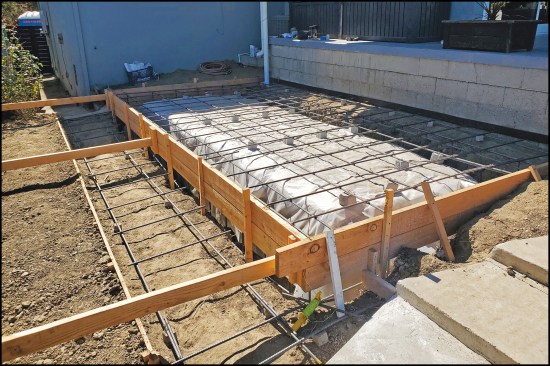
Figure 5. The preassembled unit’s slab is formed up with the rebar installed.
Electrical grounding. Depending on the pool chosen (single propulsion, dual propulsion), you will have to provide GFCI/RCD-protected circuits to the pumps. You will need appropriate grounding, bonding, and in some cases a Ufer ground to the rebar, the cold water line, or the ground rod, or some combination of the three. A Ufer ground is an electrical earth-grounding method developed during World War II that uses a concrete-encased electrode to improve grounding in dry areas. Your electrician should know how to install one. It is important that you follow your local building codes in this regard. This is an area I follow carefully, hiring only licensed and insured electricians to do all of the electrical connections.
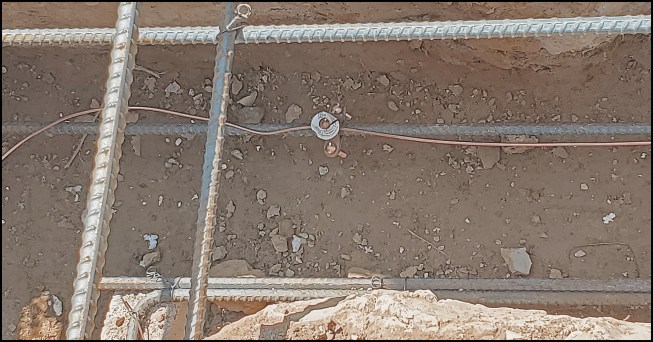
Figure 6. All the pool’s mechanical equipment and metal frame panels need to be bonded together and grounded. Here, a Ufer ground is bonded to the slab’s rebar.
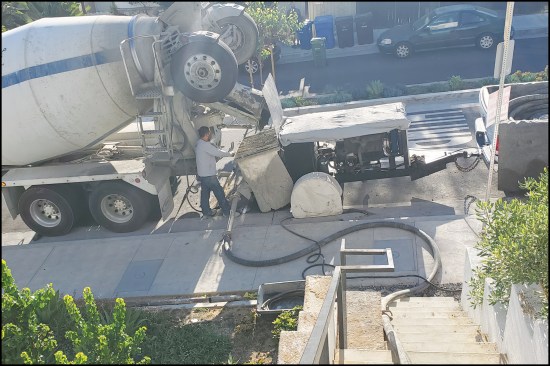
Figure 7. Concrete (3,000 psi) is pumped to the backyard slab…
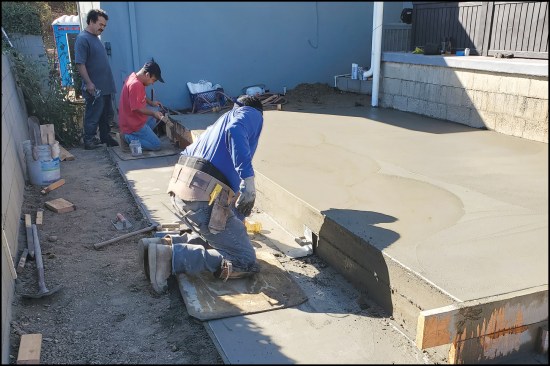
Figure 8. …and finished off by the concrete sub’s crew.
The modular kit (Figures 1, 4, and 9 through 15) is not difficult to build, but it takes more time. On the project shown here, we started by bolting the galvanized steel panels together, then securing them to the slab after ensuring they were square by checking the diagonals. Next, we drilled holes in the panels for the water supply, the LED lights, and the hydrotherapy jets, according to the locations specified in the installation manual (to access the hydrotherapy jets, I built a removable access panel in the abutting bench). The client had ordered Endless Pools aluminum coping, which simplified that aspect, so next we simply attached the coping to the metal pool walls. Then we put in the liner, making sure it was centered, and pushed its lip into the hanger groove, cut the holes for the jets and lights, and assembled those.
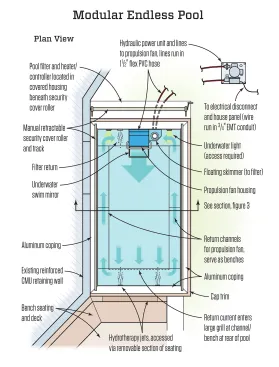
Figure 9. The modular pool has a few essential components: a remote hydraulic pump that needs 220-volt power; two hydraulic lines that conduct the hydraulic oil to and from the propulsion unit in the pool; the metal pool frame; a propulsion fan unit; a water-quality controller unit and filter; “benches” that serve as return channels to funnel the current from the back of the pool around to the propulsion unit; and a vinyl pool liner. Access to both ends of the pool is required to maintain equipment. The hydraulic pump is typically located in a garage, in a small outbuilding, or on a concrete pad shrouded in a rain cover. Remotely locating the pump to avoid potential electrocution has the side benefit of the “noisy” pump being housed away from the pool area.
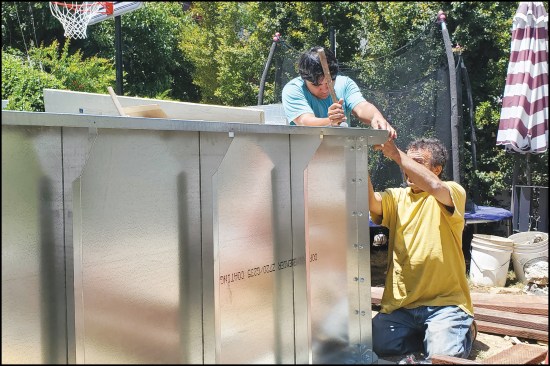
Figure 10. Workers assemble the modular kit’s galvanized steel panels. Polyiso rigid insulation was later installed in the panel bays, as shown in figure 1.
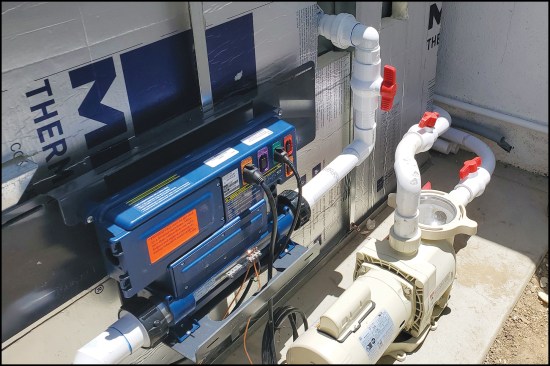
Figure 11. The unit is fitted with a “Gecko” water-quality/heat controller (blue) and filter motor. Here, the white pump powers hydrotherapy jets, while the pump that powers the filtration/electric heater is to the left of the Gecko (not shown in the photo).
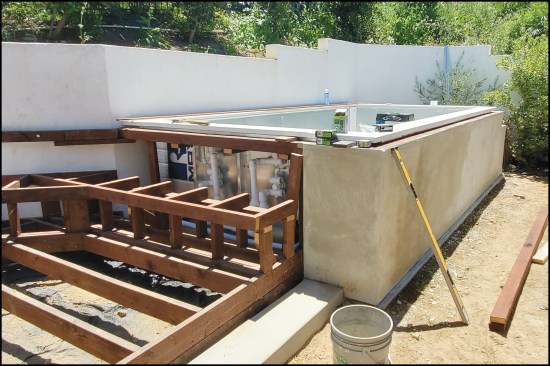
Figure 12. An abutting deck with bench seating was installed, with an access panel to the hydrotherapy jets built into the seating. The pool’s walls were clad with a smooth stucco finish.
Safety requirements. The state of California, where I work, has certain pool safety requirements, such as 5-foot-high fences, gates that swing out, pool covers, door alarms, and floating alarms in the pool that go off if disturbed. The cover has to be lockable to prevent accidental drownings. Also, the pool must be 5 feet from any glazing such as windows or doors. We needed to install most of these requirements to complete the pool project, but even if they are not required in your area, they are still a good idea.
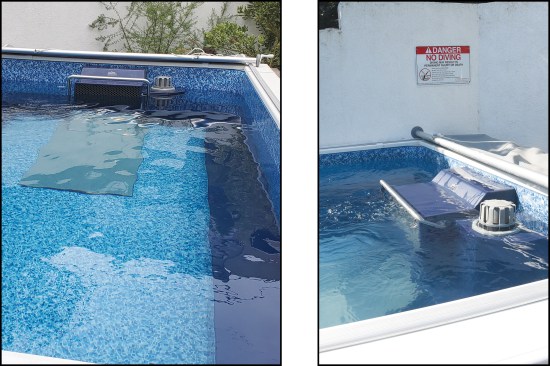
Figure 13. A floating skimmer for the filter intake is housed next to the propulsion fan unit (left, right).
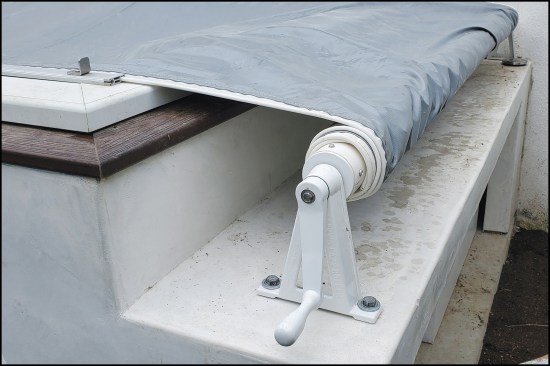
Figure 14. The hand crank for the manually operated security pool cover was mounted to the mechanical equipment housing. The cover slides in tracks located on each side of the pool and is strong enough to allow a person to walk on it without falling through.
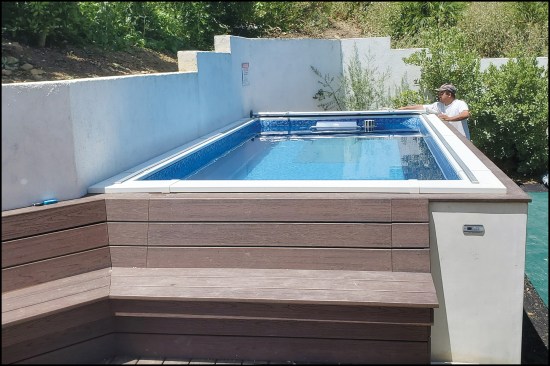
Figure 15. The finished modular-style Endless Pool and adjacent deck seating.
Photos and SketchUp models by Gerret Wikoff; illustrations by Tim Healey.


