I’ve written a number of articles for JLC on renovating inner city row houses. One topic I haven’t discussed but that’s often part of our scope of work is refinishing a home’s entry stoop.
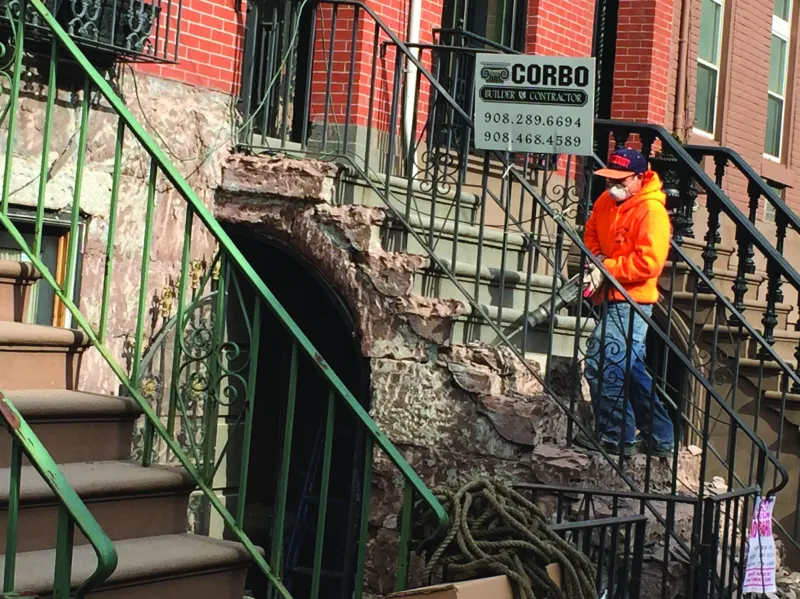
In a typical Hoboken row house, the entry stoop provides two means of egress from the home. The door at the top of the stairs enters into what’s often referred to as the “parlor level” and serves as the home’s formal entrance. There’s also a door under the stoop’s landing; this door provides access to the “garden level” and usually serves as the home’s main egress. It’s not uncommon for the small, covered space beneath the stairs to be used as a storage area (for bicycles, snow shovels, and so on), and it is typically gated and locked. Technically, the city owns the area from the street to a building’s front façade, but it takes no responsibility for maintaining the stoops or the areas on either side of them.
Brownstone History
Entry stoops in Hoboken were traditionally made mainly from New Jersey brownstone. They were commonly built as open-stringer stairs, but occasionally have closed stringers composed of a mix of brownstone and brick. Extracted from nearby quarries around the turn of the century (most of Hoboken’s row houses were built between 1880 and 1900), brownstone—a type of sandstone—was an inexpensive substitute for marble and limestone. The growing urban middle class at the time could afford something a little more architecturally sophisticated than the usual brick façade, and brownstone offered a reasonable upgrade—it was easy to cut, carve, and transport.
Some stairs were designed with closed stringers composed of a brick and brownstone mixture.
Brownstone quickly became known for its tendency to deteriorate, however; the qualities that made brownstone appealing as a building material (ease of cutting, carving, and transporting) also made it vulnerable to the harsh, Northeast weather. It was rarely specced for new construction after the early 1900s. Water combined with salt (which is applied liberally here in the Northeast during winter) easily penetrates sandstone and has the potential to wreak havoc on weather-exposed entry stairs.
The options for repairing brownstone are limited. Though my clients typically make good money working in Manhattan, their incomes are offset by steep housing and living costs. They rarely have the budget or desire to replace damaged brownstone with real brownstone, or to replace entire façades of brownstone veneer with more-stable masonry products. Because the local preservation commission is still pretty low-key about rehabbing these façades—unlike in some of the historic districts in Brooklyn and Manhattan where builders commonly have to abide by strict restoration rules and regulations—we are usually able to make use of concrete stucco. It provides a harder wearing surface, making for a more durable resurfacing material for a stoop than traditional brownstone would provide.
Refinishing the Stoop
Resurfacing a brownstone stoop is a maintenance repair, much like exterior painting or re-roofing. The lifetime of the repair depends on the quality of the original work (the structure that forms the underlying substrate for the wall cladding and the stoop) and the quality of the re-build. My clients should expect to get 15 years out of the resurfacing; longer if they stay on top of repairing surface damage (such as that caused by a heavy flower pot being dropped on the steps, or by an enthusiastic snow shoveler who gets a little overzealous chipping ice).
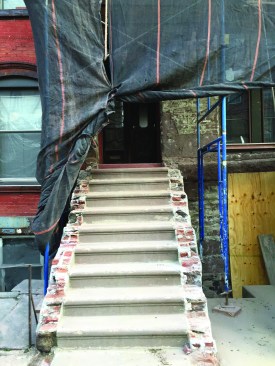
In addition to repairing the stoop, we often rehab a home’s entire façade. We set up scaffolding for any pressure-washing, brick repointing, and painting that needs to be done, and we cover it with netting to protect pedestrians from falling items. The garden-level façade adjacent to the stoop is typically a brownstone veneer with brick above it, and we usually have to tie any entry-stoop repair work into this façade. Along with our project foreman, Danny DoCouto, our masonry sub, Victor Bezama, of FPV Contracting Co., coordinates all this work.
Restoration Coat
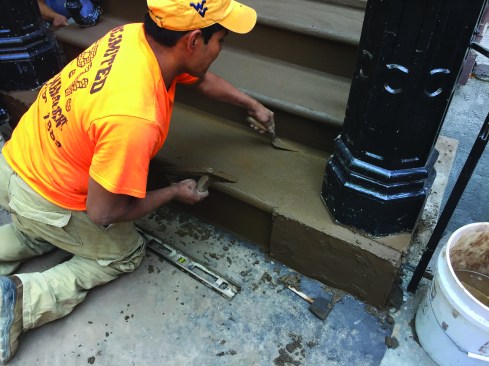
At the start of the job, Bezama’s crew begins by chipping away 1/2 to 3/4 inch of the stoop’s surface down to solid brownstone with rotary hammers (see photo 1). They also chip away the garden-level façade’s veneer; roughing up the surface to promote the bonding of what I call the “restoration” coat.
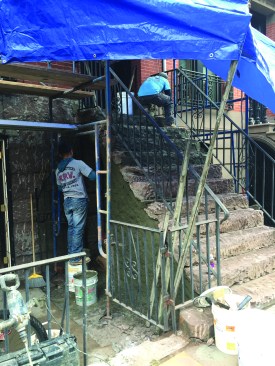
Modern repair of a brownstone finish relies on three-coat concrete stucco—a more durable material than the traditional sandstone. After the old material is chipped off, reducing the stairs to a rounded but stable substrate, the repair crew builds back the stairs using a “restoration coat” of a fastsetting cement mortar.
With the chipping complete, the demoed surface gets pressure-washed to remove dust and debris. Bezama’s crew lets the surface dry before using a fast-setting cement-based repair mortar called MasterEmaco N 424 (master-builders-solutions.basf.us) for the restoration coat. They mix this repair mortar with water (it comes as powder in 5-gallon buckets) until it reaches the consistency of damp beach sand—and only as much material as they can install without it prematurely setting up. Working from the top down, they lightly wet the work area to a saturated-surface-dry standard and apply a thin bond coat, consisting of a diluted mix of the repair mortar.
The crew applies the repair mortar in firm, 1/8- to 1-inch lifts to get good compaction, building out the material beyond what’s needed. After a few hours, they “shave” off the semi-dry excess material, a little bit at a time, to the desired profile. The shaved waste falls off like grains of sand and is considered dead material that can’t be re-used.
With little more than trowels and straightedges, the skilled crew sculpts a new set of stairs from a well-compacted build-up of the repair mortar.
I’m always amazed by the skill Bezama’s crew exhibits at this stage—they basically sculpt out the stairs using only trowels and hand levels. They’re able to precisely recreate the stair’s bullnose and scotia molding on each tread, while maintaining riser-height and tread-depth uniformity, and providing a 1/8-inch-per-foot slope on the treads and landing for drainage. On the adjacent façade, they make the linear lines simulating brownstone blockwork with longer, 4-foot levels. The ability to shave the Matrix mortar allows them to create sharp edges on these faux-blockwork lines. When they’ve formed the entry stoop (and adjacent façade), they let it cure, then apply the scratch coat.
Scratch and Finish Coats
For the scratch coat, Bezama’s crew uses a two-part sand, one-part Portland-cement mix, which they apply 3/8 inch thick with notched towels to create a smooth, grooved surface. They let it cure for one to two weeks to harden up, or longer if the schedule allows. It must cure well, as it acts as the only moisture infiltration barrier on the facade.
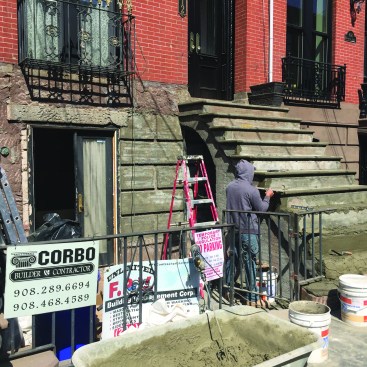
The finish coat—a colortinted cement-based mortar— goes over the scratch coat and is finished with trowels, levels, and sponges.
For the finish coat, the crew uses a cement-based repair mortar called Matrix (conproco.com/matrix) that’s color-matched to the brownstone and is mixed and applied similarly to the MasterEmaco N 424 repair mortar. They apply it 1/4 inch thick, using trowels, levels, and sponges. After this top coat dries, they power-wash it with a weak solution of water and muriatic acid as needed to achieve a uniform color.
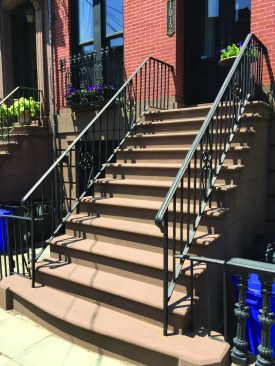
When cured, the finish coat needs to be power-washed with a weak solution of muriatic acid to even out the color.
Ironwork
Decorative railings can be a real budget buster; I’ve gotten quotes up to $40,000 for a stoop’s wrought-iron work alone. We try to re-use the existing railings as much as possible, simply removing and storing them during the job, then reinstalling and painting them in place. However, on some jobs, we’ve needed to have them sandblasted, primed, and painted off site.
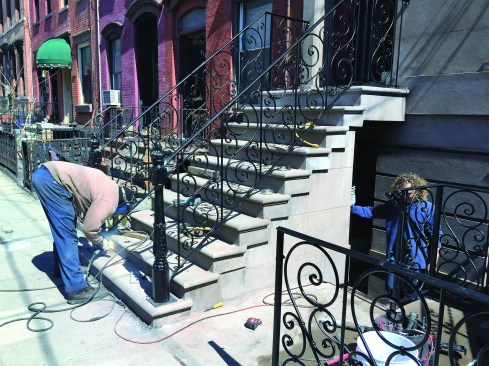
Ironwork is an important but extremely expensive part of a stoop repair. Usually, the old ironwork is salvaged with wire brushes and new paint, but occasionally the author has a chance to replace it entirely to good effect.
When the budget allows, new railings and guards look awesome. We work with Joe Monga, of Decorative Ironworks, in Paterson, N.J. He has catalogs and pictures of different styles that clients pore over, but we often have to rein them in; newel posts alone can cost $8,000 apiece.
All photos by Rob Corbo


