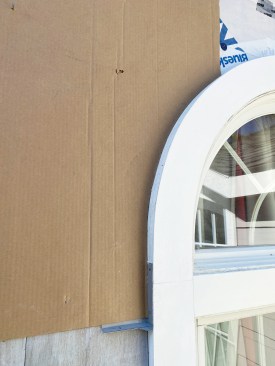
From the exterior, this clad round-top window looked to be in decent shape, trimmed with PVC that had been installed about five years earlier to replace the window’s original wood trim. But inside the house, the reason the wood trim had required replacement was obvious: The drywall underneath the window had water damage and water was leaking into the basement below.
The problem could be traced to the location of the window, which had been retrofitted to the gable wall in a previous renovation. With virtually no roof overhang above to protect it and positioned beneath a lower roof that drains directly onto it, this round-top window provided a perfect entry point for rainwater, which was funneled off the roof-to-wall intersection onto the window. From there, it flowed off the round-top flashing, down the sides of the window casing and behind the shingle siding, and into the wall cavity. Still, had the carpenter who replaced the trim not cut through the WRB underneath the siding, I don’t think there would have been nearly as much moisture damage. Finding and fixing the existing problem was one of my goals, but I also wanted to do everything I could to prevent future problems with this window, which was clearly not in an ideal location.
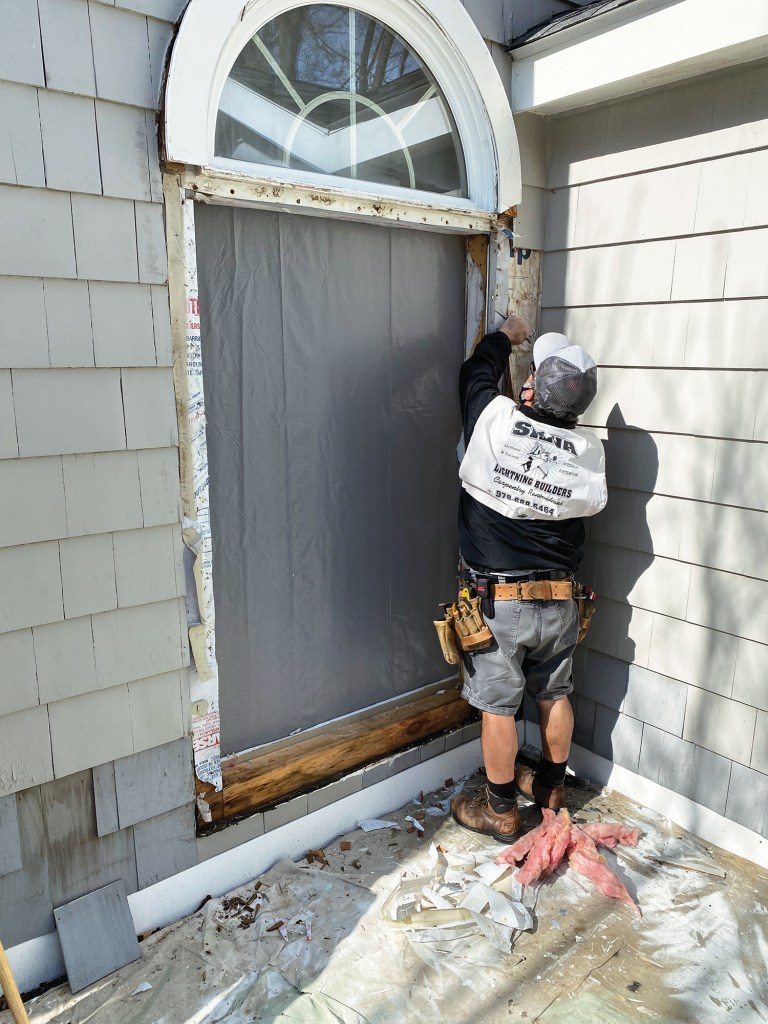
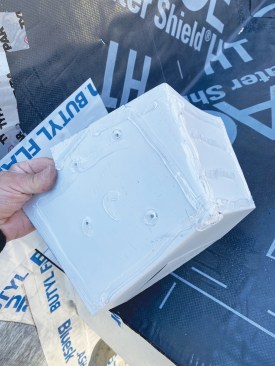
Framing fix. A rooftop deck built when the window was first installed, as part of the same renovation project, made access a lot easier than working off ladders and staging. I started by removing the trim, which is when I discovered the problems with the underlying WRB. The only way to repair the WRB and properly flash the opening was to remove both the upper round-top window and the lower double-hung, along with the cedar shingle siding around the opening.
Water draining off the roof directly above the round-top window had penetrated behind the window casing, thanks in part to damage done to the water resistive barrier (WRB) during a previous repair. The author removed the upper and lower window units, repaired the damage, and carefully reflashed the opening before reinstalling the windows.
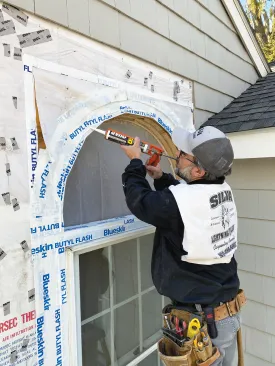
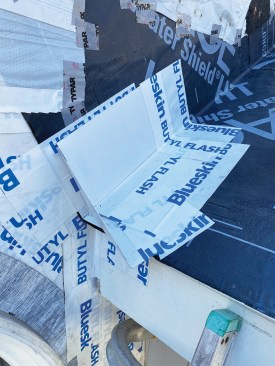
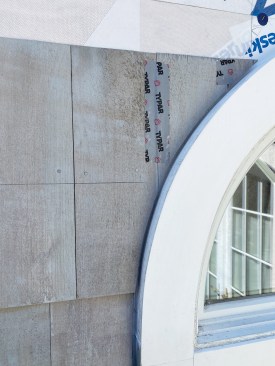
After removing the flashing and replacing the rot-damaged sill, I added a length of beveled siding to the rough opening for positive drainage. Next, I flashed the sill with DuPont FlexWrap NF, lapping it over the Henry Blueskin Butyl Flash self-adhering flashing tape that I had applied underneath the opening. Then I patched holes and tears in the WRB and completed wrapping the upper and lower openings with additional Blueskin flashing.
Prior to reinstalling the lower windows, I spread a bead of OSI Quad Max sealant around the opening to bed the flanges, leaving small gaps at the bottom for drainage. After installation, I taped the flanges to the WRB with Blueskin tape, lapping the tape up over the opening for the upper window. Then I installed the round-top in a similar fashion, taping its curved flange to the WRB with FlexWrap.
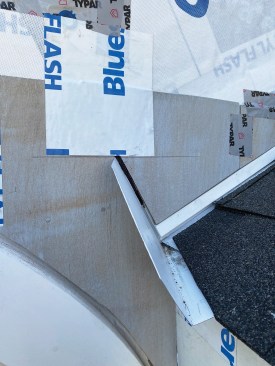
Diverter flashing. To keep rainwater away from the window as much as possible, I installed a kickout flashing at the roof-wall intersection above the window. To do that properly, I needed to peel back the wall shingles from the gable above the roof and enough roof shingles to allow me to weave in new step flashing and the kickout diverter.
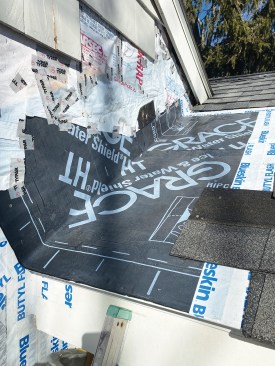
Then the author removed enough roof shingles and siding to install new peel-and-stick membranes on the roof deck and wall in preparation for improved flashing above the window.
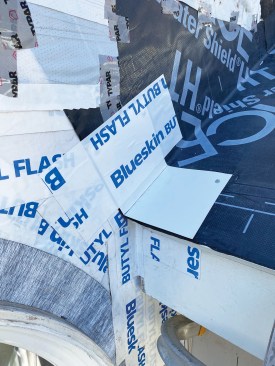
A key detail in the design would be a kickout flashing to divert water away from the window. The author began by installing the first piece of step flashing, which he fabricated from 8-inch wide aluminum coil stock.
The author used aluminum rivets and sealant to hold the folds of the kickout diverter flashing together.
He installed it over the first step flashing at the bottom of the roof-to-wall intersection.
I used short lengths of Blueskin tape to flash the tricky area where the roof eaves meet the wall, including behind the fascia and in the gap between the end of the drip edge and the wall sheathing. Next, I covered the roof sheathing with Grace Ice & Water Shield membrane, sealing the membrane to the existing roof underlayment with more Blueskin tape and lapping the membrane up the wall sheathing and tucking it underneath the existing WRB covering the wall.
From 8-inch-wide painted aluminum coil stock, I had fabricated new step flashing and the kickout diverter. After cutting and folding the diverter into the desired shape in an origami-like process, I riveted the folds together and sealed up the joints with clear silicone sealant.
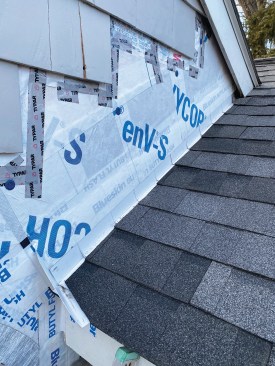
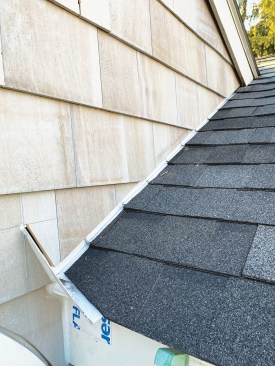
The author then reinstalled the roof shingles integrated with new step flashing, which he sealed to the WRB covering the wall with flashing tape.
I installed the kickout over a half-width of step flashing, which I had taped to the wall. Another half-width of step flashing installed over the kickout locks it in place. Then I installed a full step flashing over this assembly, taping the step flashing to the Grace membrane on the roof and wall and sealing up the roofing nail heads with silicone. I installed the remaining step flashings conventionally as I reshingled the roof, leaving a 3/4-inch gap between the edges of the shingles and the upturned legs of the step flashings for good drainage and taping the step flashing to the WRB with Blueskin tape.
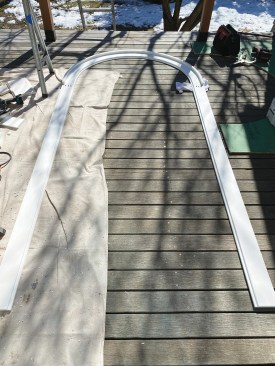
Fabricating the trim. I made a cardboard pattern of the round-top window and used it to trace the window’s outline onto a length of Zip sheathing. Using a compass set to the 4 1/2-inch width of the trim and following the arc of the traced outline, I then scribed the trim’s outside radius onto the sheathing. I carefully cut to the lines with a jigsaw to create a trim template, smoothing out the curves with a random orbit sander.
I used this template as a guide to cut out the round-top trim from two layers of 3/4-inch-thick PVC sheet stock that I had glued together with PVC cement. First, I traced the template outline onto the PVC stock and rough-cut to the lines with a jigsaw. Then I screwed the template down and used a flush trim bit in a router to trim the PVC to finished size. Because I wanted the trim to overlap the vinyl window frame, I used the router to cut a 1/2-by-1/2-inch rabbet around the inside edge of the trim piece.
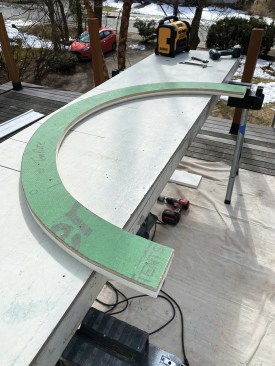
He made a template out of scrap Zip sheathing, then used a router to cut the curved PVC window trim.

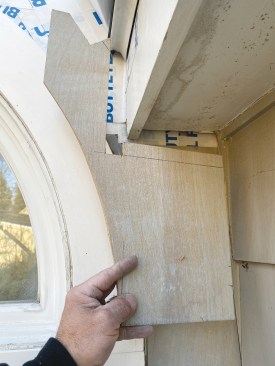
He also rabbeted the inside edge so that the trim would fit over the window cladding, and added a kerfed piece to the back so that the window casing would fit tightly against the wall sheathing.
Even though the trim piece was a full 1 1/2 inches thick, I still had to build it out with another curved length of 1-by-3/4-inch PVC applied to the back outside edge, like a back band in reverse. I couldn’t bend this piece without breaking it or putting it into a bending oven (which I don’t have), so I kerfed the inside edge with 5/8-inch-deep cuts spaced every 3/4 inch. This allowed the shim to flex evenly around the curved edge of the trim as I fastened it in place with PVC glue and 1 1/2-inch-long GRK trim screws.
The window trim was assembled with pocket screws and PVC glue as a single unit.
Before installing the trim, I added straight legs to the assembly so that the trim would cover both the upper and lower windows. I joined the legs to the curved portion with pocket screws and PVC glue, then drilled pilot holes for the 3 1/8-inch trim screws that I would use to fasten the trim to the wall, first drilling 1/4-inch-diameter plug holes that I would later fill with PVC plugs. After installation, I filled the gaps between the trim and the wall, and the trim and the window frame, with a generous bead of OSI Quad Max sealant.
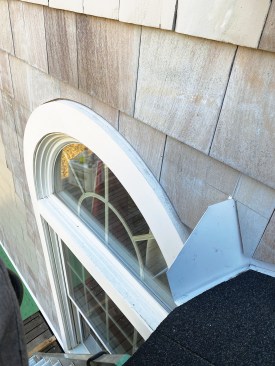
Shingle installation. Because I believed that water running off the round-top portion of the window and down the sides of the window casing caused a lot of the damage inside the wall, I folded up custom kickout flashings and applied them to the window casing while reinstalling the cedar shingle siding. To make installation easier around the curved portion of the window, I made reverse window patterns out of cardboard that I could use to mark the curved portions of the shingles on either side of the window.

Diverter flashings on both sides of the window casing prevent water from flowing off the top and into the gaps between the trim and siding.
The author made a cardboard template to speed up shingle installation around the round-top window.
Taping small, cut shingles together to form a larger unit makes it easier to cut and install shingles around tricky details.
Careful layout was needed to fit the shingles around the eave, window trim, and kickout flashing.
A temporary spacer placed on top of the step flashing prior to re-installing the siding shingles ensured a consistent gap for drainage down to the kickout flashing and out and away from the wall below.
The roundtop window should be exposed to less water thanks to the improved wall-to-roof intersection and kickout flashing.
When installing cedar shingles around curved or complex shapes, I find it helpful to join multiple shingles in a course together with flashing tape, which helps keep the smaller cut pieces properly oriented and spaced. The main thing is to stay level, plumb, and square as you shingle up from the row below, take accurate measurements, and scribe as much as you can around or along odd shapes, such as the diverter flashings that I installed on this project.
Even though the round-top window is still in an exposed location, the improved window flashing and kickout flashing above are doing their job.
After more than two years, the homeowners report no leakage problems.
Along the roof-to-wall intersection, I installed the shingles butting up against a 3/4-inch-wide temporary spacer to create a consistent gap. Where possible, I caulked around locations water might penetrate between the shingles and other trim, such as around the kickout flashing at the eaves. I use sealant only where I know it will be hidden by an overlying shingle, and when I know that the sealant won’t trap water.
Photos by Emanuel Silva.


