To accommodate their two growing kids, our clients wanted to add a media room and another bedroom and bath. But because their house is on a tight Atlanta lot with no room for an addition — and we’d already expanded upward with a previous master-suite addition — they faced a simple choice: Find another house or finish the basement. They didn’t want to move, so going down into the crawlspace appeared to be the only option for creating the additional 1,000 square feet of living area.
We’ve taken on some interesting projects in our 29 years in business, but this was the first time we ever had to remove 300 cubic yards of dirt from underneath an existing house — by hand. If the lot had been larger, we might have used the conventional approach — cribbing the house, removing the existing foundation, mechanically excavating the basement, then pouring a new foundation. There were two problems with that approach: First, the tight lot lines would have made it difficult to maneuver heavy equipment; and second, removing the existing foundation would have required that we temporarily support the home’s brick veneer. So instead, we decided to leave the existing foundation walls intact and pour a new full-height foundation within the perimeter. This would also make it possible for our clients to stay in their house during the project.
Excavation
The house was built in the 1930s. Its brick foundation was supported by a double-brick footing set on the clay substrate about a foot below grade. Only a 10-foot-by-12-foot portion of the crawlspace had ever been dug out, to a depth of around 8 feet. The plan was to dig down 11 feet below the bottom of the floor joists to provide plenty of room overhead for upgraded mechanicals. Since excavating the space by machine wasn’t feasible, we would dig by hand.
For access, we created an opening in the front foundation wall, where the plans called for an egress window and window well. The opening was close to the street, making it a convenient place to back up a dump truck for dirt removal. To ensure that we didn’t undermine the house, our structural engineer, Tom Skywark, advised us to stop the digging 2 feet from the foundation and to approach the excavation and new concrete work in 4-foot-long sections. It turned out, however, that the soil — a clay-shale mix — was much firmer than predicted; in fact, we had to use jackhammers to loosen it. As we chipped away, we had a hunch we could excavate larger sections at a time. A soils engineer confirmed this and gave us the go-ahead to dig out the entire space. Amazingly, we were able to dig vertical walls down to the planned depth without disturbing the soil beneath the footings at all.
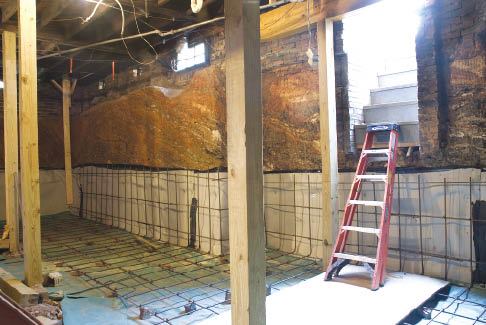
Shoring
The floor framing was supported by at least a dozen posts, several brick piers, and an old fireplace foundation (we had already removed the actual chimney during the attic renovation 15 years earlier). Rather than using a lot of cribbing, we replaced each support as we went. We worked in stages, excavating a couple of feet down around the support, setting a pair of temporary 6×6 posts on blocks on both sides, then removing the support. Next we’d dig down another couple of feet, set another blocked 6×6 post in the new hole, and remove the flanking posts so we could keep going down. We repeated this process until we reached the final depth — 11 feet below the floor framing — and moved on to the next support.
As we swapped posts, we also reinforced the floor framing according to the new framing plan. The original plans called for steel beams, but we chose to use built-up LVL beams instead because the individual members are lighter and easier to maneuver in a cramped space.
Concrete Work
We planned to place the concrete in four steps: first, the 6-foot-wide perimeter footing, followed by the 8-foot-high perimeter walls; then the massive footings for the center support posts; and finally, after installing rough plumbing for the bathroom, the basement slab. But before we could pour any concrete, we had waterproofing and rebar to install.
Steel reinforcement. The massive footing works in conjunction with the new foundation walls to create a retaining wall that resists overturning and lateral soil pressure. The finish slab locks the footing in place and prevents sliding. The rebar schedule called for a double L-shaped cage made from #4 rebar, with rods extending horizontally from the footing to tie into the slab.
Waterproofing. Although the 80-year-old house had no perimeter footing drain, the basement had stayed dry; as we removed soil, we found no evidence of moisture. Still, we wanted to make absolutely sure that any dampness in the soil couldn’t come in contact with the new concrete foundation walls or the bottom of the slab. Since the sides of the excavation would serve as the outside form for the foundation walls, we lined the dirt with MiraDrain 6200 (Carlisle Coatings & Waterproofing, 888/229-0199, www.carlisle-ccw.com), a dimpled drainage membrane that allows water to move freely through it. At the base of the excavation, we installed MiraDrain HC, a 1-inch-thick by 6-inch-high perimeter drain that collects any water at the base of the foundation wall and directs it to sump baskets located in the egress window wells, where it’s pumped out to grade.
On top of this drainage layer we installed Carlisle’s MiraClay, a waterproofing membrane made with a layer of bentonite clay sandwiched between layers of woven and nonwoven polypropylene fabric. When exposed to water, the clay expands and creates a self-sealing waterproofing barrier for the concrete walls.
Both MiraClay and MiraDrain come in 4-foot-wide rolls, so we needed two courses to extend up the full height of the walls. We pinned the membranes to the dirt walls with nails driven through washers, and capped the walls with 15-mil reinforced poly. We also spread poly on the ground underneath the new footing, cutting in around the temporary shoring posts as necessary.
Placing the Concrete
With the rebar placed, we pumped the concrete for the footings, using a standard 3,000-psi mix. Because the top of the footing would be part of the finished floor, we also screeded it and gave it a smooth trowel finish.
Foundation walls. The following day we stripped the footings and set the forms for the 1-foot-thick by 8-foot-high walls. Besides restraining the soil under the existing foundation, these walls support the new LVL beams used to carry the floor loads above.
We couldn’t use snap ties with a one-sided form, so we needed rugged bracing. Since we would eventually be framing interior stud walls inside the new concrete wall, we went ahead and shot down permanent PT bottom plates, which we used to brace the bottom of the forms. We also set 6×6 posts against the footing every couple of feet and used these posts and the floor framing above as nailers for diagonal bracing.
Again, we pumped in the concrete, bringing it up enough to cap the soil next to the existing brick foundation.
Beam footings. Next we formed and poured three grade-beam footings for the load-bearing basement walls, bringing their top elevation 2 inches below the finish slab. We also poured the egress window wells at this time. The window wells each have their own sump basket and pump to redirect water to nearby landscaping beds, and were eventually finished with Bilco ScapeWels (203/934-6363, www.bilco.com).
Finished slab. Before pouring the slab, we framed the load-bearing stud walls and finished installing the LVL beams and posts to support the existing floor system. When all the temporary supports were out of the way, we brought in the concrete pumper once again. We took extra care in floating and troweling the slab because it’s also the finished floor. Sealed with a couple of coats of polyurethane, it would be covered with rugs in each of the three main basement living areas.
Insulation and Drywall
Once the perimeter 2×4 wall framing was installed and rough-ins completed, we had our insulation sub spray a couple of inches of high-density foam into the cavities. The low-permeance foam completely covers the concrete, laps over the top cap, and extends up the brick foundation wall to the band joist. This effectively seals the narrow space between the old and new foundations.
The small crawlspace at the top of the wall is accessible through the mechanical room; some of the home’s ductwork was rerouted through this conditioned space. The plan had been to provide an uninterrupted flat ceiling, but when the homeowners saw all the overhead space we’d allowed for mechanicals, they requested a number of coffers, soffits, and vaulted spaces to help break up the ceiling plane.
Cost
The cost for finishing basements ranges widely, but this one was unlike any other we’ve ever done. The excavation, the new foundation — including the slab and waterproofing — and the structural work overhead to support the floor framing took about four months to complete, and added around $120,000 to the overall cost of the project.
Danny Feig-Sandoval owns Small Carpenters at Large, a design-build remodeling firm in Atlanta.


