There’s nothing wrong with brick or concrete pavers; my landscaping company uses them for walkways and patios every year. But most of our clients prefer natural stone. Several types are available in our area of upstate New York; my own favorite — by far — is bluestone.
A type of sandstone, bluestone is a sedimentary rock that naturally splits into sheets when quarried. Its color comes from the sand from which it was formed, so it exists in a range of colors besides “blue blue” (which is as uniform in hue as a natural material can possibly be), including greens, browns, burgundies, and rusts.
We generally use stone quarried in eastern Pennsylvania and southern New York, which gives our projects a regionally appropriate look and keeps shipping costs down. The patio in this article was built using irregular cleft flagstones, which are commonly referred to as “standup” because the large stones are shipped standing on edge on the pallet. Costs for flagstones start at about $3 per square foot.
Bluestone can also be cut into uniform square and rectangular pavers suitable for more formal designs and public-
oriented walkways and patios. Prices for natural cleft bluestone pavers — which are split to form pieces 1 inch to 3 inches thick — start at about $5 per square foot. Prices for thermal bluestone pavers — which undergo a special heating process that imparts a rough surface and uniform appearance — run between $7 and $9 per square foot.
Paver sizes start at 12 by 12 inches and typically increase in 6-inch increments (expect to pay more per square foot for sizes exceeding 24 by 36 inches). Bluestone stair treads — ranging in thickness from 2 to 6 inches and in depth from 12 inches to over 2 feet — are also available.
In many parts of the country, stones can be mortared to a well-drained concrete slab. But here in the Northeast, where we have cold winters with significant frost action, we prefer to dry-lay the stones on a bedding course of concrete sand (an inexpensive washed sand that in coarseness falls between fine-grained mason sand and coarse-grained block sand) over a solid base of stone. In addition to being less expensive than mortaring, this technique results in paving that’s easier to maintain: Dry-laid stones can be removed and reset with minimal problems and will look as good as new afterward.
Site Work and Layout
Before installing a walkway or patio, we make sure the area we’re paving hasn’t had more than 8 inches of fill added to it. Settling is often a problem with newly constructed homes; in some cases we’ve found almost 8 feet of fill within 3 or 4 feet of the house.
We can settle most soils sufficiently with soaker hoses, a process that typically takes two to three weeks. Since it invariably wets the basement walls, we always check with our client first; if the basement is finished, we avoid this approach altogether.
Another option is to delay the start of construction and return the following spring after a winter’s worth of freezing and thawing has settled the site. If our client doesn’t want to wait, we excavate loose fill down to undisturbed soil, then bring the grade back up with crushed stone tamped in 6-inch lifts.
Once the soil’s been stabilized, we lay the proposed design out on the ground with spray paint, then set up a series of stakes at strategic points. We shoot elevations with a transit and mark the finished height of the paving on the stakes, being sure to pitch the paving slightly for drainage. In general, we slope patios or walkways about 2 inches every 8 feet (approximately a 2 percent grade) to keep water from collecting on the surface and to direct it away from the house foundation.
Next, with the strings as our guide, we excavate 8 inches (or more, depending on the soil issues described earlier) below our finish grade. We extend this excavation at least 6 inches beyond the layout on all sides to keep the edges from sloughing off. Then we tamp the excavated area with a walk-behind plate compactor.
If the site is wet — or if the soil is sandy or contains a lot of clay — we place landscape fabric over the excavated area; this helps keep the subsequent layer of base stone from mixing in with the subsoil. (Contrary to a common misconception, landscape fabric does not prevent weed growth between the pavers or stones.) Then we install the base stone to a depth of about 5 or 6 inches.
Here in western New York state, we use crusher run, a mix of crushed stone and stone dust. It comes in various sizes; for most pedestrian applications like walks and patios we use a #1 crusher run, which consists of roughly 1-inch stone mixed with dust.
Proper compaction of the base stone is critical, but most walk-behind plate compactors effectively tamp only about 3 inches of stone at a time. So we install the base stone in 3-inch lifts, with careful tamping in between. Since our goal is 100 percent compaction, we run the tamper until it starts to hop. (A tamper runs fairly smoothly over uncompacted stone but begins to skim over the top with a bit of hopping as the stone approaches proper compaction.) Spraying the base stone with water keeps dust down and helps in compacting it.
Once compaction is complete, we install a 1-inch to 2-inch layer of concrete sand. We level it with a rake, using our string lines and laser levels to estimate how much is necessary to make our grades work. Because it will be flooded with water when we lay the stone, we plan on 100 percent compaction of this layer, too (2 inches of sand will compact down to about 1 inch when flooded with water).
nstalling the Stone
My crew follows two nonnegotiable rules when installing geometric stone pavers: no lines or seams longer than 6 feet, and no four corners together (unless it’s part of the design). Otherwise, installation is simply a matter of choosing each stone to fit next to the previous one, and keeping our lines as straight as possible. With straight geometric patterns, waste is minimal. When the design has curves, I add about 10 percent to 15 percent to my square-footage estimate to allow for waste when cutting.
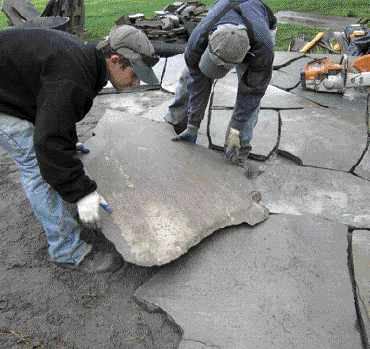
There are two methods of fitting flagstones together. The first, which gives the installation a more informal feel, is to find stones that have similar sides and match them up like a large jigsaw puzzle. We use this approach more often with pathways than with patios. Since all the stones are laid out and fit together before the final setting, there’s virtually no waste. Sometimes we use a brick hammer to break stones into smaller, more fit-friendly pieces, or to dress up edges that don’t quite fit.
We use the second method — which leaves very small seams, making the paved area safer to walk on — when we’re installing flagstone as a patio or more formal walkway. It entails setting one stone down and then either cutting another to fit next to it or overlapping the first stone with the second and making a cut through both. For cutting we use a Stihl gas cutoff saw equipped with a 12-inch diamond blade. Then, to keep the Old World look of hand-cut stones, we lightly chip the edges of all stones with a brick hammer; when we’re done, they appear to have been cut by hand.
This more painstaking method adds significant time (and therefore cost) to the project; also, we have to figure about 15 percent waste when estimating stone coverage.
Floating stone. The next step after fitting the stones is setting them. Over the years, I’ve seen people set large paving stones by banging them with dead-blow hammers and rubber mallets (bad for the stone), or by jumping up and down on them and stomping them into place (bad for the knees). But we’ve found that the best way to install large flagstones and pavers is to flood them into place.
Once the stones are in position, we literally flood the sand underneath with water, which accomplishes two things: First, it settles the sand completely, leaving no voids; since the sand takes the shape of the bottom of the stones, there are no hollow spots despite the irregular surfaces. Second, it creates a quicksand-like mixture that the stones hydroplane on, so one person can easily float even large heavy ones into place. As we float the stones, we wiggle them down to the proper height and pitch.
Another benefit of flooding is that we can go back and refloat stones to fine-tune the installation so there aren’t any high or low spots.
To finish up, we sweep in polymeric sand, which sets up like a flexible mortar when wet. It helps keep weed growth to a minimum but doesn’t get in the way if we need to remove and replace stones later.
Costs for our stone patios vary greatly, depending on such factors as access to the working area, distance from our shop, type of material chosen, and details of the installation itself, like inlays and the amount of cutting. While we never price projects by the square foot (all our work is priced by time and materials), most end up in the range of $13 to $25 per square foot installed.
Bruce Zaretsky owns Zaretsky & Associates, a design/build landscaping firm based in Rochester, N.Y.


