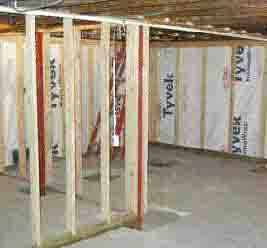
We discovered while remodeling this 1920s home that the foundation was deeper than we’d thought and the original basement floor could easily have been poured 8 inches lower: With only 7 feet of available headroom, another 8 inches would make for a much more livable space. Unfortunately, lowering the floor was outside the scope of the project’s budget.
The job called for the addition of several new columns and a bearing wall (above) to support the new construction above, so we had to cut through the slab to pour footings. Because the homeowners thought they’d eventually like to lower the basement floor, we made that future work easier by placing the footings about a foot lower than necessary and using longer columns. With the approval of an engineer, we built the bearing wall on top of pressure-treated lumber that extended below floor level and landed on a long narrow footing (below).
Before patching the slab, we covered the new footings with several inches of gravel. If the homeowners ever decide to lower the floor, all they’ll have to do is break out the concrete around the footings and shovel out the gravel. The nonbearing partitions will have to go, but the bearing wall can stay right where it is.
Chris Kennel works for City Side Remodeling in Denver.
Fiber Cement at a Clip
by Jason Seltin Fiber-cement siding is heavy and comes in long lengths, making it a challenge to install — especially if you’re working alone. Siding gauges can help, but they tend to slip out of position under the weight of the siding, which is particularly frustrating when working at heights; also, they can be difficult to remove once the siding’s nailed up.
I’ve found that the Knockoff (800/262-9680, www.knockoffclip.com) addresses all of these problems. This small plastic clip is designed to hook over the top edge of one course of siding and hold the next course in place. You use two Knockoffs per 12-foot length of siding, placing them before nailing home the course you’re working on. After the siding has been installed, you simply hit straight down on the clips with a hammer to break off the exposed sections — an easy process that doesn’t damage the siding.
The first time I used Knockoffs, I proceeded the way I usually do: Set the left side with a siding clip; then hold, level, and nail from the right. But it turned out I didn’t need to level every course when using Knockoffs; I could just set a pair of clips, nail off the course, and then quickly slip the next length of siding into position without bothering to check it with my level. The new clips made the job so easy, I ended up using them on all lengths of board.
I estimate that using Knockoffs (rather than other siding gauges) while working solo yields a time savings of at least 35 percent. Plus I’ve broken only one clip prematurely, and that was because I dropped a 12-foot-long fiber-cement board onto it.
You can’t vary siding exposure with these clips, which overlap the course below by 1 1/4 inches. Also, for a typical siding job you’ll need a lot of them (the manufacturer recommends ordering 1.5 clips per board of siding), which at about 20 cents apiece can add a couple hundred dollars to the project.
Knockoff clips are available from various sources; I get mine online at ABC Supply (888/492-1047, www.abcsupply.com).
Jason Seltin is a remodeling contractor in Saint Johns, Mich.
Squeak Reducer
During a remodel of their 80-year-old Berkeley, Calif., home, the owners complained about how squeaky the stairs were. The insulation contractor on the job, American Services Co., solved the problem by spraying the underside of the staircase with the same closed-cell spray polyurethane they were using for the roof and exterior walls. Unlike open-cell foams, denser closed-cell polyurethanes have structural properties similar to glue. In this case, the foam got rid of most of the squeaks and cut down on airborne sound transmission as well. — David Frane


