
Peter Zoni
After excavating down about 18 inches and digging trenches acros…
Our concrete company on Cape Cod has installed pervious concrete for many projects over the years where drainage or the accumulation of surface water was an issue. At a local senior center, for example, we used pervious concrete for a walkway to keep it from collecting water. Poolside areas are a common application, and we have even installed pervious concrete for the floor of a greenhouse to drain away the overflow and overspray from watering the plants.
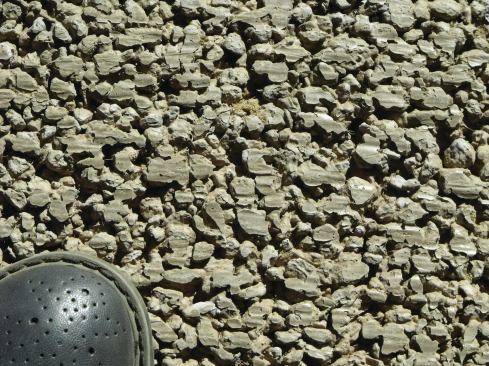
Pervious concrete is a mix of Portland cement, coarse aggregate, water, and admixtures. Because there is little or no sand in the mix, the concrete contains bigger voids than ordinary concrete does. These voids let water and air pass through, making pervious concrete a good choice anywhere you need to control runoff. In many cases, using pervious concrete can eliminate the need for expensive drainage and collection systems.
Recently, a client approached us to build a driveway up a steep, 15% incline to a horse stable behind her home. The original driveway was a rutted dirt and gravel path that washed out in heavy rains. The client wanted to replace it with a paved surface that could handle heavy horse trailers and farm equipment, and she wanted it to look “elegant and charming” in the natural wooded area near her house and stable. But this driveway abutted protected federal land, so it also needed to intercept, contain, and filter any stormwater that cascaded down its surface. Pervious concrete was the perfect choice for meeting all of these challenges.
Prepping the Site
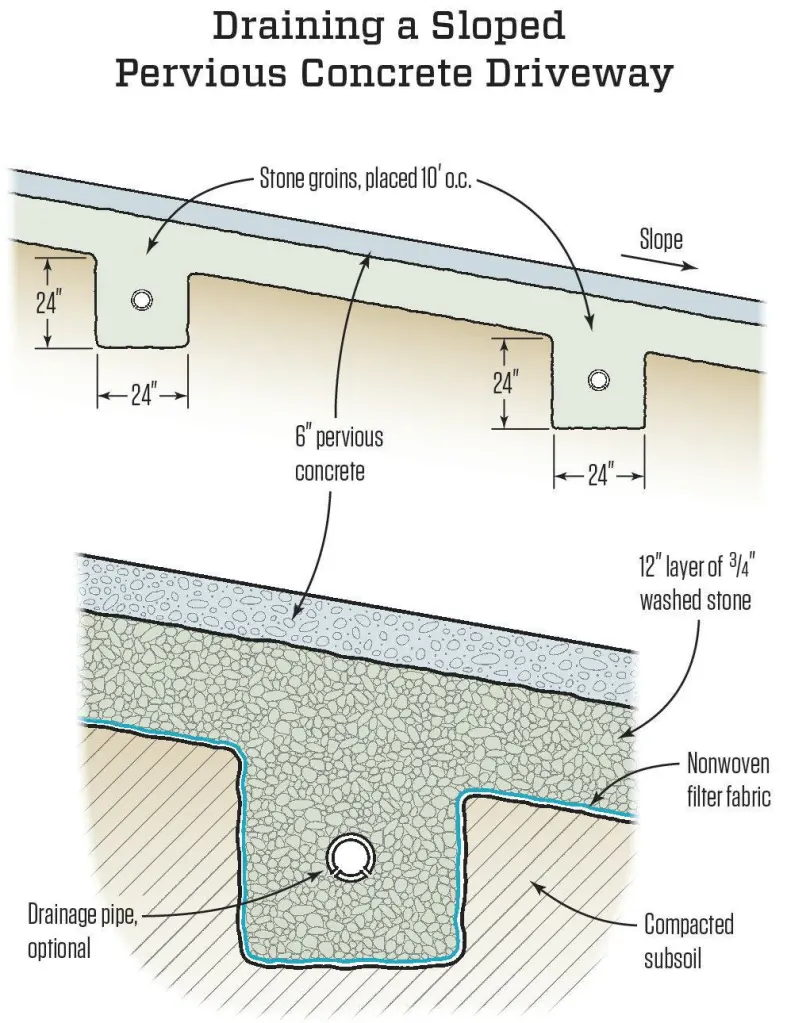
Having a uniform subgrade is essential for any driveway, but it is especially important for one made with pervious concrete. The subsoil must be the right density to provide adequate support and still be permeable enough to drain away surface water. Fortunately, the Cape is blessed with sandy soil that is excellent for both drainage and support. We began by excavating about 18 inches below grade, down to the sandy subsoil, all along the path of the driveway.
After compacting the subsoil layer, we dug “groins,” or trenches, every 10 feet along the entire length of the driveway (see illustration, above) to enhance drainage and help anchor the driveway to the slope, essentially preventing it from sliding downhill. These groins are about 24 inches wide and 24 inches deep and run perpendicular to the slope of the driveway.
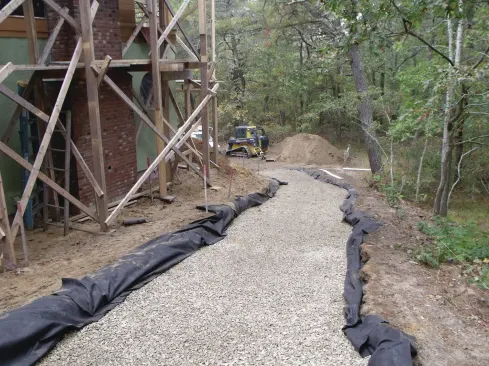
We then covered the entire driveway—including the trenches—with a natural nonwoven landscape filter fabric that allows water to drain through while keeping the soil from filling the voids in the different layers of the driveway. As a bonus, the fabric allows the formation of a bacterial matrix that eats and dissolves petrochemicals—the fabric actually cleans the rainwater and runoff as they pass through.
Next, we added a 12-inch layer of 3/4-inch washed stone, filling the groins with crushed stone at the same time. We used a skid-steer machine to transport and spread the stone;the machine also helped to compact and smooth the stone in the process.
In certain soils, perforated pipe may be included in the groins to channel away water that drains through the driveway. Because the sandy subsoil on this project provided excellent drainage, pipe was not needed.
We do not add rebar or steel screen, both of which can rust and corrode over time, to strengthen a driveway. Instead, we add a nylon-fiber mesh to the mix to provide additional strength.
The last part of the prep work was staking 2-by boards on edge along both sides of the driveway. These would act as forms to contain the concrete as we placed the driveway.
The Pour—Working against the clock
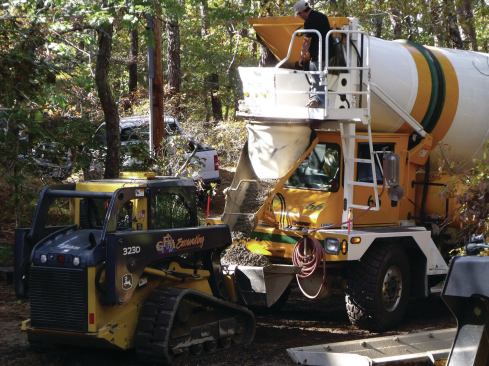
With the sublayers prepared and the forms in place, we were ready for the concrete. Our company has its own proprietary mix of pervious concrete, called Perk-Crete, and computer-controlled scales at our batch plant carefully weigh the exact amounts of the mix ingredients and aggregate needed for each load.
Noticeably absent from the list of ingredients is sand. In conventional concrete mixes, sand fills the voids between the aggregate, which is the exact opposite of what we are trying to create with pervious concrete.
Under the direction of our quality-control supervisor (who is certified for pervious concrete by the National Ready Mixed Concrete Association), water is added to the mix following tight tolerances. With no sand in the mix to give it “tooth,” the concrete paste needs to be thick enough to coat the aggregate and adhere to it completely. Because of this quality, the conventional “slump” numbers that are typically used to measure the thickness of a concrete mix cannot be applied to pervious concrete mixes.
With such a low water content, pervious concrete must be transported to the jobsite and discharged from the truck as quickly as possible. As each truck arrives at the site, the supervisor visually inspects the consistency of the mix. It’s rare that additional water is needed, but if it is, it must be added judiciously and only by the trained supervisor. Precise control over the water content ensures that the concrete creates bridges between pieces of aggregate and properly bonds them together without the paste running off and filling the voids that will be needed for drainage.
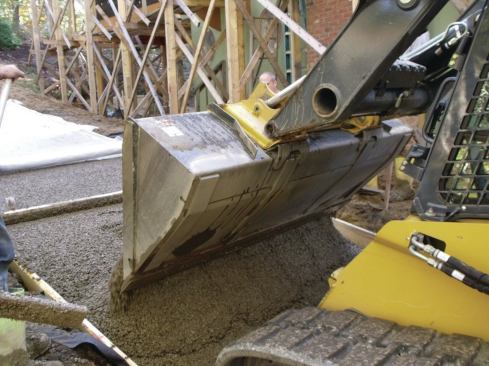
Because of its consistency, pervious concrete cannot be pumped; in fact, it’s so thick that we need to use a short concrete chute to discharge the mix. Given the limited access on this site, the most efficient way of getting the mix from the truck to the driveway was with a skid-steer machine. The truck discharged the mix into the bucket of the skid steer, which then carried each load to the driveway.
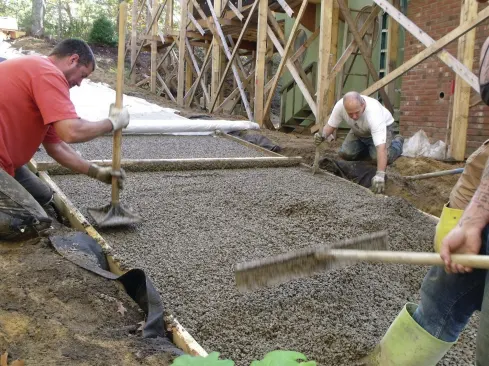
As each load was dumped, crew members roughly distributed the concrete with rakes. Then, while the machine was being refilled, other crew members compacted the edges and screeded the surface flat with a straightedge. We use a special straightedgewith ends that step down 2 inches to the surface of the driveway to keep the surface perfectly flat. The “ears” at the ends of the screed ride on top of the forms. After screeding the concrete flat, radius edging tools softened the edges of the driveway along the forms.
The next step we call “densification”—a specific kind of compaction of the top layers of concrete. We use a steel vibratory roller, which we adjust to the width of the driveway—in this case 12 feet. An engine spins the roller to increase the density of the top couple of inches of the driveway. This process helps to keep individual pieces of aggregate from loosening and kicking up when vehicles drive over the surface.
Because the pervious concrete mix has such little water, the crew must work as quickly as possible to spread and consolidate the mix. We placed this driveway in the fall when the air temperature was relatively cool. If we’d been working in the summer, we may have needed to resort to other measures, such as using chemical retarders that slow down the curing process and extend the working time for the mix.
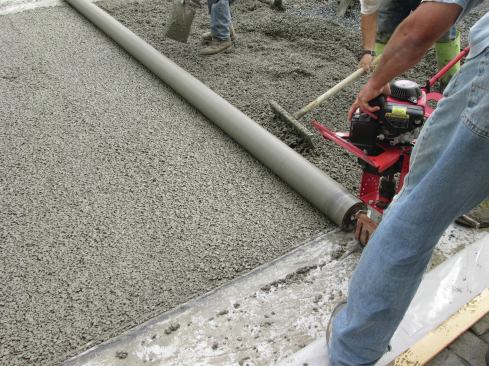
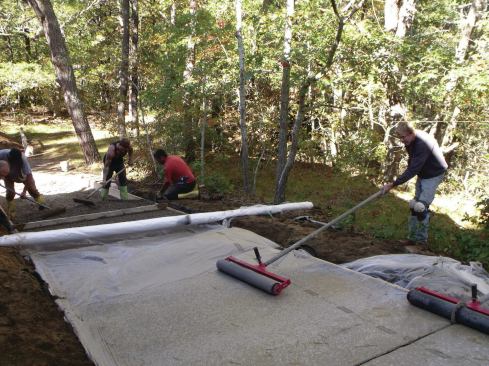
To make sure that hydration in the concrete occurs properly, we cover the driveway with a thin, 2-mil plastic sheet while the concrete is still wet. Before the concrete is delivered, the crew unrolls the sheet for the entire length of the driveway. Then they roll the sheet back up and keep it at the ready. After each batch has been screeded, edged, and densified, they immediately unroll the plastic and press it into the fresh, wet concrete to keep it from curing too quickly. By that point the skid steer usually has returned to dump the next load. The process then begins again for the next section of the driveway.
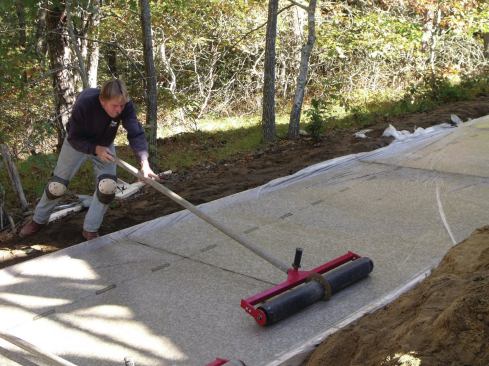
Rolling the Surface
Most concrete surfaces are troweled and floated to create the finished surface, a process that brings the slurry or paste to the surface and closes all the voids. Finishing a pervious concrete surface with conventional means would therefore defeat its purpose.
Instead, with the plastic covering the wet concrete, a crew member rolls a heavy steel roller over the surface. The roller compacts, consolidates, and smooths the surface, while preserving the voids and ensuring that the plastic stays in complete contact with the driveway surface so that hydration does not happen too quickly. The roller is pushed back and forth over the surface in a cross-hatch pattern. The plastic keeps the roller clean and prevents it from pulling up the top layer of concrete.
Cutting Control Joints
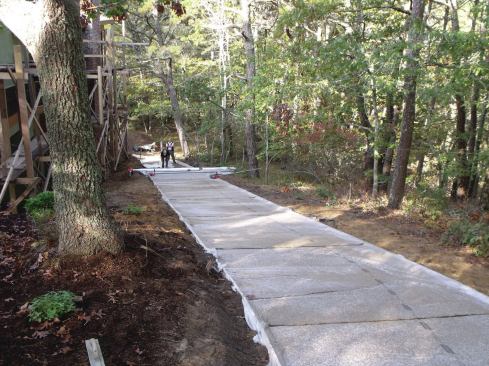
Because this driveway was more than 200 feet long, it was necessary to cut control joints in the concrete. Essentially, control joints score the surface of the concrete and “show” it where to crack as it shrinks in the curing process. Pervious concrete doesn’t shrink as much as conventional concrete, so we typically space the control joints about 20 feet apart.
To create a control joint, we use a rolling joint tool (also called a pizza cutter). A blade in the middle of the roller cuts a groove about 1 1/2 inches deep, or about one-quarter of the thickness of the concrete slab. To cut the joint, the crew member carefully places the roller on top of the plastic-covered wet concrete and pushes the roller across the driveway from one side to the other. The blade cuts through the plastic sheet and into the concrete surface, leaving a groove that functions as a control joint.
Finishing Up
We leave driveways covered for a minimum of seven days, allowing the concrete to cure properly. Then we take off the plastic and strip the forms, leaving a finished surface that is smooth overall and ready to be driven on, but that has voids between the aggregate.
For this project, we also cut back the excess landscape fabric and lined both sides of the driveway with crushed stone. The top and bottom of the concrete driveway butted into the existing parking surfaces.
The owner now has a driveway to safely access the stable with her horse trailer, with no concerns about the sloped driveway washing out in severe storms. And there is no concern about runoff adversely affecting the sensitive natural land nearby.
Pervious concrete does require a bit of maintenance. We ask owners to sweep debris off the surface as it accumulates. If debris does begin to clog the drainage through the pavement, the driveway may need to be vacuumed or blown out with a leaf blower, compressed air, or a pressure washer. The maintenance schedule can vary. Some surfaces that we’ve installed require annual maintenance, while others continue to drain perfectly with no maintenance at all.
Peter Zoni is the head of sales at Cape Cod ReadyMix, in Orleans, Mass.


