Matt Risinger
Pin-type moisture meters measure resistance from point to point,…
In my 20-year career as a builder, I’ve worked in three different climate zones: Washington, D.C.; Portland, Ore.; and now Austin, Texas. In all places, I built houses that got wet — sometimes soaked — in the framing stage. Time was when we could assume that the frame would dry naturally, even after the walls were closed in. But today we are building tighter houses that are less able to dry once the drywall has been installed.
The worst-case scenario in a wet house with a very slow drying rate is that mold and rot can form on the framing. I once took apart a one-year-old house in Portland that had wood rot damage not from leaks but from wet framing lumber that never dried to the inside or outside. Other problems — less dire but still troublesome — are nail pops in drywall, cracks in drywall around window heads, squeaks in floors and stairs, interior trim joints that open up, and caulking that pulls and cracks.
Fast construction schedules contribute to these issues big time, because the house framing barely has any time to dry on its own before the next stage of construction begins. Such “short cycle” houses are notorious for having lots of drywall cracks and other cosmetic defects after a year of post-construction heating and cooling by the occupants. These are commonly attributed to “settling,” but in my experience the more likely cause is movement produced by drying of the frame.
Most of the lumber used in my homes is kiln-dried, so it should arrive at the job site with a moisture content (MC) of 12% to 14%. How water is stored in lumber is a complex subject beyond my expertise, but the important thing to remember is that lumber can take on moisture, either while it’s being stored or after it’s in place in a building’s frame. The general consensus among experts is that mold spores are activated and the rot process begins when the MC rises above 19%.
Since we don’t typically build houses under a giant tent, we need to take a systematic approach to deciding when things are too wet and — when necessary — implementing a drying process for the framing lumber. What follows is a description of the steps I take to monitor and control the moisture content of the framing before closing up the walls.
Moisture Meters
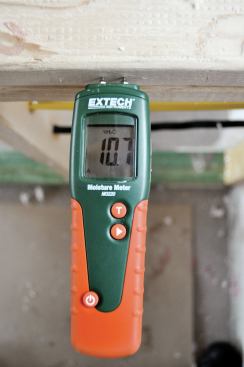
The first step is to buy a moisture meter. I like to use pin-type meters to check framing because they’re accurate and aren’t affected — as pinless meters can be — by the grain, knots, or other defects in wood. (Pinless meters are great for taking a lot of moisture measurements quickly without putting holes in finished materials, but that’s not an issue with framing lumber.)
I like my current meter because it’s reasonably priced at around $150, it’s small enough to keep in my truck, and it gives digital readouts to 10ths of a percent.
Mapping Moisture
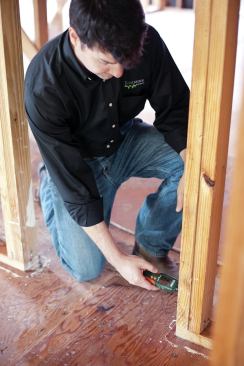
Once the frame is under cover, I check the moisture content to establish a baseline, then monitor the wood as it dries. I also delegate this task to my project managers because they are the ones in charge of scheduling insulation and drywall — work that can’t start until the building is dry. Ideally, each project manager should own a moisture meter that stays with his truck.
I usually check all areas of framing that have puddles nearby, then poke every 10th stud about chest high and again at the bottom near the plate. The plates typically have the highest moisture content, both because they soak up water from the subfloor and because moisture tends to gravitate down the vertical studs. I recommend taking and recording readings from the bottom plate every fourth stud.
I use AdvanTech subfloor, an OSB product with a high glue content, so I’ve never had a water issue with my subfloors. But if you use plywood, sweep the puddles off and map the MC.
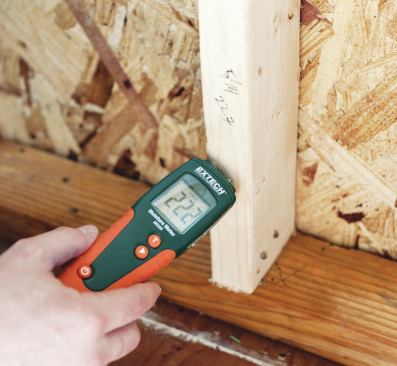
You might also want to take some readings on the sheathing if it’s been exposed to heavy rain. Also measure king studs, because they’ll take the longest to dry and shrink the most.
How often we check MC depends on how wet the house is to begin with. If we’re actively drying the house using one of the methods discussed below, we check walls every three or four days to reposition equipment, more often as we get to the desired level (15% at the baseplate, 13% chest-high). If you use a plywood subfloor, check it every day to make sure drying is progressing.
Drying to below MC19% is essential, but my standard is to get all readings down to 15% or lower for kiln-dried lumber, and 17% or less for any green or pressure-treated lumber. The reason is that once a home is occupied and the hvac system has run for a year, the studs will typically reach equilibrium at MC10% to MC12%; if studs lose more than 5 points after drywall is installed, the resulting shrinkage will cause more visible flaws in the finishes.
So what can you do if your framing is soaked? The easiest thing is to just wait. Given enough time (and assuming the framing is under cover), wet lumber will dry naturally. But climate makes a difference in how long you have to wait. If outdoor temps are above 60°F, it may take two to four weeks to get from 18% to 14%. But if the weather is cold and rainy, you could be looking at six to 12 weeks. And if the temperature drops below freezing, you will be waiting for a very long time.
Since we build to a schedule, we have three ways of actively drying things out: move the air, dehumidify, and add heat. We use these strategies separately or together, depending on job-site conditions.
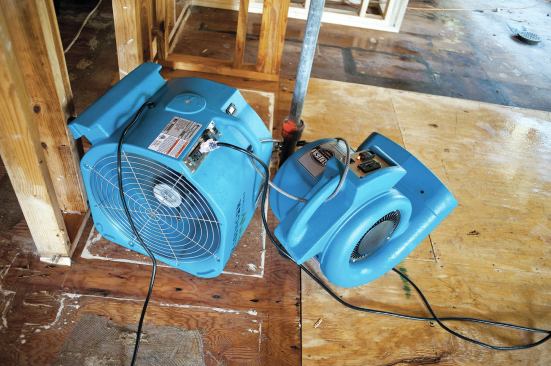
Move the Air
The easiest and cheapest way to dry a house is to use fans to blow air on the wet spots. Kelly Stelk, president of Home Certified, a Portland company that provides drying and temporary heat services, tells me he uses 10 fans for preinsulation drying of a 2,500-square-foot house. We don’t use that many, because we don’t usually get as soaked and my custom houses have longer schedules. If daytime temps are above 45°F, a fan blowing 24/7 on a wet area of framing will reduce moisture content by 0.3 to 1.0 percentage point per day. That means that by running three or four fans, I can take 5 points off the moisture content of a house in about a week.
I own several conch-shell carpet fans — the type remediation contractors use to dry wet carpeting — as well as box-type air movers. I position a 50-50 mix of both types around the house based on moisture-meter readings. I chain and padlock the fans to the framing and run them 24/7 till the drying is done.
Dehumidify
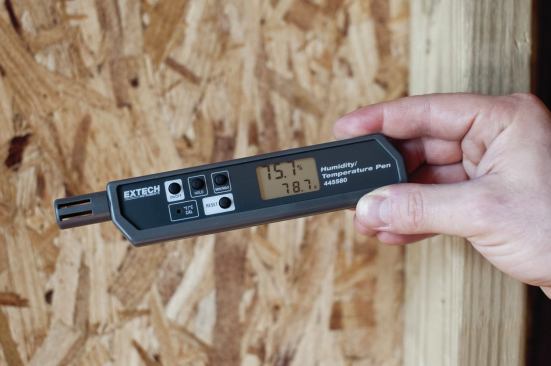
Blowing air will work to a certain extent, but controlling humidity is the key to really drying down your framing. Remember that 100% humidity means that the air has reached its maximum capacity to hold water and no drying can occur no matter how much air you move. I also own an Extech Humidity/Temperature Pen (bottom photo, page 70), and anytime I’m drying a house and get an outside humidity reading above 60%, I shift into lock-down mode: I close all the windows and bring in a dehumidifier. Running fans in conjunction with a dehumidifier will bring down your moisture content in roughly a week, assuming it’s not too cold.
Add Heat
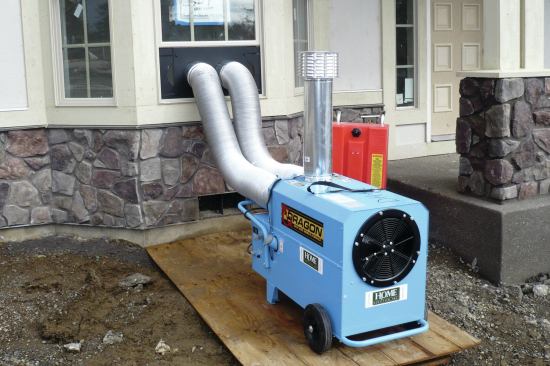
Here in Austin, winters aren’t cold enough for houses not to dry prior to drywall. If you’re building up north, however, where cold temperatures and frozen lumber are the norm, you don’t have much choice except to use heat to dry things out. But you can’t use just any heat. Although it’s common to see propane heaters used on job sites for temporary heat, they aren’t good for drying. In fact, a typical propane heater adds one gallon of moisture to the air for every hour of runtime. You also never want to use the client’s furnace for heat during construction. This will void the manufacturer’s warranty and can wreak havoc on the ductwork.
What you really need is a heater outside the house blowing hot, dry air into the building.
Matt Risingerowns Risinger Homes in Austin, Texas. This article was adapted from an entry in his weekly blog.


