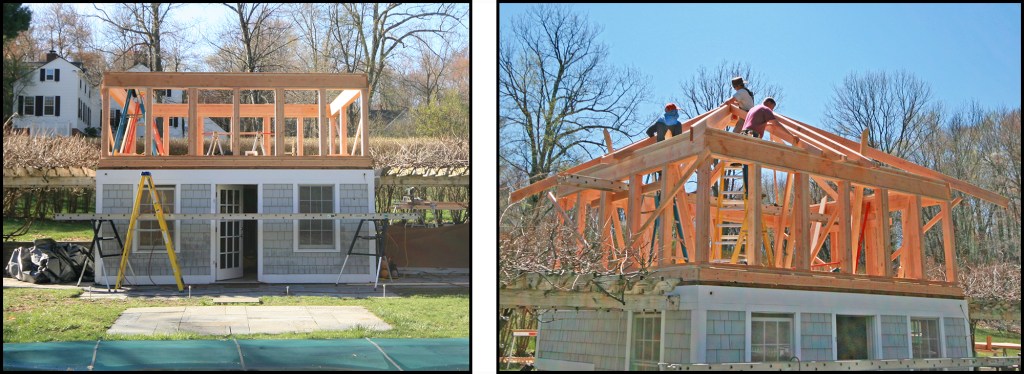
Having been a builder for 45 years, I’ve learned a number of helpful framing tricks along the way. One such trick is a technique for framing hip roofs quickly—mainly, streamlining the process of laying out and cutting the jack rafters. My guess is that quite a few carpenters out there measure and install jack rafters one at a time after the hip rafters are in place. This is time-consuming and unnecessary. The following method will help increase your installation speed and reduce the amount of cutting and material waste when you are making jacks for a standard hip roof.
There are a couple of things to note up front. For one, you need to lay out the jack rafters on the plate at their proper centers so that you can determine their lengths ahead of time. You also need to verify the common-rafter length (I typically cut a couple of test commons and set them in place to make sure they fit). Once I’ve established the common rafter’s length, I can set up a site bench and cut all the jacks and commons on the ground without a lot of measuring and head scratching.
Using a pattern made from a common rafter, I can quickly lay out all the jacks on my rafter stock. I trace and cut the birdsmouths and rafter tails on both ends of the rafter stock all at one. Then I make the hip plumb cuts, where one cut results in two jack rafters. This system works whether you’re building a small hip roof, like this one, or a monster roof with 40-foot-long hips and valleys.
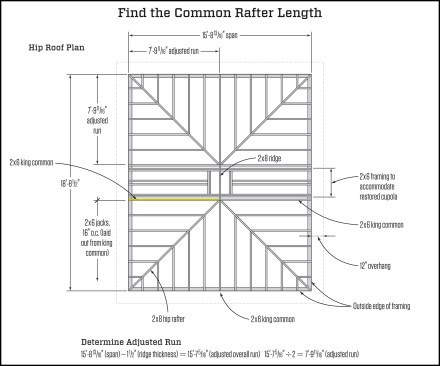
To lay out my jack rafters, I use a pattern made from a common rafter. So the first step in calculating the true length of the common rafters is adjusting the run for the thickness of the ridge (see "Determine Adjusted Run," calculation above). The span of this building was 15 feet 8 13/16 inches. I subtracted out the 2×8 ridge (1 1/2 inches), which gave me an adjusted overall run of 15 feet 7 5/16 inches. I divided this by 2 to arrive at an adjusted run for the common rafters of 7 feet 9 11/16 inches.
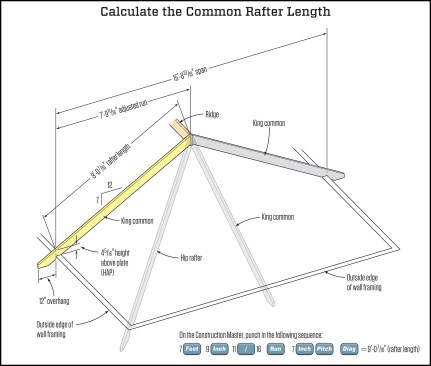
Next, I calculate the length of the common rafter using the Construction Master app on my smartphone (see CM sequence above). The result here was 9 feet, 0-7/16 inches for the length of my common rafters. Once this is done, I can cut my common rafters and move on to making my rafter pattern.
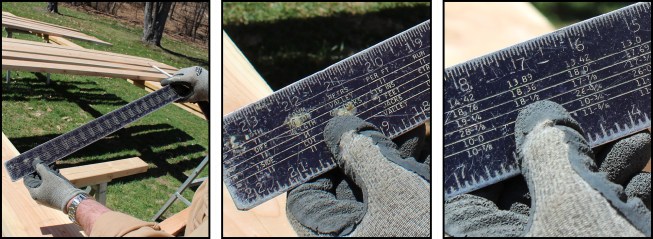
To lay out my pattern (see illustration below), I first need to determine where the jack’s long-point plumb cuts will meet the hip. For this I turn to my framing square (photos above). I use the “difference in jack rafter length at 16 inches o.c.” scale (photo, above middle) to arrive at an 18 1/2-inch on-center spacing for the long point on a 7:12 roof (photo, above right). I could have used the “jack” function on my Construction Master to determine this spacing, but I prefer using the framing square—I find it’s quicker to use; also, I can physically place the square on the rafter pattern to mark my long and short points.
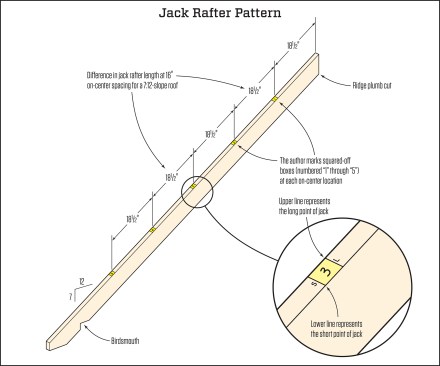
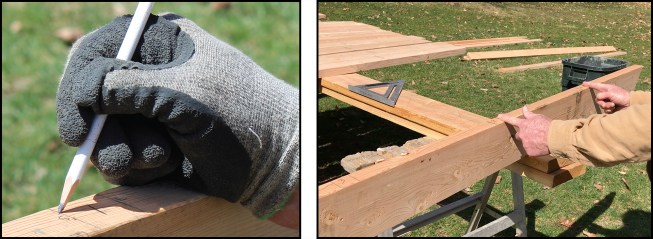
Using a common rafter, I mark and cut the ridge, birdsmouth, and rafter tail to create my jack rafter pattern (see illustration, above). Starting at the upper end of the rafter, I mark 18 1/2-inch centers— at 18 1/2 in., 37 in., 55 1/2 in., and so on—along one edge of the pattern rafter (shown on illustration, above, and in photo, bottom right). At each measurement, I mark the long and short points for the jacks (see illustration inset detail and photo, bottom left) with the tongue of the framing square—1 1/2 inches wide. I then number each layout “box” “1” through “5,” for the five jacks that will make up one side of a corner of this hip roof.


