by George Neuwirt I run a custom home building company in New England; we’ve framed a lot of interesting projects over the years. After reading a recent article in JLC on framing rake walls (9/06), I wanted to share a method we use for framing gable overhangs.
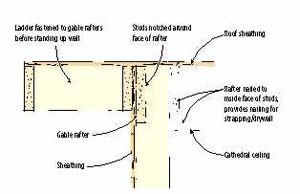
Like the author of the earlier article, we frame the overhang before lifting the wall. We used to do this the conventional way, scabbing short outlook rafters to a gable rafter positioned on top of the gable-wall top plate. But there was a tendency for the gable rafter to peel off or for the overhang to sag when we lifted the wall. So about 10 years ago we adopted a new method, which we’ve used ever since.
We found that it makes for a much stronger assembly if we leave out the top plate and instead notch the studs directly around the gable rafter (see illustration, above). We nail off the studs through the face of the rafter and add the sheathing, and we have a rugged wall with solid backing for the ladder.
Another advantage to this detail is that it’s easy to add a nailer on the inside when we have a cathedral ceiling.
George Neuwirt runs a custom home building and remodeling business in Sunapee, N.H.
On Site With Durisol
by Alpheus Fair Last year, we had the opportunity to work with a foundation material called Durisol while building an addition in suburban Maryland. Although this product (866/801-0999, www.durisol.com) has been around for years, it was new to us — introduced, actually, by the client, who liked that it’s made from recycled and renewable materials and is nontoxic to the environment. Similar in some ways to ICFs, Durisol blocks are made from mineralized wood chips bonded under pressure with portland cement. They have good R-value when ordered with insulation inserts, and come in a variety of widths and lengths. We used 12-inch-by-24-inch block with a 1.5-inch mineral-wool insert.
The blocks were shipped on standard 4-foot-by-4-foot pallets (1) directly from the factory in Canada to my job site; they arrived about four weeks after I placed the order. We had to rent a forklift to place the material curbside, which took about four hours.
The product retains many of the characteristics of its wood component; you can cut, screw, glue, and nail it with conventional tools. One inexpensive carbide-tipped blade in my 71/4-inch circular saw lasted me the entire job (2). When the depth of cut exceeded the capacity of my circular saw, we used a reciprocating saw with a masonry bit (3).
The top course of block had to be cut down 3 inches to make necessary grade. To ensure a consistent cut, we clamped a straightedge to the saw (4).
Whenever we cut from the exterior side of the block, we were careful to adjust the blade depth so as not to cut the mineral-wool insulation insert. After cutting through the cementitious exterior, we would go back through the saw kerf with a hacksaw blade mounted in a simple straight plastic handle to cut the insulation (5).
To create a bond beam across the top course, we first kerfed the block webs (6), then tapped lightly with a hammer to remove the material (7, 8).
We used a pump truck to place the concrete (9), following the manufacturer’s recommended concrete specifications: 2,500 psi @ 28 days, minimum slump of 7 inches, aggregate not to exceed 3/8 inch. We began placement at window openings to prevent any voids as the rest of the wall was poured.
Once the area below the windows was filled, we slowly filled the wall cavity, starting at least 3 feet from corners and taking care not to exceed a vertical height of 4 feet per hour, again per the manufacturer’s specs.
Since Durisol isn’t structural, we had to place the 2×6 wall for the addition directly above the concrete core, creating a 4-inch ledge on the outside. We dealt with this by installing copper flashing with a drip cap along the top of the foundation wall, then allowed the stucco finish on the 2×6 wall to bell out slightly to get a pleasing finished look (10, 11).
10
11
Alpheus Fair owns and operates Fair Carpentry, a custom-build firm in Takoma Park, Md.


