Overview
Air barriers must work together to provide a continuous and complete enclosure of the building envelope—floors, walls and roof. Every subcontractor and installer on the job should understand the importance of maintaining the air barrier. A few holes carelessly drilled in the wrong places can undo the work of many other people.
Passive House air-sealing standards. There are now two Passive House standards – one that originated in Germany, and the other a U.S. offshoot set by the Passive House Institute U.S. (PHIUS) Both have rigorous air-sealing requirements, but the climate-specific PHIUS standard is probably a little more forgiving.
Pretty good air sealing. If you’re not going that distance, consider shooting for a blower-door result of between 1 and 2 air changes per hour at 50 pascals of pressure (ach50). Under the 2012 International Energy Conservation Code, blower-door testing is mandatory:
in Climate Zones 3 to 8, houses must test at 3 ach50 or lower
in Climate Zones 1 and 2, houses must test at 5 ach50 or lower
See also the EERE Air Leakage Guide.
Air-Sealing Materials
A variety of materials may be used to form an air barrier, including lumber, drywall, plywood, special membranes, tapes, caulks, and spray foam. What’s important is how these materials are applied, and how they are integrated with each.
Here’s a summary of the major groups of materials that can be used:
- Sealant tapes. High-quality tapes, such as those made by Siga, 3M and others, can form a tenacious bond and remain flexible over long periods of time. Tapes are more effective at creating a continuous seal at doors and windows than a canned foam sealant, which cures rigid and the seal may be broken when wood shrinks. It is also all-too-easy to apply with gaps and voids that will leak.
- Membranes. Housewrap, plastic sheeting, and specialized products such as Pro Clima DB+ all are examples of air barriers that come on a roll and are applied beneath concrete slabs, and in wall and roof assemblies. Some are vapor permeable and some aren’t, so they aren’t interchangeable. Where they are used depends on their particular properties.
- Liquid-applied sealants. Some are applied with a roller, others with a sprayer. They are especially effective at filling irregular gaps.
- Sheet goods. Drywall and plywood can become part of the air barrier. Joints between panels must be sealed. Some products, such as Huber’s ZipSystem sheathing, come with sealing tape. OSB may or may not be an effective air sealing material, and should be avoided if aiming for a rigorous standard.
- Caulk. A number of readily available caulks make excellent air seals around penetrations for wires and pipes. Caulk is more durable than foam sealant when a wire or pipe is likely to be flexed or moved, although it must cure completely before being stressed in order to maintain its bond.
- Spray foam insulation. Both open-cell and closed-cell spray polyurethane foam can make an effective air barrier. One advantage of foam is that it fills gaps and seals leak in irregularly shaped and hard-to-reach places, such as the area around a band joist.
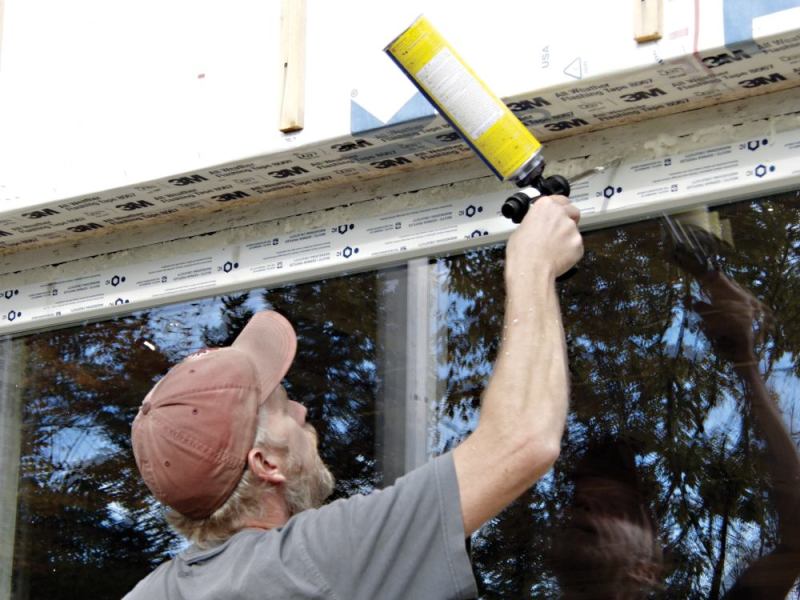
- Canned foam. Although some builders doubt its long-term effectiveness, foam sealant in a can is often used to seal windows and doors in place, and to fill gaps around pipes and wires.
Common Air Leaks
Where to focus your air-sealing efforts. Just about any part of the building envelope will leak if given the chance, but the places where leaks are most likely to occur are low and high on a building. Generally leaks occur where one material or part of an assembly meets another.
Basements and Band Joists
The area around the band joist has lots of potential for leaks because so many different materials come together here—the foundation wall, the mudsill, and wall and floor sheathing. The slab and the connection between foundation walls and slab also are potential leaky spots. Windows set in foundation walls are notoriously leaky.
Framed Walls
Gaps between sheathing panels, and the spaces between door and window jambs and the rough openings are typical places for air leaks. Pay particular attention to where exterior walls meet the foundation and the top plate. These are both spots where dissimilar materials meet and where barriers from one plane to another must be joined together.
Any through-the-wall penetrations also are a common source of leaks. This can include gaps around electrical service entrances, water and drain lines, vent hoods and any other spot where the barrier is breached.
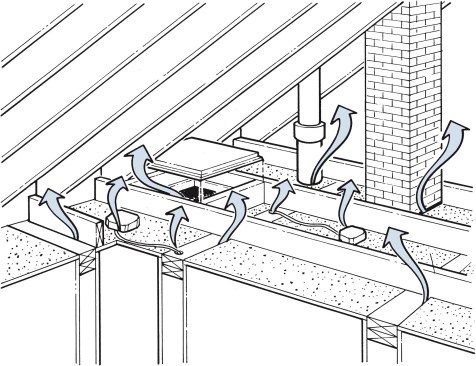
Ceilings and Attics
Ceilings are full of opportunities for air leaks, not only around the perimeter, where ceilings meet walls, but also via the many penetrations that are common in the ceiling. They include recessed light fixtures, electrical and plumbing chases, gaps around chimneys, and holes for wiring, pipes and ductwork.
Air-Sealing Priorities
What to tackle first? Tests at the Owens-Corning research facility provide a good idea of where you will get the biggest bang for your air-sealing buck.
These guidelines should be a starting point. Keep in mind the Owens-Corning research applies to a relatively small, two-story house on a slab, and results may not translate to every other house type or size. Other potential leaks that weren’t specifically studied, such as rough-in mechanical penetrations through interior wall plates, aren’t covered.
Air-Sealing Attics
The ceiling plane between the conditioned space and the attic is typically a large area, and there’s a big payoff in beefing up the insulation and sealing air leaks here simply because there’s so much real estate.
All of the penetrations for wires, ducts, and pipes must be sealed with caulk, foam, or building tape.
Recessed light fixtures and duct boots are often big offenders (see Air-Sealing Priorities above). If the light fixtures will be used in a cathedral ceiling, read that section below.
You can reduce leaks around light fixtures by making a box from foil-faced rigid foam insulation and sealing it in place with expanding foam. Seal around the electrical feeds and the mounting brackets with expanding foam.
In new construction, an effective strategy for sealing the ceiling is to bring the housewrap on exterior walls up and over a strip of 3/4-in. plywood attached to the top plate.
Apply a continuous layer of drywall before interior walls are built, and apply a strip of sealing tape to the outside of the wall as shown. The advantage here is that the potential leaks where the ceiling meets the top plates of each room are eliminated.
Another approach is to seal the perimeter of the ceiling with expanding spray foam after the ceiling panels have been hung but before the wall panels have been installed. This will make a more reliable seal than paper drywall tape and joint compound.
Foam sealant can be sprayed over gaps around light fixtures, fan boxes and duct boots.
Foam sealant can’t be used, however, around chimneys, where leaks can be significant. Instead, use sheet metal sealed with a high-temperature caulk that meets the ASTM 136 standard.
Air-Sealing Foundations and Crawlspaces
Slabs. The air barrier should begin beneath the slab with a product such as Stego Wrap, a vapor and radon barrier as well as a hedge against air leaks.
Poured concrete foundations are relatively airtight by themselves. However, the joint between the wall and the footing, and between the footing and the slab, are potential leaks and should be sealed.
Block foundations (CMU walls) can be leaky. They need to be sealed with a coat of plaster or a fluid-applied air barrier. Basement windows also are known for air leaks. If they’re not essential for egress, try to avoid them in the first place.
Vented crawlspaces. Crawlspaces have traditionally been vented to the outside and left as unconditioned space. In this case, the floor between the crawlspace and the conditioned interior becomes the location for the air and thermal barriers. This floor assembly can be sealed with a combination of rigid foam insulation applied to the bottom of the joists, taped at the seams and foamed at the perimeter. The rim joist area can be sealed with open- or closed-cell foam.
Another option for sealing the rim joist area suggested by Energy Star’s Thermal Bypass Checklist (PDF) is to install a small structural insulated panel in place of conventional 2x material. The SIP acts as both an air and thermal barrier.
Conditioned crawlspaces. Increasingly, crawlspaces are treated as conditioned space. In this case, outside walls are insulated with rigid foam in an amount appropriate for the climate zone. Panels should be taped at the seams, and the band joist area sealed with spray foam. The foam should be lapped over the top edge of the rigid insulation to create the seal.
Air-Sealing Windows
Windows are part of a building’s air barrier, and they must be connected to other components of the air barrier in order to keep air leaks to a minimum.
The Building America program recommends applying the air seal between the window unit and the rough opening toward the interior edge of the window frame. This creates the least interference with drainage. And this way, the seal is pressure equalized with the outdoors, so there’s no air pressure difference to push moisture into the joint.
The window should be sealed into the rough opening with an impermeable material—fiberglass insulation stuffed into the crack is not an effective air barrier.
Air barrier tape, caulk (used in conjunction with backer rod for large gaps), and low-expansion foam sealant all are materials that can be used.
Openings in a wall with continuous exterior foam. The use of rigid foam on the building exterior complicates air sealing around windows.
Sealing the Rim Joist
Rim joists at the first-floor level and band-joists between stories, are difficult place to seal because a number of components come together here—sill plates or top plates, the rim joist and subflooring.
Alternately, a layer of closed-cell spray polyurethane foam that encases the mudsill/foundation connection and covers the back of the rim joist provides an excellent air barrier. Low-density, open-cell foam also can be used here, but it may need an additional vapor retarder in Climate Zones 6 and higher.
Fiberglass batt insulation stuffed into joist cavities against the rim joist will not block the flow of air between the basement and the rim joist. This can increase the risk of condensation, leading to mold growth in this area.
Air-Sealing Walls
Knee walls. A common problem with knee walls is a lack of blocking below the knee wall’s bottom plate. This allows cold air from the attic or the outside to move through the insulation and into the ceiling and attic. Install blocking between joists, and seal the perimeter of the blocking with caulk or foam sealant.
When knee walls contain ducts and pipes that make effective insulating and air-sealing impossible, shift the thermal and air barriers to the slope of the roof. Add a layer of rigid foam insulation to the bottom of the rafters and seal all of the seams and the perimeter. Fill the cavities with blown-in cellulose or fiberglass. Or, use closed-cell spray-foam insulation to insulate and provide an air barrier.
Balloon-framed and gable walls. In a balloon-framed wall, studs run all the way from the sills to the rafters. At the attic line, there’s typically a gap between the first ceiling joist and the exterior walls on the gable ends. These must be blocked and sealed to prevent air from leaking into the attic. The blocking can be made from a variety of rigid materials, as long as the perimeter is carefully sealed.
Cantilevers. At the wall line, add blocking between the joists and seal the edges to prevent air from moving into the ceiling. Blocking can be made from solid wood, plywood or rigid foam with the edges foamed or otherwise sealed in place. In addition, the sill plate of the upper wall should be sealed to the subfloor. Seal any seams in the subfloor, and seal any penetrations through the subfloor for wires or pipes.
Slideshow: Air Sealing Tips and Tricks
Air sealing at the sheathing layer. Huber’s Zip Wall System, in which all seams are sealed with a proprietary tape, or taped housewrap can be an effective air barrier on conventionally framed exterior walls.
When using housewrap, fasten it to the wall with cap fasteners, or use staples at seam overlaps only.
All seams and edges must be taped (particularly at the base of the wall), and all holes for vents, electric and water service must be sealed. (See Weather Barriers and Flashing.)


