In 2015, New York State, where I work, adopted the International Residential Code (IRC) requirement for all new homes to be tested with a blower door and to pass an air leakage standard of 3 air changes per hour at 50 pascals of pressure (3 ACH50). As a certified Home Energy Rating System (HERS) rater, I perform the service of third-party verification of homes under construction. At the point in the construction process when homes are able to be pressurized or depressurized, I go to the house with my blower door and test the home’s air leakage to determine whether or not the house complies with code.
When New York first adopted the blower-door requirement, very few builders in my Rochester market were ready for the change. Even now, four years later, some builders are having trouble passing the test. The builders who have already been through the wringer, the ones who are building more than 20 houses a year, have all stumbled and are just now starting to get the hang of it. Their prints have now been updated and their trade contractors have been trained, and they are passing on a more regular basis. But smaller contractors and owner-builders who are contracting their own homes are often unaware that they even need to have a blower-door test done, and they are still struggling to meet the 3 ACH50 standard.
In the past, I worked for many years as a home-performance technician, upgrading existing homes to make them more airtight and energy-efficient. I’m experienced at finding and sealing air leaks. So when a house doesn’t pass the test (whether I did the testing or somebody else did), many builders turn to me to help them tighten up the house enough to get over the bar. In that case, we’ve got some work to do.
If somebody misses by just a little, we may be able to find a few big air leaks right away, seal them up, and get to passing that day. But when the numbers are way off, I have to schedule another visit to do blower-door-assisted air-sealing. So far, nobody has been unable to pass the test after some remedial sealing. Below, I’ve identified a few classic trouble spots that we frequently come across and need to remedy.
Even though we have been able to help builders squeak over the line with remedial air-sealing, I do not recommend that approach. In this story, I’ll explain some of the ways we’ve solved problems at that stage. But I recommend that builders address these types of air leaks during the framing stage, when assemblies are exposed and can be sealed without drastic measures.
Unsealed Ceiling
The worst example of failure I’ve encountered so far was a slab-on-grade home that, based on the home’s volume, needed to test at 800 cubic feet per minute at 50 pascals (800 CFM50), but was actually at about 3,000 CFM50. [Editor’s note: For an explanation of the relationship between CFM (cubic feet per minute) and ACH (air changes per hour), see “Blower Doors for Builders,” by Jake Bruton (Mar/19).] Fortunately, the builder had not yet installed the baseboard trim, so we were able to access the area at the base of the exterior walls and caulk that joint. The home’s ductwork was in the attic, and none of the duct registers were sealed at all, so we took care of that. Then there was a large room with a vaulted tongue-and-groove ceiling with no air barrier behind it. This unsealed ceiling was applied to a scissors truss, so, luckily, it could still be accessed from above.
We quickly realized that we weren’t going to be able to air-seal the back of the tongue-and-groove ceiling with all of the insulation in the way, so we emptied the attic of insulation. Next, we cut Tyvek housewrap the width of the trusses and rolled it down on the top side of the ceiling between the trusses. Then, using two-part foam, we sealed the Tyvek to the sides of the trusses.
Top-Plate Joints
The joints between the wall drywall and the top plates—specifically, top plates that are exposed to an attic space, whether they are exterior-wall top plates or interior-partition-wall top plates—are often huge air-leakage areas. When you’re framing a wall, if the stud is proud of the top plate by even 1/8 inch, the wall drywall is pushed far enough off the top plate to create a gap along the top plate that communicates between the wall cavity and the attic. Air from the unconditioned attic moves everywhere from there: I find air infiltration at interior door strikes, at all of the outlets, at switches, and at heating and cooling registers.
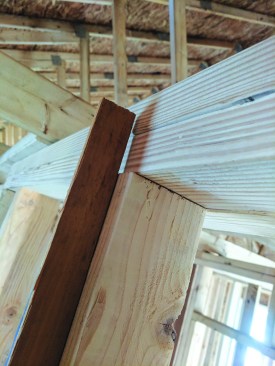
Studs often stand proud of the top plate—here, by a strong 1/8 inch. This situation will hold the drywall away from the top plate, allowing a pathway for air infiltration from the attic if not addressed.

The author seals this joint from the top in a home that failed its code-mandated blower-door test.
With the blower door running, usually the first place I look is at the door strike for an interior door. Where the strike is open to the rough opening, you can feel air blowing in between the frame and the opening. If it’s cold enough outside, you can see it with an infrared camera, blowing down from the attic. The remedy is to flip the blower door around and pressurize the house, and then climb up into the attic and feel the air blowing up between the top plates. After you pull all the insulation away and find the top plates, you can apply caulk and gun foam and fairly quickly—in just an hour or two—knock off 300 to 800 CFM by sealing the drywall to the plates.
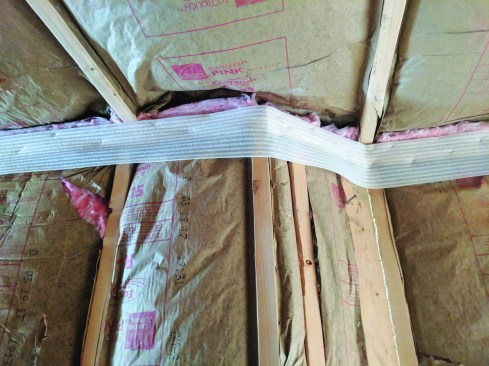
Here, the builder has applied sill-sealer material to the top plates in a home.
When drywall is installed, the sill sealer will form a gasketed seal and prevent air infiltration at the top of the wall.
Of course, it’s better to make the air-seal during construction, instead of as a repair after failing a blower-door test. One solution that I recommend to builders is to use sill-sealer gasket material on their top plates to help cover that void. When you roll out this 7-inch or 8-inch sill-seal gasket over the top plate, it makes a nice little gasket that the drywall can seal up to. Habitat for Humanity started doing that in my area and saw a significant improvement. The first house that I ever tested for the organization was at 9 air changes per hour, and now its houses are at about 2.
Entry Foyer Stair Landings
In my market, two-story entry foyers are common, and it’s typical to find stairs to the second floor in that room. I frequently find leaks at the stair landing where it connects to the balloon-framed wall. The leak occurs where the drywall contacts the landing. If it’s a carpeted landing, sealing that joint is as simple as pulling the carpeting back and caulking under the trim, and then tucking the carpet back in. If it’s a finished hardwood floor, things are a little bit trickier: Sealing the joint requires pulling the trim off to access the joint between the drywall and the floor.
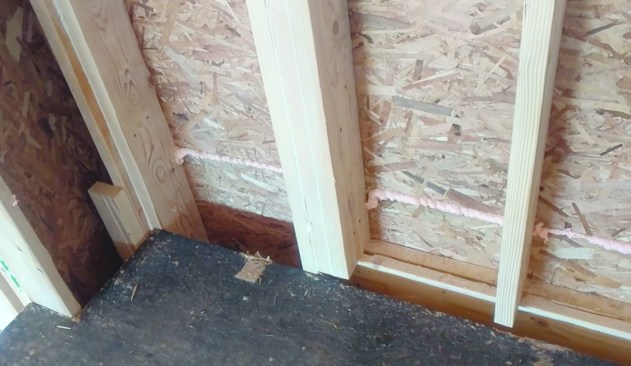
Here, the framing juncture between a stair landing and a balloon-framed wall has no solid blocking where drywall will meet the floor.
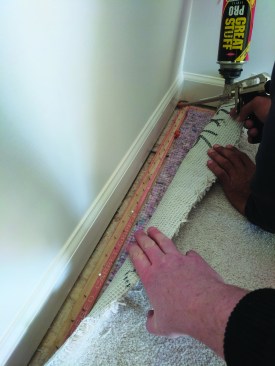
Without the blocking, air pours through the gap beneath the baseboard. The author pulls back the carpet at a landing in a finished house and seals the joint with gun foam.
Staircases on Garage Walls
Another trouble spot I see quite often is where a staircase attaches to a wall between a house and the garage. In this case, there’s usually a false ceiling on the underside of the staircase, and a wide-open air gap between the stairs and the garage wall. If the drywall on the garage side isn’t sealed to the slab, which it’s usually not, then air can readily find its way into the garage wall, and then into the underside of the stairs, and then into all sorts of framing cavities in the main house.
A stair against a garage wall creates a highway for likely air infiltration.
To address this air-leakage pathway, I ask the builders I work with to seal the joint between the drywall and the garage slab or the band joist on the garage side of the wall. I also recommend installing an air-barrier material such as rigid foam board over the air gap between the staircase and its false ceiling. This is not a condition that can be easily addressed once the house is finished, so it should be taken care of at the framing stage.
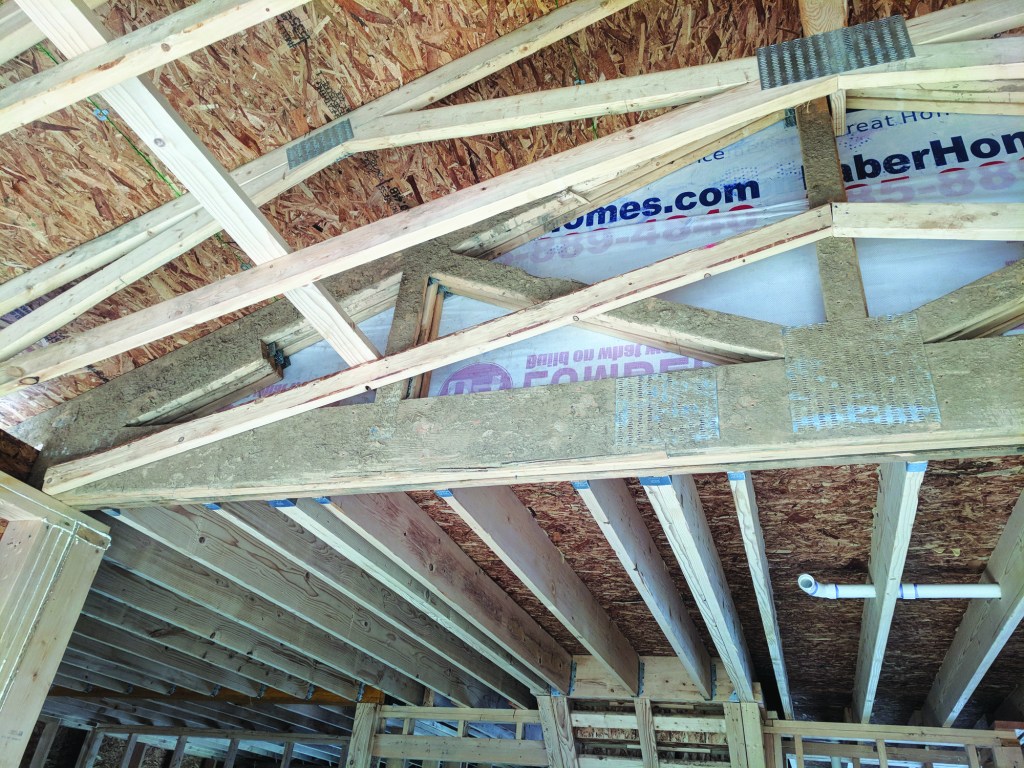
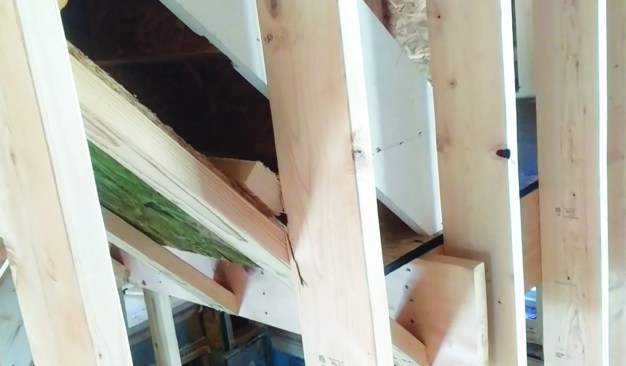
Attic-to-Wall Intersections
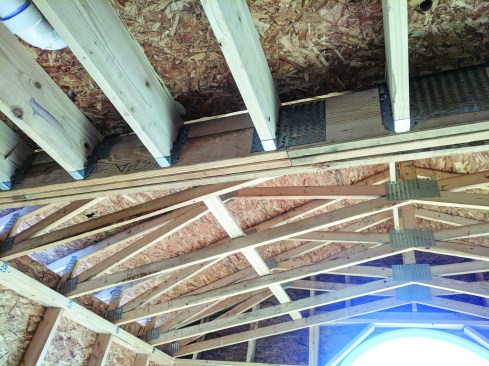
Another condition that I often see involves the juncture of a first-story scissors-truss roof (or flat attic) with a second-story wall. A potential problem exists wherever a laminated beam or girder truss is required to carry the second-floor floor joists with hangers. A typical situation is a one-story morning room abutting the back of a two-story main house. In the example shown here, a tripled-up girder truss supported the floor framing for the second floor of the main house, with the floor joists hung off of the truss. The vented attic of the lower space contacted the wall of the second story and its floor framing—which is also the ceiling framing for the first floor of the main house.
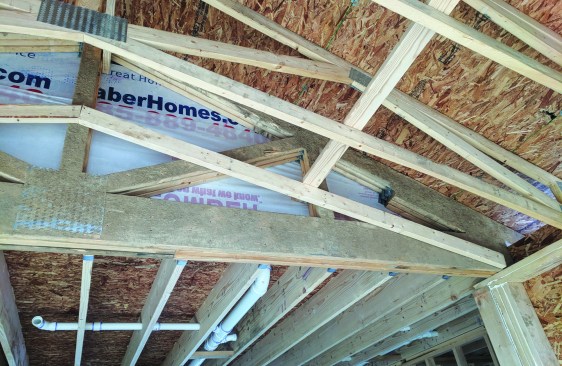
A scissors-truss roof abuts a carrying beam for a floor system …
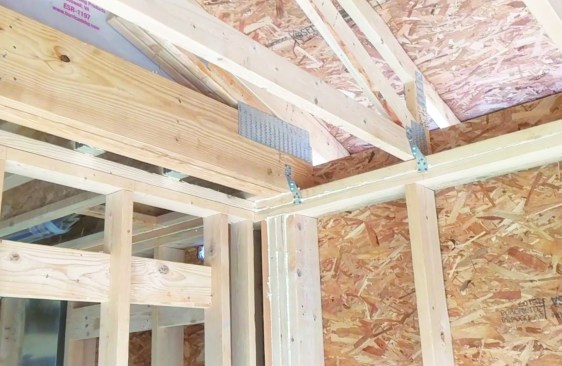
… as does this flat ceiling truss.
The hangers of the floor joists hold the drywall down from the girder truss, and the second-floor subfloor can’t reach all the way out to the edge of the girder truss because the chord members are in the way. As a result, a pathway is opened up for unconditioned air in the ventilated lower attic to move into the first-floor ceiling assembly and down into the room through recessed lights—or, depending on the air pressures, for conditioned air to find its way into the attic. This is just about impossible to fix once the house is finished.
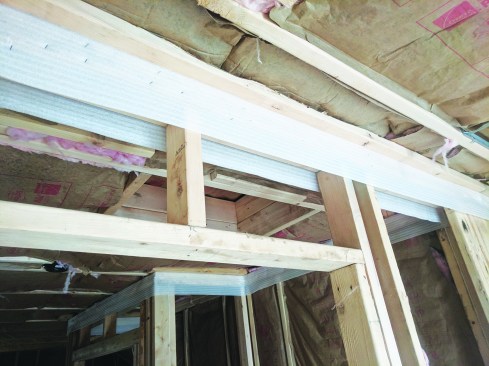
The leakage pathway is visible when the framing junction is viewed from the other side
The time to address this problem is at the pre-drywall phase. At that point, critical air leak points can be identified and sealed with gun foam. The bottom of the girder truss or laminated beam should be gasketed as well. I usually recommend that the builder or framer staple sill-seal gasket material on the underside of any place there are hangers supporting the second-story floor joists. This gasketing will seal the joint between the drywall and the beam or girder truss.
Educating Builders and Trades
The requirement for a blower-door test and the need to pass an airtightness spec is old hat for Energy Star builders. But for builders who haven’t been participating in any above-code program, it’s a new challenge and an added cost. It’s new for them to have to pay me $75 an hour to come to their house and test it. But it’s even worse when they have to pay me to come back a second or even a third time to remediate their house if they fail the first time.
Obviously, the ideal time to address these air leaks is before you do the final blower-door test. But for that, you have to know what to look for, and what to do, at the framing stage. I’ve offered to sit down with builders to go over recommendations with them, but I’ve had very few takers. Instead, they end up paying me more to go up into their attics and fix problems.
The learning curve is a challenge for the building trades, as well as for the builder. At some point, somebody has to take responsibility for air-sealing—but who? When a house fails to pass, the finger-pointing starts. Was it a trade’s fault, or the builder’s, or the architect’s (because, after all, the air-sealing details weren’t on the prints)?
When I’m walking through a house with a builder after it has failed a blower-door test, I like to stop at an outlet near the door between the garage and the main house. I’ll ask, “How many people put their hand on that outlet before I told you to seal it?” The framer was there; the insulator was there; the electrician was there; the drywaller was there; the painter was there; and the builder walked by the outlet every single time he walked in the building. Yet nobody sealed the outlet to the drywall. This is generally true: Multiple trades are dealing with components that leak air, and any of them could theoretically take responsibility for it. But because it’s not in any of their contracts, nobody is doing it.
Photos by Matt Bowers


