DOE Building America
…
Guidelines from the U.S. Department of Energy’s (DOE’s) Building America program cover the design and construction of wall assemblies that use more than 1 ½ inches of rigid exterior insulation. Written by Joe Lstiburek and Peter Baker of Building Science Corporation (BSC), the 115-page “Measure Guideline: Incorporating Thick Layers of Exterior Rigid Insulation on Walls” offers clear guidance on some of the tricky details required to maintain a consistent “water-control layer” when you have fat layers of exterior foam.
Control layers. Those familiar with Lstiburek’s thinking about building envelopes will recognize the terminology. For Lstiburek, it’s all about “control layers”—the various systems that control the flow of moisture vapor, air, bulk water, and heat through a wall assembly. His is a conceptual way of keeping track of what a wall needs to do. You can substitute the terms vapor retarder, air barrier, weather barrier, and insulation for each of the control layers. But thinking in terms of layers moves us away from focusing on single materials and toward a systems approach that integrates several components to form a continuous layer. For example, a complete weather barrier is not just housewrap that we need to roll out onto a wall; it must also include the flashings, tapes, and sealants that complete a “water-control layer” to keep rainwater and wind-driven snow out of the wall.
The confusing part is that the materials that make up one layer often do double- or even triple-duty. The materials in the water-control layer might also be integral to the air barrier, for instance, as when you tape seams in overlapping pieces of housewrap. And when you tape the seams in the exterior foam to help seal out air and water, you are making use of the thermal-control layer (foam insulation) to control air and water flow, as well.
Thinking in terms of layers helps us evaluate each of the elements we are trying to control. So, for example, if we’re using a taped weather barrier as an air barrier, pausing to identify the continuity of the air-control layer might help us remember to apply a foam sealant around penetrations to stop air flow. This is an added step, if you will, to the steps needed for controlling bulk water—the shingled flashings that stop water leakage around those same penetrations. “Control layers” is a little academic, but I think it’s a helpful way to stay mindful of the purposes for all the different envelope materials. And when we add thick foam to the exterior, keeping track of all these different flows can get tricky. That’s where this Building America document shines especially bright.
Reasons for exterior foam
There are good reasons to use exterior foam. The opportunity to extract triple-duty performance from the foam, as mentioned, is one. Creating an effective thermal-control layer by shutting down most of the thermal bridges, of course, is another. This is probably the main reason energy codes have pushed builders toward continuous insulation, and why the Building America program is working hard to create practical building details for this approach. But there’s a third reason that jumped out at me from these guidelines, not least because it bumps up against an issue covered last month in this column (“Lessons in Building Science” Apr/15): With enough exterior foam on the wall, you don’t have to worry as much about wall-cavity condensation. Exterior foam becomes your primary “vapor-control strategy,” and it works regardless of the climate zone. It’s especially good for reducing the condensation risk in any climate zone where air conditioning is included. (Even in cold climates, we all know, AC is frequently installed). This does mean that no warm-side vapor retarder should be used, and no vapor-closed interior paints or vinyl wallpaper should be applied to interior walls. If the walls are allowed to dry to the inside, leaning on the right amount of exterior foam is, in the words of the guide, “arguably the most effective means of condensation control from both air transported vapor (air leakage) and vapor diffusion.”
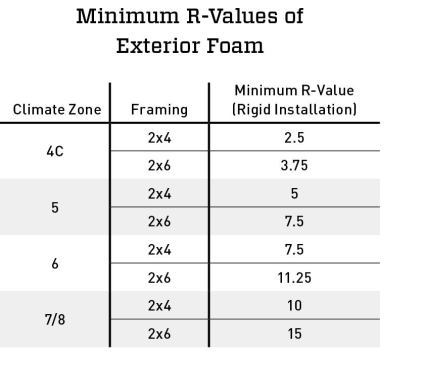
How much foam is the right amount? The guide provides the answer in clear terms via the 2009 and 2012 IRC (see table, above). If you’re building in climate zone 5, for example, you need at least 1 ½ inches when using extruded polystyrene (at R-5 per inch), and in climate zone 8, you need 3 inches (or 2 inches of polyiso at R-8 per inch). Remember, these are only minimum values to keep the inside face of the exterior sheathing above the dew point. More foam, of course, will increase thermal performance.
The prescribed values assume that the 2×4 or 2×6 wall will be filled with cavity insulation. The guidelines are careful to note that if your walls will be fatter than 2×6 (that is, have more cavity-wall insulation and a greater risk that the sheathing will reach the dew point), additional analysis is recommended. The type of analysis the authors are referring to here is the sort done by BSC on the net-zero homes built by R. Carter Scott and company, as described in this column in March (see “Moisture in Fat Walls—A Closer Look,” Mar/15).
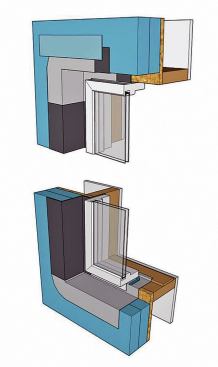
Exterior Details For Fat Foam
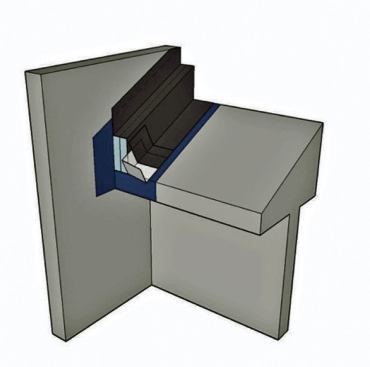
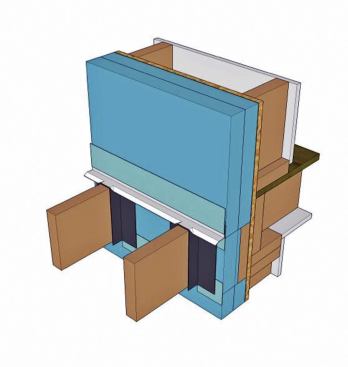
The meat of this document comes in the step-by-step guidelines for integrating the water-control layer with thick layers of foam. Many are based on real-world experience, including some documented in JLC by David Joyce, working on projects for BSC’s Betsy Petitt (see “Retrofitting Exterior Insulation,” Nov/09). But there are a number of important details we have not seen—details that are common on homes. Key examples include integrating fat foam with the step-flashing and kick-out needed for an intersecting roof (see Fat Foam Meets Side-Wall Flashing, above) and attaching a deck ledger (see illustration, left). Detailing for two cases—installing the water-control layer over the foam and under the foam—are provided.
Why Insist on Cost-Effectiveness?
There are some parts of this guide that are much less insightful, namely the cost analysis. It starts with a “base wall” that’s fully sheathed with OSB, but then evaluates the added cost of foam sheathing using walls that are only 25% sheathed. This 25% “is a result of installing OSB only where structurally necessary,” which isn’t realistic.
You can, in some locations, sheathe only corners. But then you must deal with the discrepancy in thickness between the sheathed framing and the unsheathed framing. Are you really going to use ½- or 5/8-inch foam to flatten out the surface before applying thicker layers of foam? There is no evidence in the guidelines that the cost analysis factors in the extra labor to do this or that the labor cost would offset the added cost of more OSB. It’s telling that none of the details show anything but a continuous layer of structural sheathing, and in many locales, you need continuous structural sheathing to meet wind bracing requirements (assuming you want windows).
I’m not blaming BSC. I’m guessing they were encouraged by the DOE to use bare-bones building requirements as a basis for cost-effectiveness. For a bare-bones house, it’s probably perfect. But it doesn’t accurately reflect the way most houses are built.
The DOE should give up on insisting that every energy upgrade be cost-effective. Can you imagine if the auto and computer industries advanced only technological improvements that were cost-effective? The energy-efficient housing industry shouldn’t feel so constrained. Hats off to those, like BSC, who keep pushing the envelope (pun intended), regardless.


