
I met Mick and Laura Waverly in 2014 when they bought an early 1900s Dutch Colonial in Albany, N.Y. Since then, they have become long-time, repeat clients. Their home has beautiful interior millwork, including coffered ceilings, French doors, solid hardwood floors, and built-up window and door casings. But like a lot of older homes, this one was not well insulated, had older windows, and was generally in need of weatherization and energy upgrades. That’s where I stepped in.
In the years since we met, the Waverly family has had us do a ton of work on their home. Whether my role was to perform the work or to provide a lead for the owner to hire another trade, I always got that first phone call. As a sole proprietor, I sometimes function as the general contractor and sometimes I play more of a consulting role, helping the owner hire and coordinate contractors for roofing and mechanicals—work outside the domains of demolition, carpentry, waterproofing, and insulating that I typically perform. Could I have made more money as the GC? Possibly. But I earn nearly all of my income from my own billable hours, and find it is often in my best interest to give a trusted, repeat customer the name and number of a trusted trades professional for work that falls outside my wheelhouse. That frees me up to do what I do best, and it relieves me of considerable risk.
I believe that my experience with the projects completed on this home, as detailed below, can offer contractors some ideas on how to make an older home more comfortable and more durable. The project descriptions may also suggest ways to communicate the value of this work to their clients.
Fun or Functional?
The Waverlys have always chosen pragmatic and responsible ways to upgrade their home, choosing work that enhanced durability, rather than those “fun” projects that might bring them joy but did not add to the home’s long-term resilience. Like many middle-income home owners, their primary focus has been on removing uncomfortable conditions, such as cold floors (and those high heating bills), rather than on adding luxury. Of course, aesthetics and design are still important to them. Like most people, they want a beautiful home. However, when the budget is limited, projects that reduce discomfort usually take precedence over nonessentials, and the Waverlys have always been especially tuned to the functional aspects of their home. They see their home as a long-term investment and know that paying upfront for energy upgrades, for instance, provides both comfort and long-term fiscal health.
Rim Joist Insulation
The first upgrade the Waverly’s hired us for was insulating the rim joists in the basement. I recommended this initial scope of work because I consider it “low-hanging fruit.” It’s typically not a heavy lift from an install perspective, especially when the basement is not finished and is completely accessible. In upstate N.Y., it’s common to see warm basements with rim joists that are insulated with fiberglass. But this offers no air-sealing effect, so condensation can form on the backside of the rim joists. I have seen this condition, and the rotten rim joists that result, more times than I can count. I suggested using closed-cell spray foam (CCSF).
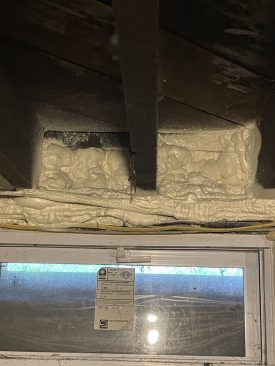
Cold floors and high heating bills prompted questions from the homeowner. Insulating the rim joist with closed-cell spray foam was the first step the author recommended.
Despite the environmental concerns that some people have toward CCSF, it serves a purpose and serves it well. It checks all of the boxes that we were looking for: insulation, air sealing, and ease of installation. A common alternative is what we call “poor man’s spray foam,” which is cutting blocks of rigid insulation board, fitting them in the bays, and using canned foam to seal the edges. This is a DIY-friendly approach, but is time-consuming to get a tight seal. And given the straightforward layout and clear access after we cleared the way, the spray foam contractor was able to shoot the entire job for just over his minimum fee of $900. In 2014, this was a no-brainer and money well spent.
The result? Less heat loss in the winter, fewer drafts during windy conditions, and, of course, warmer floors on those cold winter nights!
Wet Basement Woes
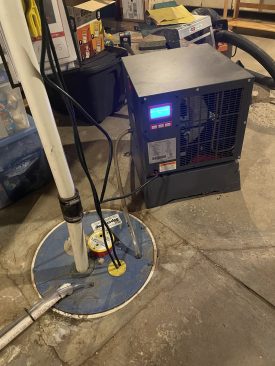
A heavy-duty sump pump with a battery-powered backup and commercial-grade dehumidifier have helped keep the basement noticeably drier.
When Mick and Laura moved into their home, they quickly discovered that the existing basement sump pump was running far too often for their comfort level. It had no battery backup, and their fear was that in the event of a power outage they would be left with a basement full of water. The solution was a new, heavy-duty sump pump with a battery-powered backup installed by a local contractor I recommended. When power is lost in the home, a sensor relays a signal to a module that enables the sump pump to be powered by a deep-cycle marine battery. The battery is kept at full capacity with a charger and tender (which monitors the battery and switches to float mode to prevent overcharging) when the power is up and running. After I saw the relative simplicity of this system, I installed one for another client who had similar conditions and concerns.
Additionally, to alleviate the general higher relative humidity levels in the basement, the Waverlys had a commercial dehumidifier installed by the same company that installed the sump-pump backup system. Although there are no metrics or data to share, the basement is noticeably drier and the usual musty smell is gone.
New Roof
When the Waverlys bought their home, they hired my friend Tony Blue of Squared Away Contracting in Albany to perform a roof inspection. While the roof was included in their pre-purchase inspection, the report was superficial and limited in scope. Tony’s inspections are much different. Based on his recommendations, which included a careful inspection of the attic, it was clear it was time for a new roof.
The older three-tab shingles were removed and replaced with architectural shingles. This, coupled with new soffit and ridge venting, now offers a durable, well-vented roof assembly that performs better than the previous box vents. Additionally, the low-slope, flat-lock tin roofs on the porches were replaced with rolled SBS asphalt. The Waverlys hired Tony and his company directly. This saved them from cold-calling roofing contractors, not knowing what to expect or whom to trust with such a critical upgrade to the home. It also saved them a subcontracting markup and saved me from the responsibility for any future roof leaks or blow-offs.
New Windows
Two years ago, we replaced all of the older vinyl replacement windows in the Waverly house with new replacement units. The old vinyl replacements were getting foggy, and some were not easy to operate any longer. It was time.
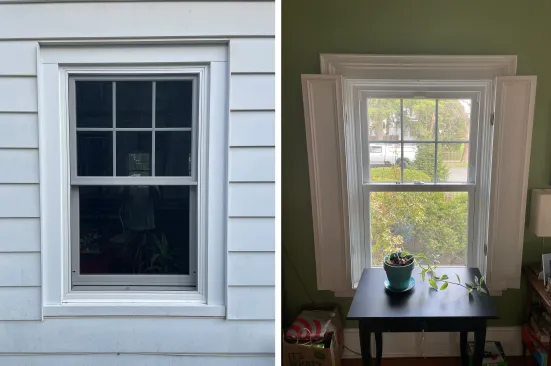
The author replaced the tired vinyl windows with new Marvin Elevate windows throughout. While he usually prefers full-frame windows when replacing windows, it would not have been cost-effective to disassemble and reinstall or replace the elaborate, multipiece interior trim.
The Marvin Elevate line provided a perfect fit for an early 1900s Dutch Colonial. The factory-painted interior on this line offers an authentic, traditional look and feel, while the fiberglass exterior provides modern durability. I typically steer customers toward full-frame, new-construction windows, which are easier to flash and air seal. However, the Waverly home has a multi-piece interior casing set that would have been cost-prohibitive to remove and replace.
A crucial step that is overlooked by some window-replacement companies is removing the sash weights and insulating those pockets between the jack-stud and window frame. Using a combination of rigid insulation and DAP Draftstop 812 gun foam, we wanted to make sure we could get the new replacement windows as well sealed as possible. Too many times we have seen clients spend their hard-earned money on replacement windows, only to complain that they could still feel cold air coming in from around the old window frames.
Heat Pump Water Heater
When the Waverly family bought their home, domestic hot water was provided by a standard natural-gas water heater. While this is typical and effective, it’s not the most efficient appliance for making hot water. Mick Waverly did some research on his own and decided to go with a new heat-pump water heater (HPWH.) This was a smart upgrade for using less natural gas, but the replacement offered some lessons—both for the homeowner and for me.
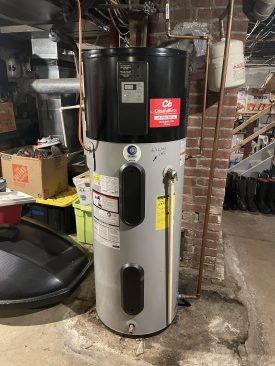
Heat-pump water heaters recover more slowly than gas-fired units. In retrospect, this unit should have been upsized.
This was my first client to install an HPWH, and the lessons learned proved valuable in helping me make choices for subsequent HPWH installs for other clients. The first lesson was that HPWHs have slower recovery times than gas units. Going from a standard 40-gallon gas unit to a 50-gallon heat-pump unit wasn’t enough. In hindsight, they should have chosen a 65-gallon unit to provide more hot water. The other lesson is that placing the unit near the home’s forced-air furnace provided some efficiency gains. Although a furnace doesn’t kick off as much heat as a boiler with hot water piping, it does provide some nearby ambient warm air to help with the efficiency of making hot water.
Smart Switches for Outdoor Lighting
Smart switches are often used as replacements for traditional light switches. They have small control buttons, and are sometimes Bluetooth-enabled, making them easy to program and control from a phone or tablet. Smart switches on the exterior not only provide the convenience and safety of illuminating ingress areas between sunset and sunrise, but also ensure that lights will not stay on longer than necessary. While outdoor lighting is not a huge energy draw, keeping light fixtures from being left on too long qualifies as low-hanging fruit. This upgrade was installed by a trusted electrician who I have worked closely with for years.
Air Sealing and Insulation
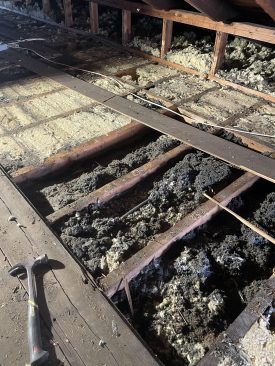
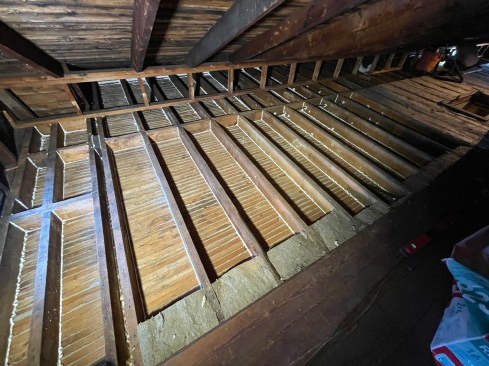
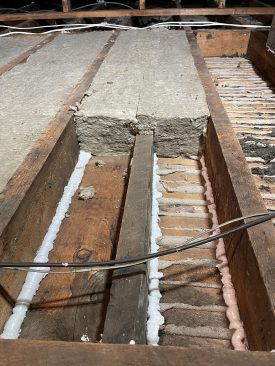
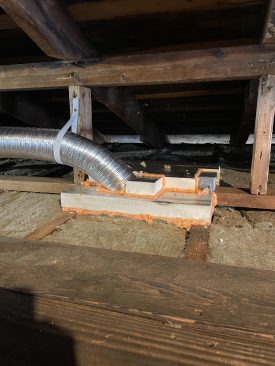
The most labor-intensive energy upgrade to the Waverly home was re-insulating the attic ahead of a solar installation. Mice had overrun the joist bays, ruining the blown fiberglass and leaving a heavy odor of urine in their wake. Some bays were never insulated in the first place. Air sealing was nonexistent. This was evident by condensation on the underside of the floorboards, which faced the living space. The floor joists were 2×6, which leaves only so much space for cavity insulation, so we wanted to be sure to detail our work with care and precision, offering a Grade I install.
The process was as follows, working in half of the attic at a time so we had staging and storage room:


Remove half of the floorboards and stockpile them on the opposit…
1) Remove half of the floorboards and stockpile them on the opposite side of the attic for later re-installation.
2) Rent a gas-powered insulation vacuum to remove half of the attic insulation. Hoses went directly out a gable-end window and into massive bags in the bed of my dump trailer.
3) Use a shop vac and cyclone separator to vacuum up the remaining smaller bits that weren’t handled by the larger gas-powered vacuum. The result is a clean, dust-free space.
4) Redline air seal the entire space, paying close attention to areas of concern such as two-ply headers that have space between them, top plates of walls, penetrations, and so forth. (By “redline” air seal, I am referring to sealing with a mind toward creating a continuous air barrier. For more on this, see “Air-Barrier Basics“).
5) Use copper mesh and plywood to keep rodents out of larger holes and avenues.
6) Install R-23 mineral-wool thermal insulation.
7) Re-deck the newly-insulated areas with the previously removed floorboards.
8) Switch sides and repeat the process in the other half of the attic.
9) Work included moving electrical and building an airtight box over the bathroom exhaust. This is a location that is often poorly detailed and tends to leak a lot of air.
Because the newly installed mineral wool only yielded about R-23, future plans included adding more insulation on top of the floorboards, but only after the solar folks had completed their work. We wanted to leave them some working room without ruining what would have been a second layer of insulation that would have been in their way.

Traditional fireplaces pull a lot of conditioned air out of a house. A new insert proved to be a much more efficient way to add wintertime comfort to the home.
Wood Burning Insert
The Waverlys’ original fireplace was what you would expect in a home built in 1919. While the open firebox created ambiance in the living room, it didn’t really heat the space. In fact, it would draw and draft air through the living room and right out of the chimney. The solution? A high-efficiency insert for wood heating, provided and installed by a local chimney/fireplace company with which I have a relationship.
With an airtight firebox and blower motor, wood not only burns more slowly and efficiently, but it can actually heat the living space. Hardwood firewood is not only abundant in upstate N.Y., but it’s fairly easy to procure. This wood-burning appliance helps the home use less fossil fuel, and also crosses over into the fun category of home upgrades.
Solar Panels and Electric Cars
The latest upgrade to the Waverly home is a new solar panel array on the roof. The new panels, which are tied to the local power grid, produce and export a surplus of electricity. Given the tax credits at the time, the cost of the panels will be paid off and break even in as little as three years. The Waverly family is effectively banking electricity with the utility during the sunny months, then getting it back during winter when the panels may be covered with snow or the weather isn’t as sunny.

The author installed this car charger, which allows the owners to charge their car for $80/month.
Two new cars in the family—a completely electric 4-door sedan and a hybrid-electric SUV—rounds out the equation of removing a reliance on fossil fuels. While some folks might see this as a purely geo-political or environmental decision, the proof is in the electric bills: The all-electric sedan costs less than $80/month to charge at home.
I installed the car charger, as it was a relatively straightforward task for us to do. (For more, see “Wiring an EV Charger.”) Because the garage in this Dutch Colonial house is quite small and houses bicycles, lawn tools, and outdoor power equipment, it is not used for parking vehicles. As such, we installed the electric car charger outside on a small, site-made stanchion on a retaining wall. It’s centrally located in the driveway, and it’s fed with AC line voltage through grey PVC conduit.
Financing The Work
It’s worth noting here that the Waverly family’s finances are similar to that of many clients I work with. They have been able to pay out of pocket for some of the smaller projects, but the majority of the work on their home has been afforded through a home-equity line of credit. This is extremely common, as very few of my customers are financially liquid enough to just write checks for the improvements. As homeowners using HELOCs pay them off, they are then able to choose another upgrade project for their home. This allows them to improve their homes without going broke or living outside their means.
HELOC rates have soared in the last two years, making them less attractive for many people, so it will be interesting to see how the Waverlys (and other clients) finance future improvements. The point is that, like most homeowners, they’ve gradually upgraded their home as money became available. The lesson here is that it’s advantageous for a contractor to establish a solid relationship with clients, acting as an advisor to help them understand which improvements the home needs and ranking those improvements according to the best return on investment. The reward can be repeat clients and work stretching over many years.


