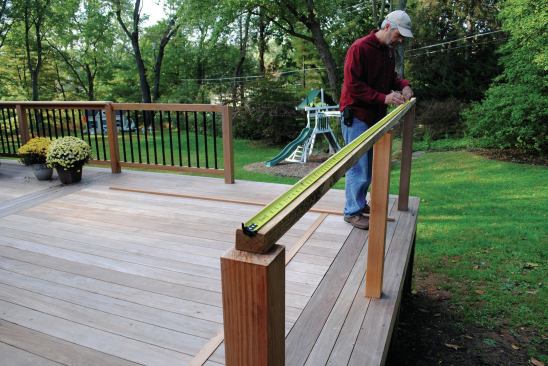

To help us visualize the kitchen's footprint, I laid out some ri…
To stand up to the weather, most of the outdoor kitchens I’ve built were made from masonry and steel studs. Typically, their storage was limited to open space behind stainless steel door units mounted in masonry openings; some also had prefabricated stainless drawer units. That worked well for those particular jobs, but when compared with an average indoor kitchen, storage was almost nonexistent.
When a friend asked me to build his outdoor kitchen, I wanted to make the cabinetry as functional as that in his indoor kitchen—and with doors and drawers. Building cabinets for the outdoors involves many of the same processes I use for indoor work, but also requires attention to the effects of water and moisture. This means using water-resistant materials and stainless steel fasteners and hardware, as well as addressing water infiltration and drainage.
Planning
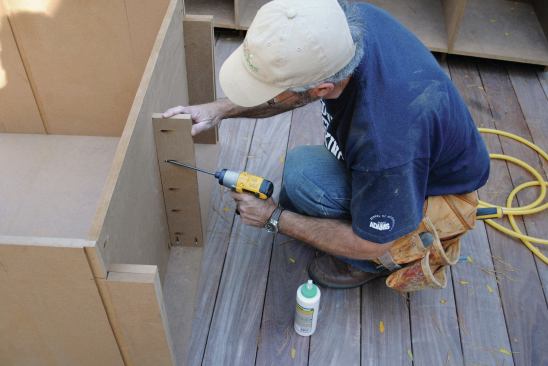
Before we cut any material, I worked with my friend to finalize the design. The plan was to fit the cabinets between the posts on the existing deck. To help us visualize the kitchen’s footprint, I laid out some rippings of wood on the deck. Next we made a story pole to lay out the locations of the cabinet sides and the appliances.
Most of my indoor cabinets have face-frame construction and frame-and-panel doors. On an exterior project, though, the face-frame and door joinery would be exposed to the weather, so European-style, frameless cabinets and doors made from single slabs made more sense for this application.
In the end, I blended methods from both styles and was able to employ many of my tried and true construction methods to build the boxes for this project. I used pocket-hole construction with stainless steel screws from Kreg Tools (kregtool.com) for almost all the joinery in the cabinets.
I also used Extira (extira.com), a material I’ve used for years, always with great results. It’s an exterior-grade panel product with excellent moisture, rot, and termite resistance that’s available in dimensions up to 4 feet by 16 feet and in 1/2-, 5/8-, 3/4-, 1-, and 1 1/4-inch thicknesses. It’s used by sign makers because it stands up to the weather and takes a keen edge when milled. It is hard; at the end of this project, the carbide router bit I used was noticeably dulled. Compared with MDF, Extira is a bit heavier, more rigid, and more costly—about two to three times more—but for outdoor jobs, the many benefits of the product outweigh the extra expense.
Materials and construction
For added strength I made the cabinet backs out of ¾-inch-thick Extira and pocket-screwed them into the sides. I also installed horizontal stretcher rails at the top of the box, front and back. For the wider cabinets, I built an L-shaped front stretcher from two pieces of Extira screwed together. The fit for doors and drawers is much more demanding with European cabinets, so I made sure all dimensions were accurate and was careful to mill all the parts square.
Because the cabinets would be outside and exposed to the weather, I sloped the bottoms 1/8 inch downward from the back to the front; that way, if any water got in, it would flow toward the front. I also cut the bottom pieces of the boxes about 1/8 inch short of the cabinet front so water would have a way to drain out.
Knowing that Extira is a flammable product, I contacted the grill and burner manufacturer for clearance recommendations. The company sells a liner to set grills in, and because most of the heat from the burner rises—instead of migrating to surrounding cabinetry—we needed to provide only a ¼-inch space around the burner.
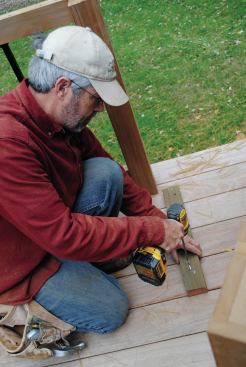
Once I laid out the appliance locations and dimensions, I divided up the remaining cabinet space for a large, two-can trash drawer at one end and for a bank of large drawers. The next step was to make a cut list for the cabinet sides, the only repetitive parts in the project.
I cross-cut the Extira sheets to their finished height using a track saw and ripped the more manageable pieces on a table saw to their finished depth. Next I numbered them to match the story-pole layout, so I could determine how to mill each piece. The milling included drilling for adjustable shelves, notching for toe-kicks, routing a raised-panel design in the cabinet side on each end of the run, and cutting a dado to accept the bottoms.
Most of the milling was straightforward. I used a Kreg jig to drill the shelf pins, cut the notches for the toe-kick using a table saw, and made the dadoes using a straight-edge jig and a router.
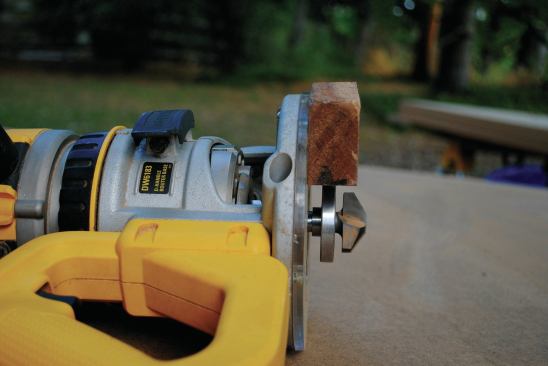
Cutting a raised-panel design in the cabinet sides was a bit more involved. I used a Whiteside panel bit (whitesiderouterbits.com) fitted with a bearing above the cutter and a template frame to guide the cut. Because of the depth of cut for the panel, I had to use 1 ¼-inch-thick material for the frame. With thinner material, the bit would have hit the Extira before the bearing made contact with my template.
Later in the construction process, when I routed the door and drawer fronts with the raised-panel profile, it was easy to unscrew the template frame to adjust its size. For all the pieces, I kept the rout about 2 ½ inches in from the edge. I attached a block of wood the same thickness as the template to one edge of the router base to help keep the router base riding flat on my template—sort of like training wheels for the router.
It took several passes around the template to get a final, clean panel cut. Cutting Extira creates a lot of dust, so I used a vacuum cleaner between passes. Even in windy outdoor conditions, it’s a good idea to wear to wear a dust mask.
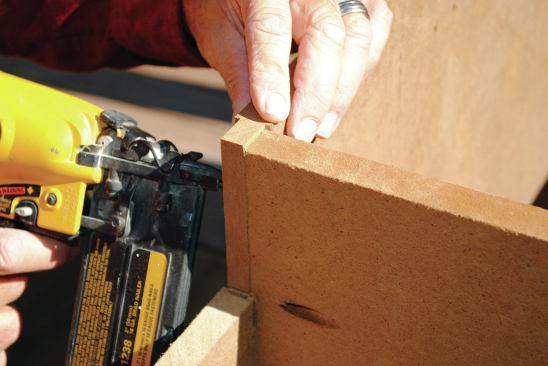
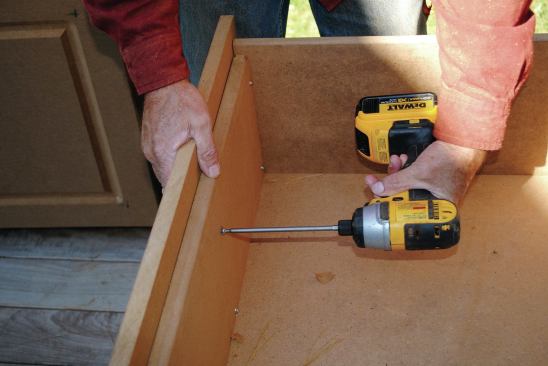
With all the sides cut and milled, I started at the trash-can end of the cabinet run and cut the first cabinet bottom and set of stretcher rails, then drilled for pocket screws. Because none of the pocket screws would be visible in the finished cabinetry, I adjusted my Foreman to drill to a depth that would let me drive 1 ¼-inch screws into the side panel without coming out the face.
Working from one end to the other, I assembled the cabinet run section by section, first fitting each bottom piece, then adding the back, then the stretcher rails. For cabinet sides with double dadoes, I through-nailed the bottoms in place, then secured them with extra screws. The first part of the assembly was done with the cabinets on their backs, then I stood them up to screw in the back pieces.
The manufacturer specified that the grill cabinet hold at least 300 pounds, so I added a vertical divider in the center of the cabinet in the toe space and glued and screwed extra cleats to the cabinet side pieces.
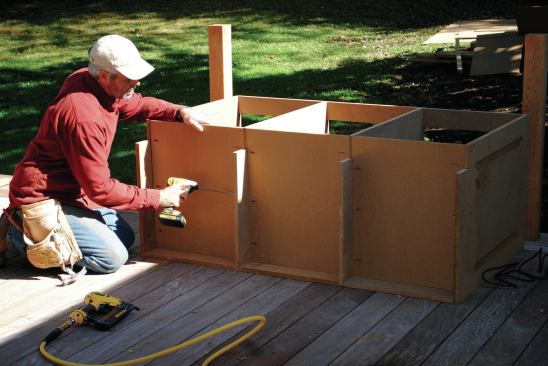
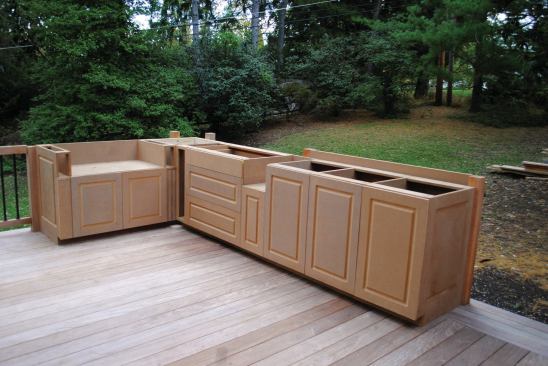
When both runs of the kitchen were built, I matched them up in the corner and shimmed them to level. I screwed cleats to the deck boards, then screwed the cabinets to the cleats. The cabinets were also screwed to the deck posts.
Doors and drawers
The project was starting to take shape, but a lot of the most challenging work was still to come: building and installing the doors and drawers. Building frameless cabinets made a lot of sense for this outdoor kitchen, but it also meant working with much tighter tolerances. Using overlay doors and drawer fronts on face-frame cabinets allows for a bit of wiggle room; not so with frameless cabinets where tolerances and reveals are more exact.
I planned that the height of my doors and trash-can drawer would be within 3/8 inch of the top of the cabinet so their top edges would be well-protected by the overhang of the stone countertop. I fit the fronts of all the drawers to tight tolerances. (After the cabinets were painted, I added stick-on weather stripping to the top edges to keep out water.)
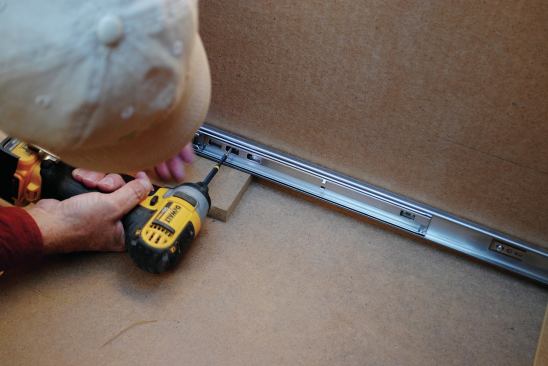
All the hardware I used was stainless steel Sugatsune from Custom Service Hardware (cshardware.com). The full-extension Sugatsune drawer slides require ½ inch of clearance on each side, but they have some built-in forgiveness if the drawer is on the narrow side. The drawers would have to hold a lot of weight, so I made the boxes with ¾-inch-thick sides and ½-inch-thick bottoms that slide into a dado routed into each side piece.
I used a 5/16-inch-radius router bit to ease both edges of the drawer-side top pieces and one edge of the front and back pieces. For extra strength I used nails and pocket screws to assemble the drawer boxes. The pocket screws through the back pieces will never be seen unless someone removes the drawers, and the pocket screws through the front pieces would be covered by the finish drawer fronts.
To install the drawer boxes, I first attached the slides to the cabinet side, spacing them off the bottom with a 1/2-inch-thick temporary shim. (At first I forgot the front had to be raised up an extra ¼ inch since the cabinet bottom slopes up from front to back.)
The part of the drawer slide that attaches to the cabinet side has elongated horizontal screw slots for in and out adjustments. After driving in two screws, I pulled the slides out and screwed them to the box using the vertically elongated screw slots, which allow for up and down adjustments. I didn’t install all the screws yet; I would do that after the finish drawer fronts were installed.
You could use blocks and shims to hold the boxes in place while attaching the slides to the drawer boxes, but I think it’s easier to have a helper hold things. Once the slides were screwed in place, I made sure the drawer boxes slid in and out freely. I’ve learned that it’s a waste of time to make any permanent adjustments until the fronts are attached.
The drawer fronts were cut to leave 3/16-inch-wide reveals between each other and between the doors beside them. At first, I cut them a little tight; you can always trim a little off later, but it’s really hard to add wood back on.
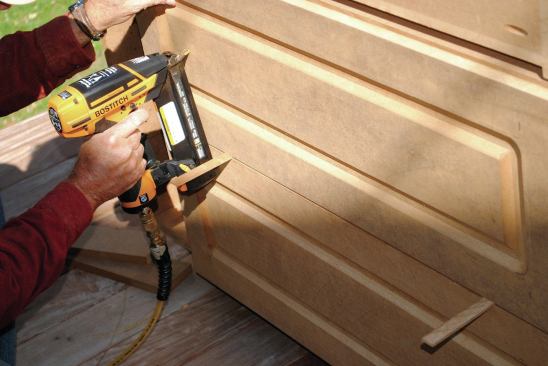
After fitting the fronts, I routed them with the same panel profile used on the cabinet ends. I set the drawer fronts in place and shot a couple of 18-gauge brads through the fronts to hold them in place until I could use pocket screws to attach them permanently from the back side.
For the bank of stacked drawers, I worked from the bottom to the top, using temporary shims between the fronts to gauge the reveals.
When I’m building face-frame cabinets, all the door hinges are the same. Frameless cabinets, however, take two types of hinges: full overlay and half overlay. At the beginning and end of a cabinet run, I used full-overlay hinges to cover the full edge of the cabinet box; and in locations where two doors or a door and drawers met, I used half-overlay hinges.
Similar to how I made the finish drawer fronts, I cut the door slabs a little tight, routed in the panel profile, then drilled them for the hinges. Both types of hinges called for the same setback from the edge, but just to make sure everything would work as planned, I drilled a test hole in a piece of scrap first.
Hanging the doors was also a two-man operation. I marked the setback to the back of the hinge and put one screw in each mounting plate, then mounted the doors to test the fit before adding the second screw for each hinge. I had to trim a few of the doors on the table saw to get the right spacing. When everything fit perfectly, we sanded all the door and drawer edges, then nailed on the toe-kick on the bottom of each cabinet run.
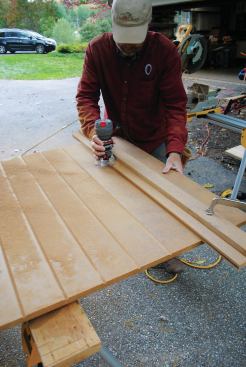
I wanted to dress up the back side of the cabinets, too. My solution was to rout vertical V-grooves into ¾-inch-thick Extira panels, using a straightedge and a trim router. To support the paneling at the outside corners, I added blocking. The crew that framed the deck did a great job keeping the posts plumb, so it didn’t take much work to fit each panel between them.
I wanted the V-grooves to be spaced about 4 ½ inches apart and have the look of a full piece at each end, so layout was critical. The friend I worked with showed me a wonderful DeWalt construction app (dewalt.cengage.com/mobilepro). In a few minutes, using the app, he had a layout that worked exactly without any adjustments to the V-grooves as we got closer to the edge.
We finished up the panels just as it was getting dark on the second day of hard work. Before I headed home, everything was ready for the painters, who would do some sanding to ease some of the sharp edges, then paint the interior and exterior of all the cabinets. The stone contractor would come next to finish the countertops.


