
Rebuilding masonry steps with CMUs over a reinforced slab
Last fall, we rebuilt a home’s masonry entry steps and walkway, the kind of small job we would have politely declined a few years ago. It’s not that we don’t do masonry work: When the economy was hot, we began doing the foundation blockwork for our additions because it helped us control the schedule and ensured that everything came out of the ground level and square. Back then, though, we limited our masonry to our own projects; now that things have cooled off, we’re more likely to take isolated small jobs wherever we can get them.
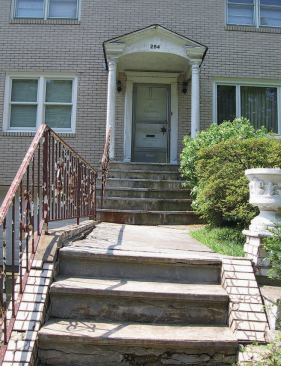
Located in the historic Forest Hill section of Newark, N.J., the house was suffering from a classic case of deferred maintenance, and the owner had received a summons from the city requiring repairs to the existing fa§ade, steps, and front walkway. Even though the 1950s residence had few of the characteristics of the neighborhood’s grander homes built earlier in the century, it was subject to the same historic preservation rules and review by New Jersey’s Landmarks and Historic Preservations Commission. For smaller repair projects like this one, the commission’s local historic preservation officer can issue a Certificate of No Effect, which we had to apply for along with the building permit. After reviewing our plans and specs, the officer suggested that replacing the front entry’s rotted columns with similar wood columns — instead of fiberglass ones — would allow us to avoid full commission review at the next monthly meeting. We followed her advice and walked out of the office with our permit that same day after paying the $694 building permit fee.
Demolition
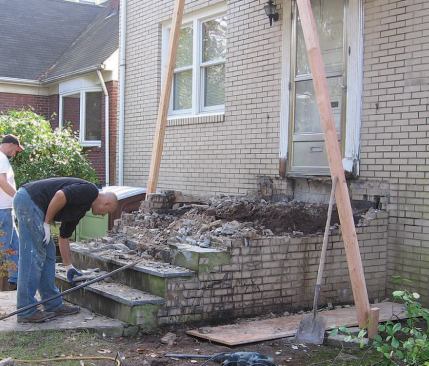
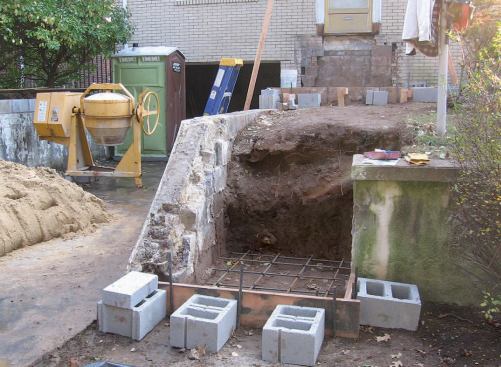
When we began pulling the steps apart, it became clear that the crumbling surfaces had contributed to the deterioration of the overall structure. There’s a saying that they don’t build things like they used to, and if these steps are any indication, it’s probably a good thing: The stairs had been backfilled with broken block, wood construction debris, and dirt, all of which had settled over time as the deterioration worsened and water poured in and compressed everything even more. The porch landing, originally limestone set on a 2-inch-thick concrete pad, had 6 inches of space beneath it. We were amazed — not by the fact that there was so much damage, but that the stairs had lasted close to 60 years.
The original bluestone treads and landing pavers were worn, spalled, and cracked, and weren’t worth salvaging. Everything — including the railing — got tossed in the dumpster.
Slab Support
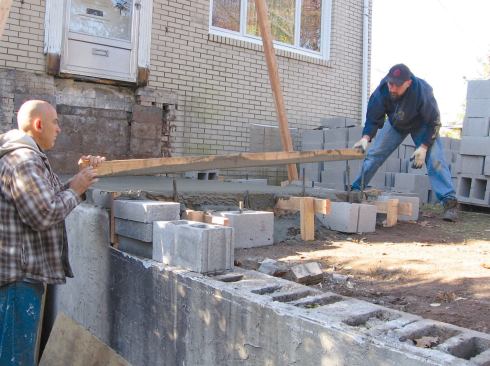
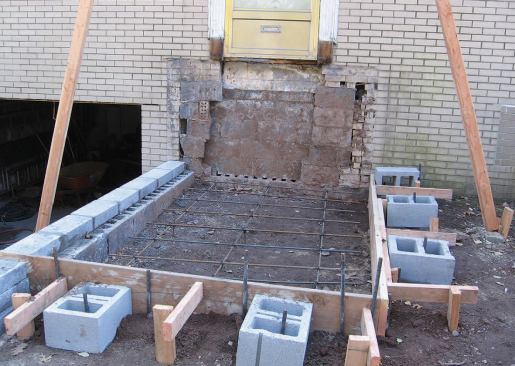
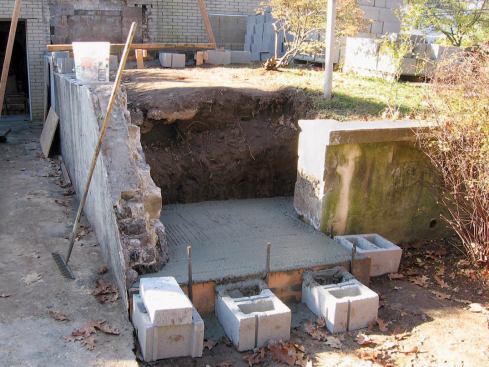
Once we had propped up the porch roof and cleared away the debris, we built forms for the two slabs that would support the upper and lower sets of stairs. Against our advice, the owner wanted to keep the existing retaining wall, so we didn’t have the option of forming a perimeter footing for the stairs. Instead, we would form and pour reinforced 12-inch-thick concrete slabs on grade that would be thick enough to provide a solid base and serve as the first step for each set of stairs.
We placed the formwork so that the top of the upper slab would be 43 inches below the door threshold, our benchmark elevation. This would allow room for five 8-inch-high steps (the slab itself is the sixth step), plus a 2-inch-thick limestone landing platform and a 1-inch-thick bluestone threshold under the door. We formed the lower slab so that the top would be 91 inches below the benchmark, leaving room for another set of stairs with five risers.
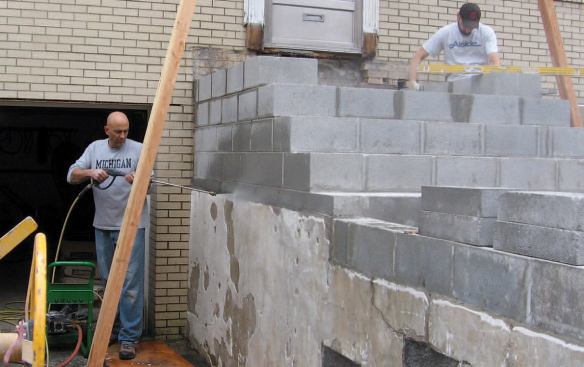
We wanted to reinforce the retaining wall and lock it to the upper slab, so we capped it with solid 8-inch pancake block. This left 4 inches of the 12-inch-wide block exposed, which would allow concrete from the slab pour to flow into the block cavities. We reinforced each slab with 1/2-inch rebar tied in a grid 12 inches on-center and supported by chairs.
It took almost 4 yards of concrete to pour the upper and lower stair slabs and to repair part of the retaining wall on the opposite side of the driveway. We left the slabs a little rough to help key the mortar and blockwork.
Steps
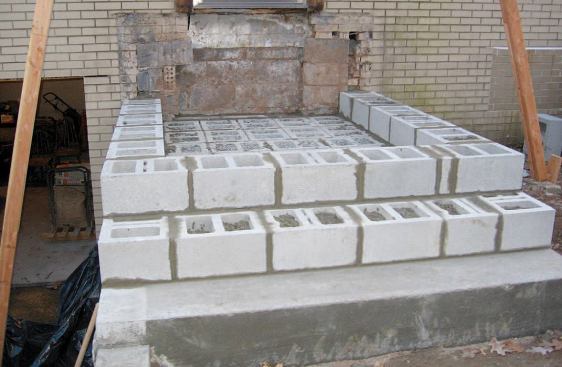
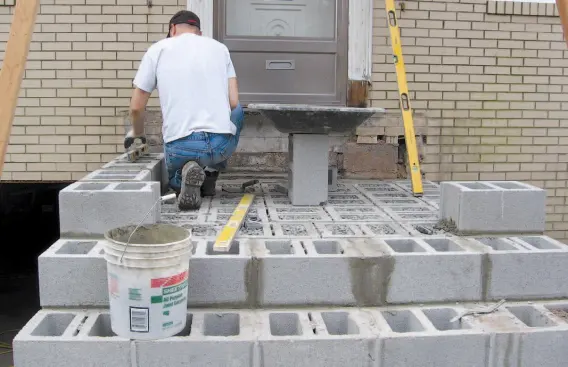
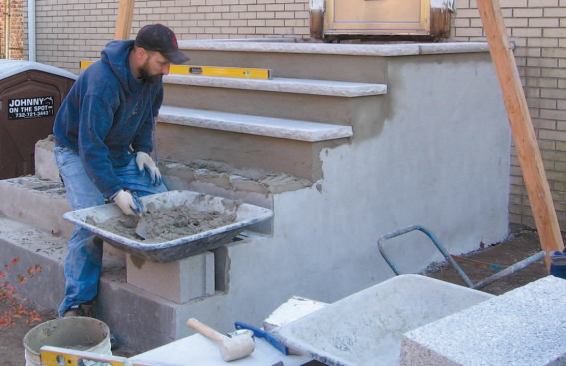
Each step is basically a platform built with 8-inch by 12-inch by 16-inch concrete masonry units (CMUs), stepped back far enough from the platform below it to allow room for a 12-inch-wide by 2-inch-thick limestone tread. Each 8-inch riser equals the thickness of a block, or 7 1/2 inches, plus a 1/2-inch mortar joint. As we set the blocks for each platform, we mortared the joints around the perimeter, then infilled with more blocks set in mortar. There’s no vertical reinforcement, but we filled the perimeter cores with mortar and the interior cores with 3/4-inch stone.
Once the blockwork was completed, we scraped, power-washed, and patched the existing retaining walls and began parging everything before setting the limestone treads. We used a 2 1/2-to-1 sand-mortar mix, building up to a 1/2-inch total thickness with two coats of mortar.


