When I was learning the basics of building a proper staircase, I found rail heights to be one of the hardest concepts to master. Not only do rails have to be properly set to make the post heights, baluster lengths, and rail fittings work well together, but they also have to fall within certain parameters to meet building codes.
Being the visual learner that I am, I eventually developed a system that enabled me to work it all out on paper or a scrap of melamine beforehand, so that I could see how well a certain rail height would work with my baluster lengths and placement relative to the rise and run of a particular stair. This system has become affectionately known among my crew as the “Up System.” Using it, we can get a good idea of how the various railing components will fit together before we start cutting and fitting.
Start With a Drawing
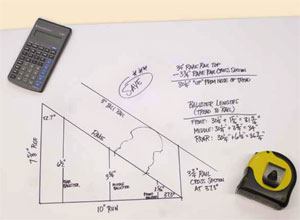
I start by transferring the measurements of the actual stair’s rise and run to my framing square, then use the square to draw an equivalent full-scale right triangle. The stairs in this article have a 10-inch run and a 75/8-inch rise, so these are the dimensions of my triangle’s base and height.
To calculate the rake angle (or pitch), I use my calculator’s trig functions to divide the rise by the run (75/8 ÷ 10 = .7625), and the inverse tangent function to find the primary rake angle, which in this example equals 37.3 degrees. You could also measure this angle with a protractor. So that I don’t forget it, I label the primary angle — which I use to determine cuts on rake rails and fittings and moldings that run with the rake — prominently on my drawing.
Subtracting the primary rake angle from 90 degrees gives me my secondary rake angle, 52.7 degrees. This is the angle I use for rake-to-level cuts or for determining an easing cut for a gooseneck. For rake molding cuts, I use the primary angle when the molding meets a plumb surface and the secondary angle when it meets a level surface. When making a miter where the rake molding meets either a plumb or a level surface, I use half the respective angle.
Next, I draw a line parallel to the hypotenuse of my triangle, offset by the thickness of the rail, which for this staircase measured 3 inches. Then I draw a line perpendicular to the base of the triangle, which gives me the height of the cross section of the rail at that particular rake angle — 3 3/4 inches, in this example. You could use math to find this measurement, but the beauty of the Up System is that I can just scale the dimension off the drawing.
Determining the “Up” Number
Since I do most of the fitting of rail parts right down on the noses of the treads, I have to figure out how much to add to the rail cross section to achieve my desired finished rail height. I call this my “Up” number. For example, if my optimum rake rail height is 34 inches to the top of the rail plumb up from the nose of the tread, and I’ve determined that my rail cross section is 3 3/4 inches, then I know that my Up number will be 34 minus 3 3/4, or 30 1/4 inches.
Once I’ve determined the Up number and clearly marked it on my drawing, I can check the baluster lengths to make sure they’ll work with this particular rail height. Sometimes my trim crew will arrive on a site where the stair parts have already been ordered and delivered without anyone taking into account that the rear baluster on a tread needs to be considerably longer than the front baluster. In those cases where the rear baluster is a bit too short or the front baluster is a bit too long, we can raise or lower the rail height, or we can adjust the baluster placement slightly by moving it either forward toward the nosing or back toward the riser. In some cases, we’ll need to do both.
When I’m satisfied that the balusters are approximately the right length, I establish the baluster spacing. To meet new code requirements, I usually install three balusters per tread. I start from the run’s centerline and mark equal centers from there (calculated by dividing the run by 3) on the baseline of my triangle. Then I draw plumb lines up from these centers to the rake line. By measuring these plumb lines and adding the Up number to them, I can determine the baluster lengths needed for this particular rail height.
If I’m working with pin-top balusters, I’m careful to allow for enough length for the baluster to go up into the rail. Be aware that some millwork companies figure the length of the pin on the bottom of their balusters. For example, a baluster that has a stated length of 39 inches with a 3/4-inch tenon on the bottom may have only a 38 1/4-inch usable length from tread to rail. With the Up System, I can easily adjust my Up number to make sure the balusters I have will work with a spacing on the tread that I like and that passes code.
Another advantage of this system is that I can use the points where the baluster centerlines intersect the hypotenuse to figure out how far apart the balusters will actually be on the handrail. I just set my scribe to this distance and mark the baluster locations on the bottom of the rail. I usually mark the treads first, then plumb up to the rail, checking with my scribe to correct for any minor layout discrepancies and adjusting the spacing as needed.
Determining Post Heights
The old axiom of “measure twice, cut once” certainly applies to newel posts; once cut short, they are hard to stretch, and I rarely order extras. My Up number makes it easier to get this right.
I generally start by determining my post locations, keeping in mind rail centers and the general flow of the stair as a whole. Once I know where a post is located, I make the necessary notches so that it will stand in its final position. I mark the top of the post where I want the top of the handrail to hit, then measure down the distance of my Up number and make a mark. Next I lay a piece of handrail cut with the proper rake angle on the stair treads and mark where the top of this piece hits the full-length post. The difference between this mark and the mark that I made near the bottom of the post is the amount I need to cut off the post.
The same principle can be applied to over-the-post rail systems: I fit the rail parts together on the treads, then add the Up number. I can’t count how many times I have had some other tradesman comment, “Pretty low for a handrail, isn’t it?” while my rails and fittings are resting on the noses of the treads waiting to be raised up.
Over the years, I’ve found that drawing out the basic geometry of the stair with this simple rise/run/rake triangle does more than just give me the information I need to make good decisions when laying out the basics of a stair; it also provides me with a great place to make construction notes that I won’t lose. When more than one person is working on a stair, the drawing serves as a central reference source for important details, keeping us all on the same page. Plus it’s a great visual aid for adjusting heights when a post needs to move back and forth a bit, or for determining how far to move a post to achieve a needed change in rail height.
Just don’t forget to write “SAVE” on whatever you draw your stair information on and hide it in a good place until you’re done with it. If you don’t, the painters might accidentally throw it away.
Phil Springer is a trim carpenter in Delavan, Ill.


