Nearly every project my company undertakes is architect-designed and rich in custom details. Custom built-in cabinets are typically featured throughout the home, with dimensions and details not usually available in stock cabinets. While I do maintain a fully equipped woodshop, I’ve found that we can effectively produce uncompromising work on site using custom-ordered parts. Our process—a tried-and-true method that uses materials and techniques that have been around for decades—is a hybrid of on-site and off-site production. If there’s a door or other panel that can’t be precisely defined or determined in advance, we’ll make it on site. But generally, I can buy custom doors and drawer boxes for nearly the same money I’d pay for raw materials, so it only makes sense to outsource these items.
Making top-notch cabinets on the jobsite requires both basic and more-specialized tools, including a good, accurate table saw accessorized with a cut-off sled, a pocket-hole machine, a thickness planer, a biscuit joiner, and numerous proprietary or custom-made jigs to aid hardware installation.
Don’t Underestimate Planning
Before we start cutting plywood, I spend a considerable amount of time developing shop drawings and an accurate list of components and dimensions for each cabinet. This helps us optimize materials and get a jump on the building process (especially when I need to communicate to other crew members involved in building the cabinets). This planning also provides me with all the information I need to order plywood, as well as cabinet doors, drawer boxes, and hardware from outside suppliers.

Planning is crucial for this process to work, so the author creates detailed shop drawings for each cabinet run (top left), as well as detailed checklists for drawer and door counts (top right). Though there are many manufacturers that supply both drawers and doors, the author prefers to use drawer boxes from Scherr’s Cabinet & Doors (bottom left) and doors from Maple Craft USA (bottom right).
Paint-Grade Quality
For the cabinets in this story, we used cabinet-grade maple-veneer plywood that is prefinished with a clear coat. Typically, we use material prefinished on one side, facing the prefinished side to the cabinet interior and painting the exterior or facing the end with a finished overlay panel. Cabinet sides, bottom, and top are built with 3/4-inch stock, and the backs are typically 1/4 inch.
Because the clear coat prevents a glue-bond between parts, we use GRK wood screws to secure the sides to the bottom and top. Predrilling is crucial to avoid spreading the veneer apart. We attach the backs with pneumatic staples, 3 to 4 inches on-center. All common interior cabinet partitions, as well as shelves, are made from plywood prefinished on both sides, and we edge-band the visible edge with heat-activated wood veneer, applied with a household iron and finished with an edge trimmer.
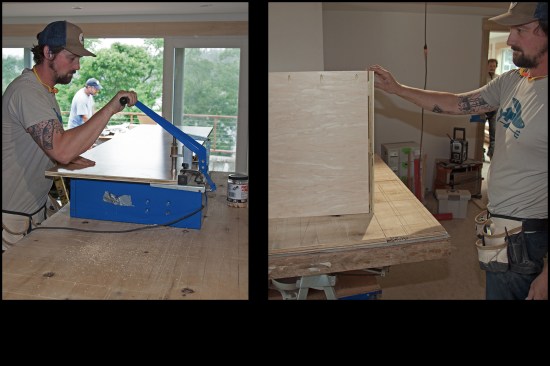
Cutting the stock. Our primary cabinet builder, Dean Moran, typically slices full plywood sheets to the planned cabinet depth on a table saw, then crosscuts individual panels to height on a workbench using a square and a track saw.
He also crosscuts with a sled on the table saw that has an adjustable stop for repeat accuracy and accommodates panels up to 27 inches wide. The sled ensures true, square corners. However, the wider the panel, the more awkward the sled becomes, since you have to start with it in front of the blade. The sled works best for cutting narrower panels for wall cabinets, shelving, and face-frame components.
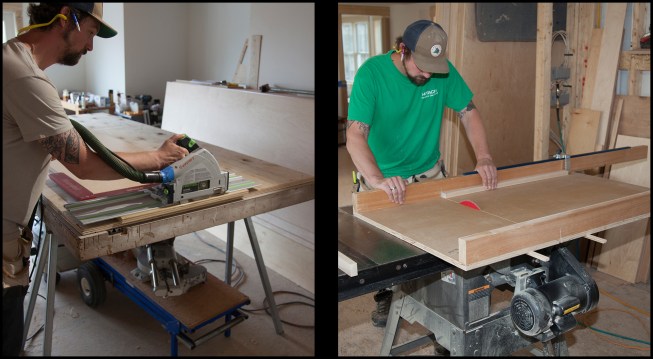
Cabinet-builder Dean Moran crosscuts stock using either a track saw or a table saw with a sled. On wider stock, like the 27-inch-wide cabinet end panels, he cuts with a Festool track saw used (along with a Woodpecker framing square) to ensure the wide stock is cut square (above left). Of note: The cabinet-grade maple-veneer plywood he's using comes oversized (48-5/8 inches wide by 96-1/2 inches long) with rough factory edges that need to be trimmed. For narrower stock, like shelving or wall cabinet panels, he uses a crosscut sled with an adjustable stop on it (above right). Here, he’s cutting components for the face frame—the sled guarantees an absolutely square, 90-degree cut.
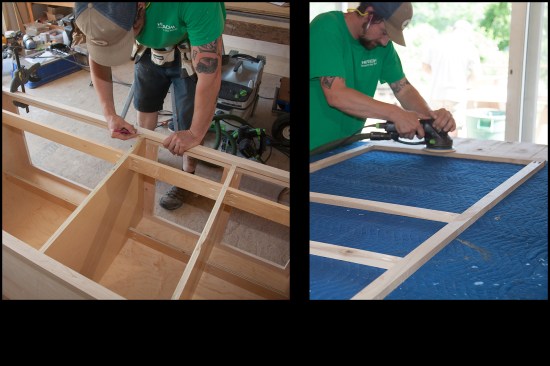
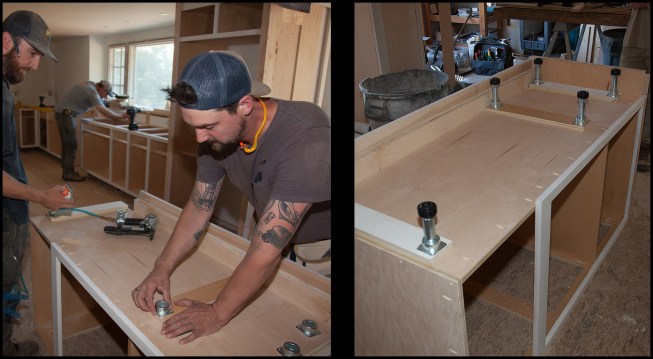
Web frames. Instead of using a solid panel for the cabinet top, we typically make web frames, which have the identical outside profile as the bottom panel. Frames use less material, reduce weight, and don’t require a cutout for sinks or other countertop drop-ins. Frames are accurately cut on the sled and assembled with pocket screws and glue. If you’re using a lot of pocket screws, a Kreg Foreman quickly justifies itself. Our worktable incorporates a T-track, allowing us to use hold-down clamps to hold the glue joint flush while we’re installing screws.
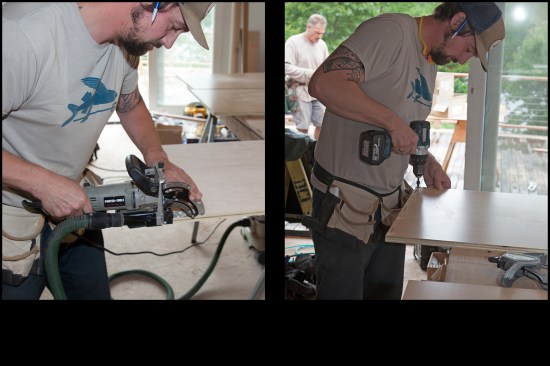
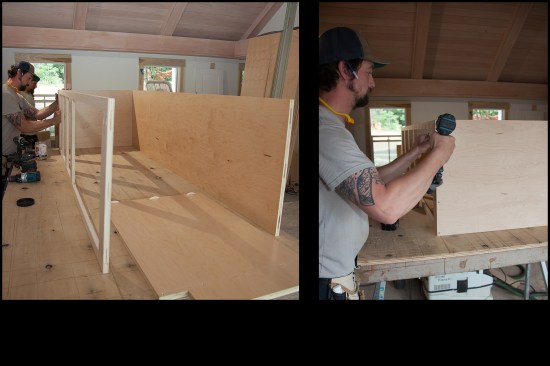
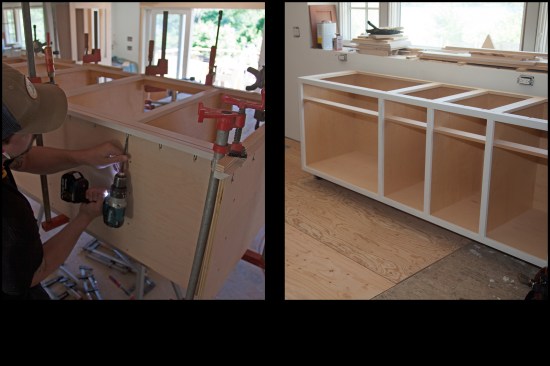
Fastening the carcass. Putting cabinet panels together requires some kind of control to hold the parts in alignment while we fasten them. Precise alignment is key to a uniform match with the face frame, as well as to drawer and shelf fit. Moran installs dry-fit biscuits, followed by screws for the final, mechanical connections. Bar clamps hold the joints tight while allowing small adjustments to alignment during fastening.
Intermediate partitions separating cabinet sections typically install between the top web and bottom panel, secured with screws. Temporary spacers cut from scrap wood establish accurate spacing during fastening. Moran turns the cabinet on end for a gravity assist, resting the partition on the spacers and installing screws through top and bottom (see slideshow photo, below).
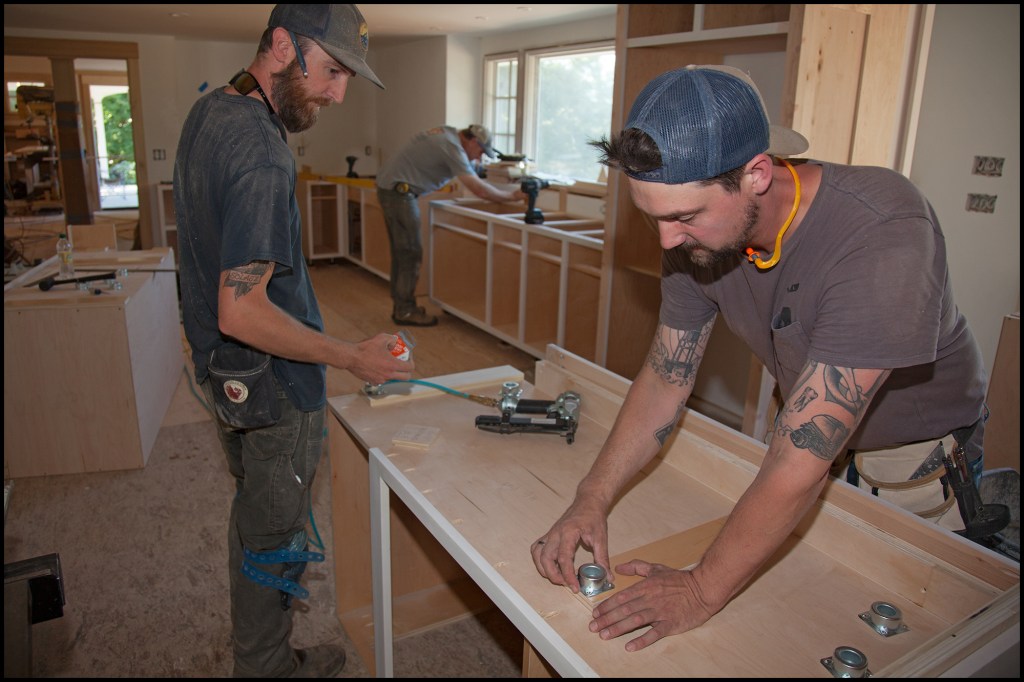
Drawer webs. Drawer webs provide a built-in stop in drawer-over-door configurations, as well as direct support for undermount drawer hardware. Other drawer hardware is mounted to the cabinet sides; we use temporary spacers to aid installation, working top to bottom.
To help assemble the cabinet’s basic box, dry-installed biscui…
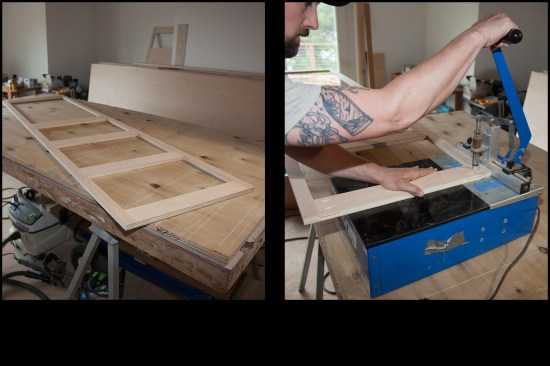
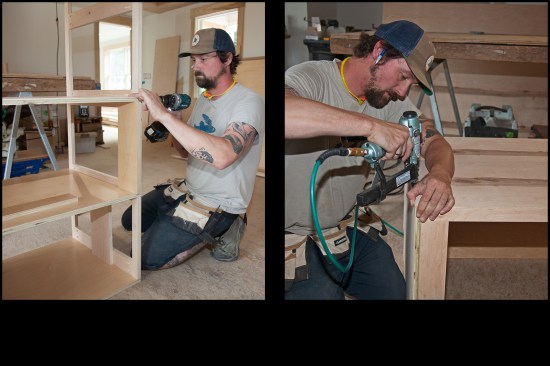
Face frames. For paint-grade cabinets, I use hard maple, which serves as an excellent paint base for face-frame assemblies. We nearly always build the face frame first, letting it guide the dimensions of the carcass, doors, and drawer boxes. The ability to pre-scribe a face frame to an abutting wall before it’s applied to the cabinet is a real convenience, especially on large, heavy cabinets.
Before attaching them to the cabinets, we sand the face frames to 150 grit, leaving all glued joints flush and invisible under paint. Small imperfections are filled with Bondo (a two-part epoxy filler), allowed to cure overnight to accommodate shrinkage, then finish-sanded. Moran typically spray-paints the frames with a quick-drying primer such as Bin to highlight any lingering defects that need repair.
Inset drawers and doors. On this particular job, the drawer and door faces are inset in the frames. While overlay doors are arguably more forgiving of minor inaccuracies in the fit, inset doors will highlight them. Either way, it’s crucial that face frame and carcass mate precisely. To avoid damage to the prefinished interior, we sand the inside edges prior to installing the face frame on the cabinet.
Wherever possible, we glue and screw the face frames from the back. As long as the pocket screws will be concealed by an adjacent cabinet, wall, countertop, or finish end panel, it’s a go. In paint-grade work, faces on intermediate partitions are typically glued and face-nailed, and the holes repaired with Bondo. In other situations, we’ll use specialty clamps, weights, or other improvised on-the-job ingenuity to glue the frames.
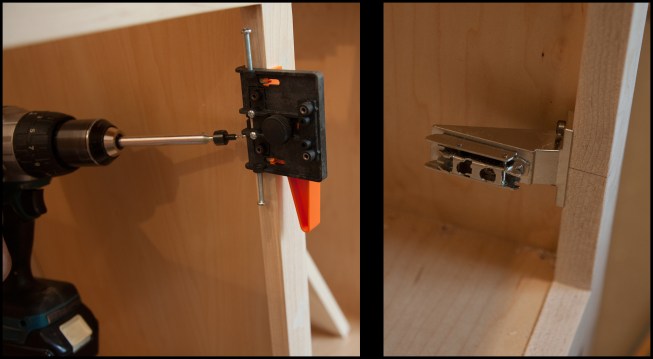
Adjustable legs. Instead of building a standard recessed base, we use PMI metal adjustable cabinet levelers. This not only eliminates scribing the box to an out-of-level floor, but also lets you more or less effortlessly fine-tune all base cabinets to a common laser line. The standalone finish toekick facing is easy to scribe, and snap-on fittings attach it to the leg tubes in a firm but reversible grip.
Fine-Tuning the Doors and Hardware
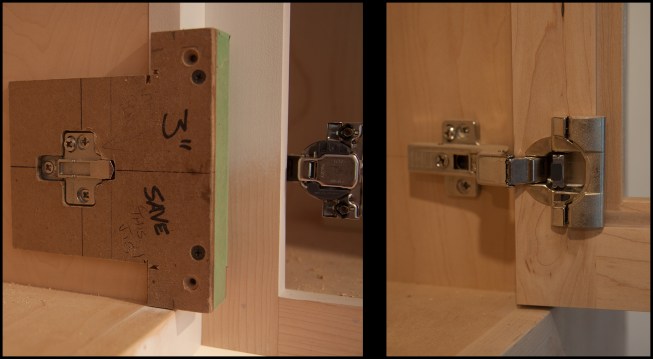
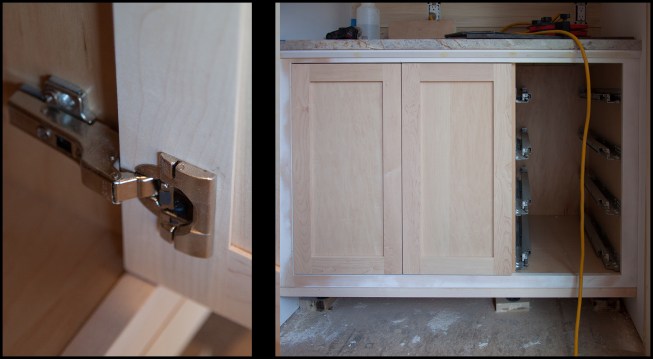
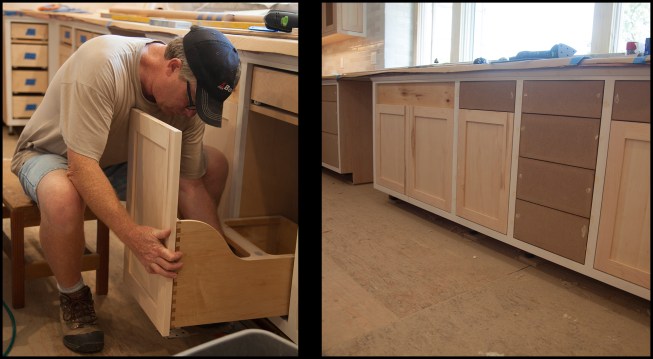
I order doors and drawer fronts the same size as the face-frame opening, then trim them to fit with a 3/32-inch margin on all sides. Doors have to be drilled for the concealed cup hinges we use. Blum offers a pricey but indispensable Ecodrill hinge jig for the job. The jig adjusts to establish the critical margin between door edge and hinge cup bore, which varies from 2mm to 8mm, depending on hinge type. Those holes are hard to alter, let alone hide, if you mess up, so I make a list matching each door to hinge type for reference.
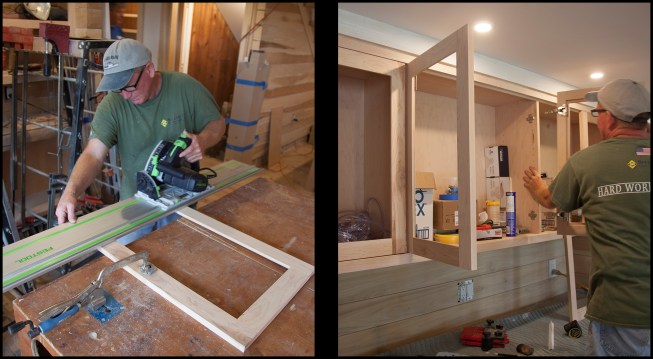
The doors and drawer fronts are ordered the same size as the face-frame opening, then are trimmed to fit with a 3/32-inch margin on all sides. In the photos above, Tim Towle, of Artisan Builders, trims the inset-style doors (which will be glazed later on) for the wall cabinets. Inset doors float entirely inside the face frame, so the margin you see becomes crucial (as opposed to full-overlay or half-overlay doors where you won’t have to worry about a precise margin around the edge of the door relative to the face frame). To help maintain the margin on all sides, Dean cuts precise 3/32-inch-thick slivers of maple that wedge the door in place to help “tune up” the door during installation.
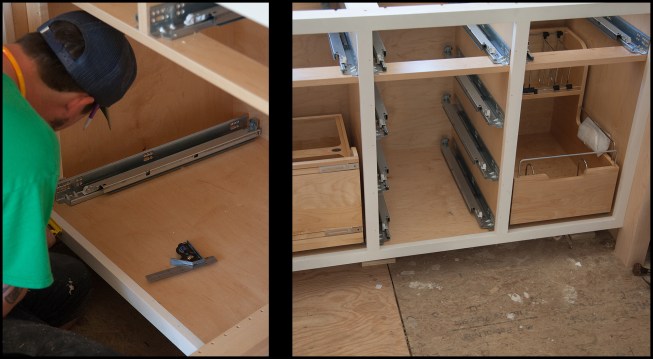
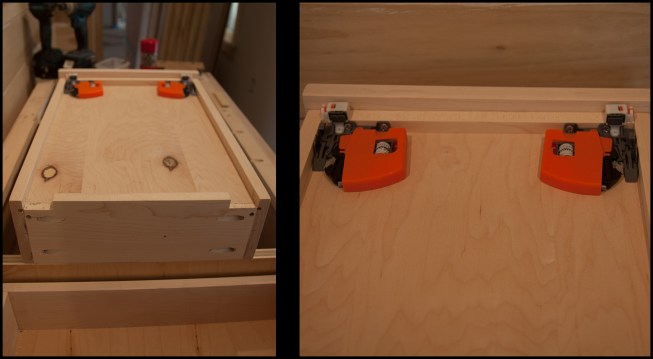
Drawer slides. Installing door and drawer hardware can take place while the cabinet is still on the bench or after it’s installed. Having worked with all available top hardware brands, I’ve settled on Blum as the manufacturer that’s nailed the requirements for versatility, adaptability, and ease of installation, as well as smooth, durable performance.
Because I outsourced the drawer boxes specifying Blum self-closing undermount slides, those boxes came ready to receive the hardware, with a 1/2-inch recessed bottom and a pair of notches at the rear edge. The notches fit over the slide bodies, while a pair of adjustable catches applied (by us) beneath the front edge of the drawer capture the slides. Installation is as simple as dropping the drawer into the opening and pushing it home to an audible click. When you pull it open again, it is fixed on the slides and glides effortlessly back to a soft, self-close.

Instead of building a standard recessed base, PMI metal adjustab…
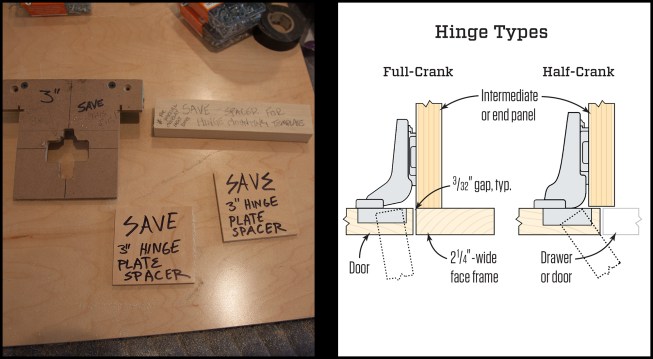
Door hinges. Using concealed cup hinges, you have to do your homework when it comes to hinge selection. The inset doors on this job called for inset hinges. Blum provides a comprehensive catalog and technical manual and it’s worth taking time with this document to see what’s available. This job called for at least five different hinge types with varying door-swing degrees for different locations and relationships (flush or inset) to the face frame.
One important distinction we found helpful to understand: Some hinge arms are designated “half-crank” and “full-crank,” referring to the bend in the arm that determines whether the door edge will half-overlay or be flush with one side of a mounting partition. It’s a subtle but important difference to keep track of.
The hinges are all adjustable for side-to-side, in-out, and up-down fine-tuning following installation, but the range is relatively limited. In a case where the face frame is offset from the cabinet interior, a specialized, frame-hung mounting plate substitutes for the common base plate used in “frameless” cabinet construction. Once you understand the differences, hinge selection becomes more intuitive.
Finishing up. Several cabinets on this job were also designed around prefabricated Rev-A-Shelf storage inserts, including a trash pullout, a blind corner pullout, and a food-storage-container organizer in the base-cabinet lineup.
Several cabinets on this job were designed around prefabricated Rev-A-Shelf storage inserts, including a trash pullout, a blind corner pullout, and a food-storage-container organizer in the base-cabinet lineup. Here, Karl Gerry, of Artisan Builders, installs a trash bin pull-out (above left). The drawer faces were made from 3/4-inch-thick MDF (medium-density fiberboard). MDF is a solid, stable material (it doesn’t expand or contract) and it doesn’t need to be edge banded (above right).
Paint Finish
We make drawer faces from solid, 3/4-inch MDF—a smooth, flat, and stable material that takes paint well. The edges are sanded, not banded. We work with a highly skilled paint crew who apply all the finishes in the house, including built-ins and kitchen cabinets. Following two coats of quick-drying primer, filled and sanded in between, the cabinets are sprayed with two coats of Cabinet Coat enamel (www.insl-x.com). The result is a seamless integration with the surrounding architecture.
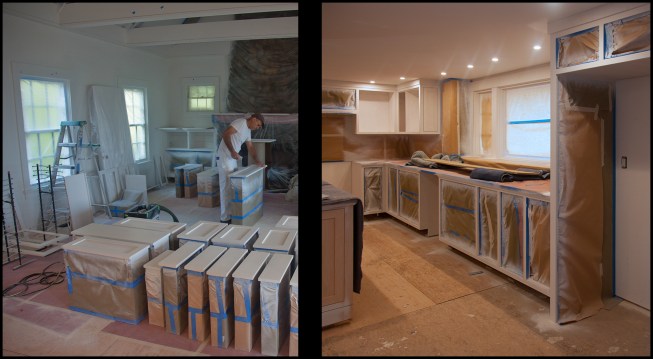
Painter Brendan McCray sprays the cabinets with two coats of Cabinet Coat enamel (www.insl-x.com). The doors and drawers are painted in a designated “spray room,” while the cabinet frames are sprayed in place.
Photos by Dave Holbrook.
Got a Comment?
Click here to submit a Letter to the Editor. We value all comments, corrections and questions.
If we think others will benefit, we may publish it in print. Letters should be exclusive to JLC, Professional Deck Builder or Tools of the Trade. We do not publish open letters or third-party letters. Writers of letters selected for publication will be notified. Letters may be edited for clarity and shortened for space.


