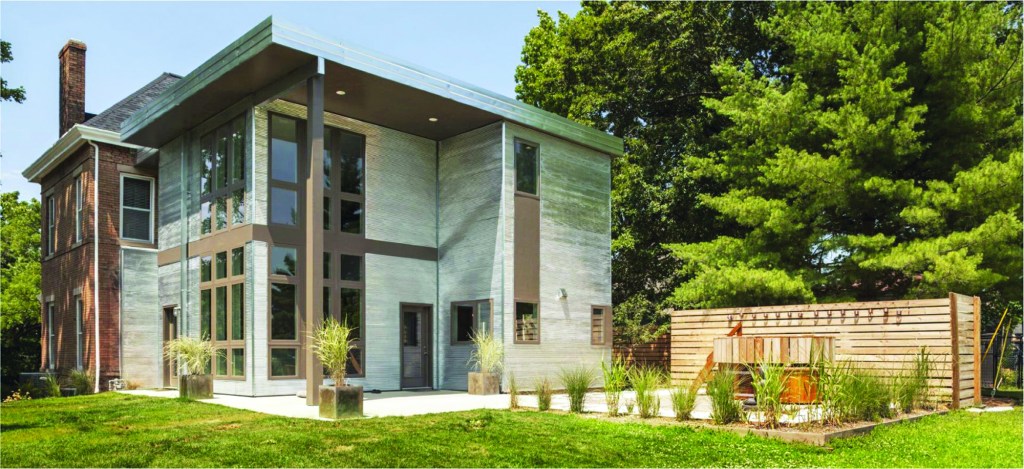
We had the opportunity to build a modern addition on an 1840s brick farmhouse—the sort of marriage between old and new that is increasingly popular. The design by Brian Morgan Architects included exterior metal panels, using inexpensive corrugated metal panels and lots of glass—a design driven by the clients’ interest in what is often dubbed “industrial chic,” an ultra-modern architectural style that draws its aesthetic from industrial materials.
When it came to the bathroom of the addition, however, the owners got stuck on the tile selection. They had chosen concrete floors in the kitchen, which was leavened by a good amount of glass to keep it from seeming too heavy. In the bathroom, they were leaning towards a gray, slate-like tile for the shower and bath surround, but because it would not have all the glass to balance it, they were concerned that this choice for the floor and walls would be too dark. That’s when I suggested we use the same corrugated metal that we had used on the exterior. To my surprise, both the architect and the owner went for it.
Great, now what? Now, I had to figure out how to implement this idea. The main issue, of course, is that there is no way for the trim of the showerhead and mixer to seal well against the corrugated surface. It would look terrible and would leak.
The solution we worked out with the architect was to build a central column for the plumbing that would stand proud of the metal surface. This column would be tiled, creating a nice, flat surface against which to seal the shower controls.
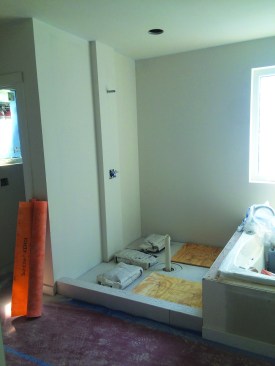
First came a drywall base.
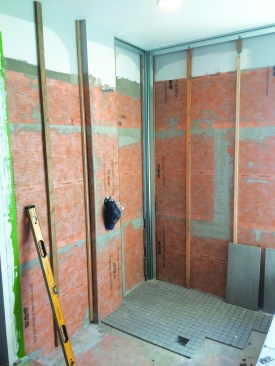
Then the author installed a Kerdi system.
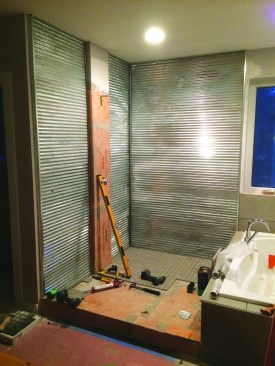
Wood battens provide drainage space, and custom-bent metal channel is used to trim out the edges of the corrugated panels. The panels are secured to the battens with grommeted screws, as they would be on an exterior. If the fasteners leak, well, there’s a rainscreen.
Rainscreen Shower Walls
We framed the column out, and once the plumbing was roughed in, we finished out the shower walls with the drywall.
To create a watertight shower assembly, we installed Schluter’s Kerdi membrane over the drywall, just as we would for tile. We also installed the metal panels on a rainscreen assembly, as we had on the exterior, securing the metal to 1 3/4-by-3/4-inch pressure-treated pine battens (ripped from 1x4s). To avoid holes in the waterproofing membrane, we attached the battens with screws only above the showerhead level; below this level, we used Schluter’s Kerdi Fix—a high-grade silicone sealant. At the suggestion of the Schluter rep, we also installed a second layer of the Kerdi membrane under the battens. This was added insurance in case there might be some interaction with the tannins or other leachates from the wood—a low risk, the rep thought, but an easy addition for a little peace of mind.
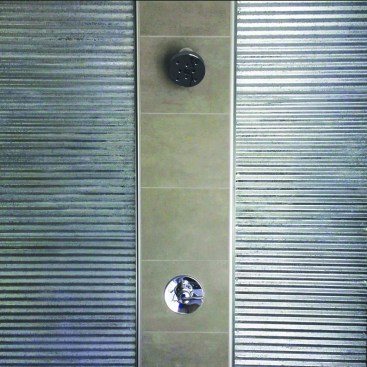
The central column stands proud of the metal panels. Once tiled, it provided a flat surface for the showerhead and mixer trims.
A Finished Look for Rough Metal
While the shower trims meeting on the surface were the first and most obvious issue with the corrugated panels, neatly trimming the perimeter edges of the rough metal was another trick we needed to solve. Around here, we typically refer to this type of panel as “barn metal.” It’s not exactly a finish material, to say the least; we couldn’t just butt it to drywall at the edges and expect it to look halfway decent. The solution here was to use a custom-bent galvanized trim. We have a good sheet-metal shop that provided a U-channel with one wide flange that we screwed to the rainscreen battens. The crisp bent corners of the sheet metal married well with the surrounding finished wall and floor surfaces. To create a good seal between this metal trim and these surfaces, we applied a thick bead of Kerdi Fix, pushing the galvanized trim into it.
To install the metal panels, we slipped the edges into the perimeter U-channel and screwed off the panels with the usual grommeted screws that we used to secure the exterior panels. These aren’t the most leakproof fasteners in the world, but with a rainscreen behind the metal, it wouldn’t cause problems if they occasionally leaked.
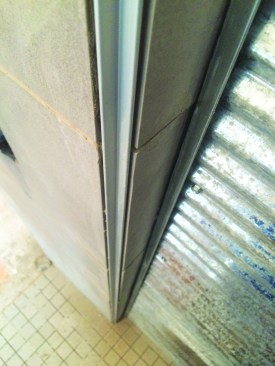
At the corners of the tiled column, a reverse corner, using metal corner stock, echoes the detail used for outside corners on the exterior.
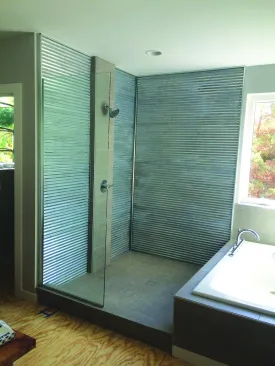
In the finished shower, the metal panels create a brighter space and the desired industrial look.
One final detail: Rather than lapping the tile on the outside corners of the central column, we installed the tile right to the corner on each side and filled the space at the corner with metal corner stock. This “reverse corner” was the detail we had used on the exterior where the metal panels joined at an outside corner. This detail, along with the overall shower design, provided a nice echo of the exterior.
Photos by Jake Bruton


