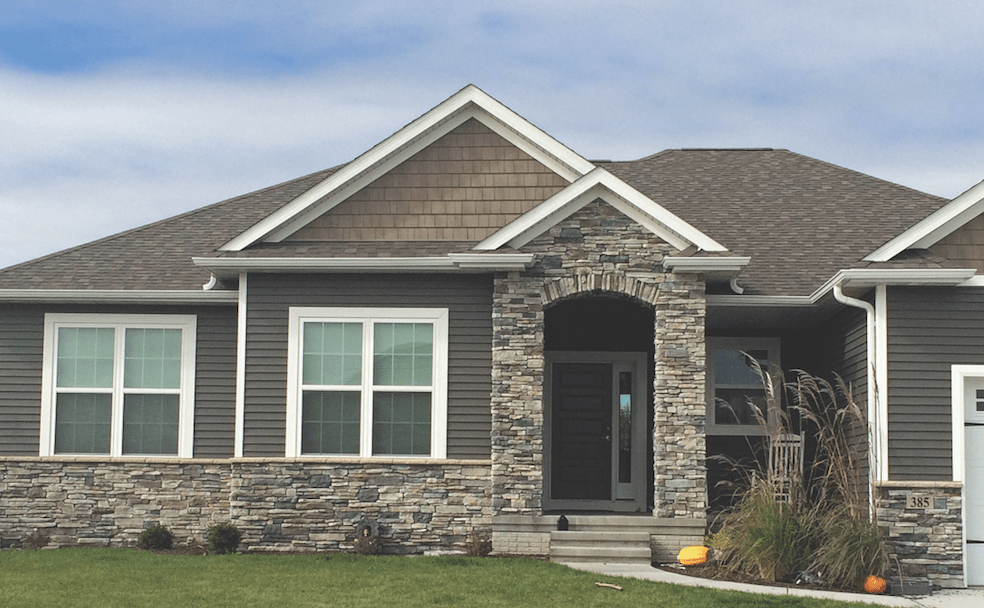
In the latest Cost vs. Value report, the manufactured stone project proves to have a high return on investment for homeowners, recouping as a national average of more than 95% of the cost of the project at the time of the home sale. In my area in Iowa, this is a very popular exterior that we install often both as a retrofit and on new homes. But in my work as a building consultant, often inspecting and reporting on cases tied to litigation, I frequently see manufactured stone (or as the industry refers to the range of products like it: adhered concrete masonry veneer, or ACMV) installed poorly.
One case I was involved in stands out: a $2.4 million lawsuit, in which a hotel’s manufactured stone exterior was installed without adequate drainage behind the veneer. Water leaked behind the stone cladding and rotted out the sheathing and, in some places, the framing. The building is only 11 years old. While that is a commercial project, it is no different on the installation details than a residential project. The very first project I remediated was a $13,500 repair on home with a manufactured stone veneer that had been installed only 11 months prior.
Once water gets past ACMV and completely soaks a wall, it won’t dry out very fast and mold and rot can set in very quickly. Hopefully that’s what you can avoid by following the recommendations I outline below.
Conventional ACMV is commonly referred to in the field as “stick-on-stone” because the concrete masonry pieces are typically installed into a stucco base. Too often, this base is slapped up against a single layer of housewrap. I find this happens a lot when the veneer is installed as a retrofit. Housewrap is fine for vinyl or fiber-cement siding, but for manufactured stone and stucco, building codes require a minimum two-layer water-resistive barrier (WRB).
The problem goes beyond the lack of an effective WRB behind the stone. Typically, I also find no flashings at the transition between the siding on the upper part of the walls and the stone veneer “waistband”; poor flashings near windows; and no effective drainage from behind the stone.
Case in point: On a recent home with a stone veneer waistband, the contractor simply slathered mortar onto the existing single layer of housewrap and began applying the stone. He didn’t provide a flashing detail at the transition, so any water draining from the upper vinyl-sided walls hit a stone dam and traveled in three ways:
- Some of the water flowed down the crack between the housewrap and the stone. There was no flashing here, just the vinyl starter strip.
- Some water flowed down the exterior, soaked through the stone, passed through the housewrap by capillary action, and soaked the OSB sheathing, where we measured 55% moisture content.
- And some of the water flowed around the window flange and down the wall studs.
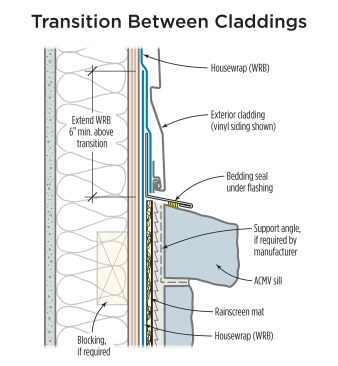
Had the wall detail allowed for it, the water should have drained all the way to the bottom of the wall, where it should have been allowed to escape and drain away from the building. To make this happen, the wall needs a continuous drainage plane behind the vinyl that drains out of the wall via a through-wall flashing above the stone sill. Vinyl is a loose and forgiving cladding, and you can usually get away with one layer of housewrap, as long as it laps over the top of the through-wall flashing, as shown in the illustration at left.
Behind the stone, you need much more than just housewrap. Most manufactured stone veneer should be detailed like a stucco wall. (The exception is a mortarless installation that is screwed in place and includes built-in standoffs that create a drainage space behind the stone.) There are a number of manufacturers that provide rainscreen mats or drainable housewraps that are designed to be installed over a conventional housewrap. I prefer using the product line from Masonry Technology (mtidry.com) because it offers a full array of weeps, flashings, and drainage materials.
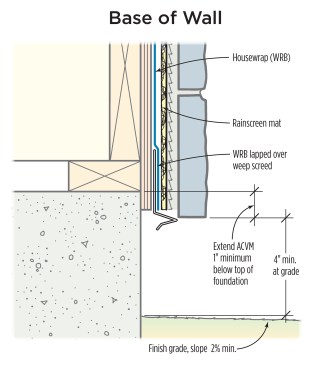
If a rainscreen mat is not used, at the very least you need a new layer of black paper over the existing housewrap, or two layers of black paper, as is required by code for an exterior lath and plaster assembly. The housewrap and rainscreen mat should lap over the foundation sill and terminate at the bottom of the wall at a weep screed positioned at least 4 inches above grade.
I get a lot of pushback from contractors who complain that a two-layer WRB or a WRB with a rainscreen mat adds cost. The details shown in the illustrations here will end up costing $2 to $3 per square foot, depending on your location. That’s a real investment, I admit. But compare that to the cost of remediation: The project will cost at least $25 per square foot in labor and materials to fix, and I have had remediation jobs for failed stone veneer that have gone as high as $58 per square foot. This says nothing about the legal fees that might be involved, and the long-term damage to your reputation. I’ll take the couple of dollars a square foot over all those costs any day.


