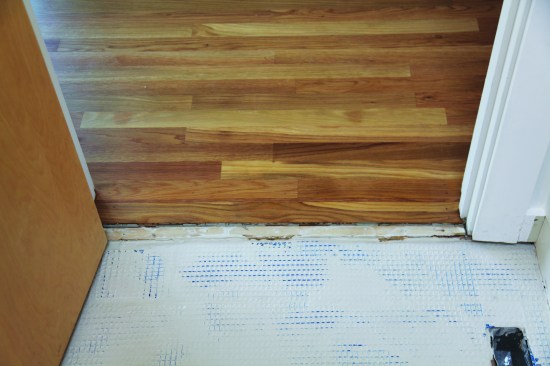
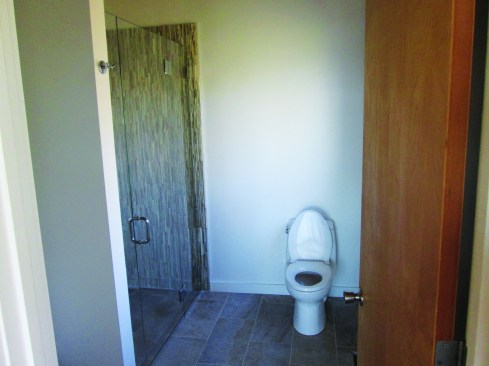
Our company undertook a remodeling job in Provincetown, Mass. that included a complete makeover of the kitchen and two bathrooms. Part of this makeover involved installing new floor tile and integrating curbless, or barrier-free, showers in both bathrooms. The floor tile came flush with the hardwood flooring outside the bathroom doors, and the client wanted to maintain perfectly even floor planes. Somehow we had to find a way to establish a drainage slope in the showers without adding to the original floor thickness.
A curbless shower requires one of several possible designs for creating a 1/4:12-inch drainage slope. It was clear we couldn’t build up the subfloor, and we were reluctant to reconfigure the floor joists under the pan. This is fairly easy to do in new construction but much more complicated in an existing home, especially on this job: The floor was framed with 11 7/8-inch-deep I-joists. There was no easy solution for cutting into those, so we knew we’d need to find an alternative.
Click to enlarge image below.
Tim Healey
The Third Option
Best practice for a mud base calls for the bed to be not less than one inch thick at its thinnest edge.
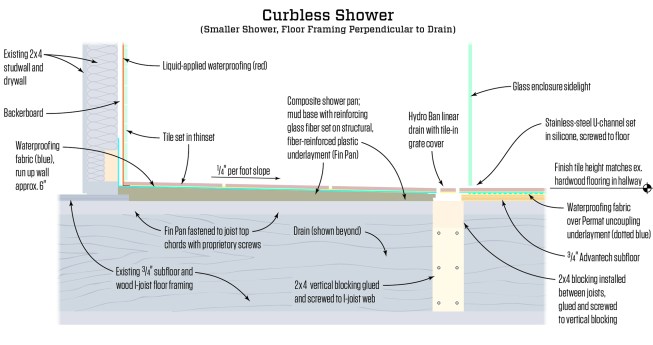
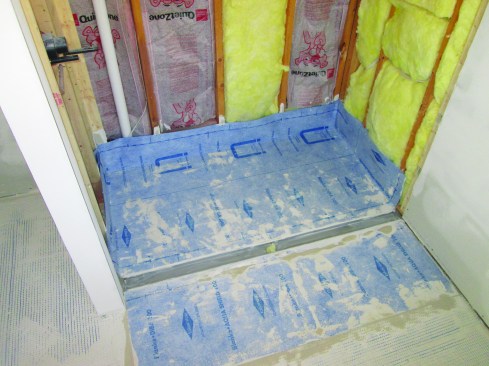
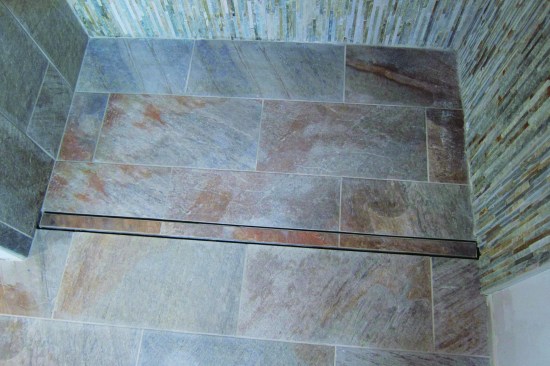
Both showers were 3 feet deep by 4 and 5-plus feet wide, respectively, and would have a monoslope to the drain, adding 3/4 inch to the bed’s thicker edge. The drawings originally showed the drains at the back of the shower, which would mean sloping the bed front to back. While it’s pretty intuitive to want to drain the shower away from the point of entry, it meant that we’d be restricted as to how much we could build up the floor to create a positive slope. Instead, we moved the drains to the front of the shower, just inside the door line, allowing the slope to build toward the rear at the incline we needed.
However, in order to match the oak-flooring thicknesses at the door and have a 1-inch-thick edge at the thinnest section at the drain, we would need to burrow down into the subfloor. We discussed blocking between joists in order to drop the subfloor between them in the pan area, but were concerned about the long-term stability of the framing and the possibility of movement that could crack the mud base and tile if we used that approach. Bottom line, we weren’t going to start the job without first having a solid solution in hand.
We did some online research and found a product called TI-ProBoard, which is manufactured by Fin Pan (finpan.com). This is a structural, fiber-reinforced ribbed plastic panel designed to replace the subfloor in the shower area. It would allow us to pour a mud base almost directly on top of the joists. This product is designed for use with a proprietary central drain only, but working with a technical representative, we were able to adapt it for use with a linear drain.


Dave Holbrook
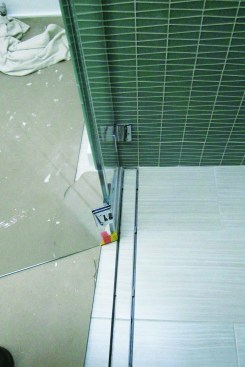
The joists in the smaller, 3×4 shower ran perpendicular to the l…
Roughing in the Drains
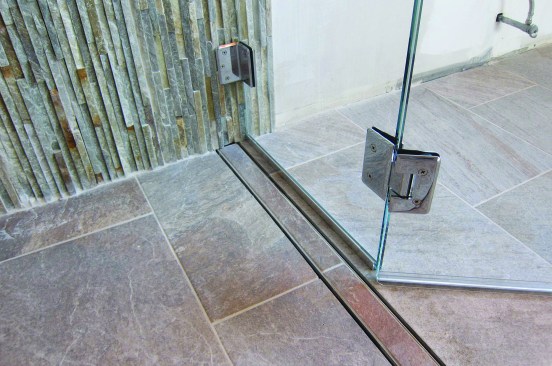
There are plenty of linear drains to choose from (see “Lineup of Linear Drains,” Nov/14). We picked the Hydro Ban linear drain by Laticrete (laticrete.com). Laticrete offers drains with either a finished grate or a ready-for-tile insert cap. They generally come in fixed stock lengths. For a front-draining installation where the drain must run fully wall-to-wall, the length predetermines the shower’s rough opening dimension. (An important note when ordering: To figure the drain length, be sure to account for how much you build out the shower wall at each end. The drop-in drain cap must remain removable for occasional drain maintenance and cleaning.) For the smaller, 4-foot-wide shower, we could use a stock size. For the larger shower, however, we needed an in-between length. Fortunately, Laticrete was able to custom-cut a 62-inch-long drain for a reasonable upcharge and extra lead time.
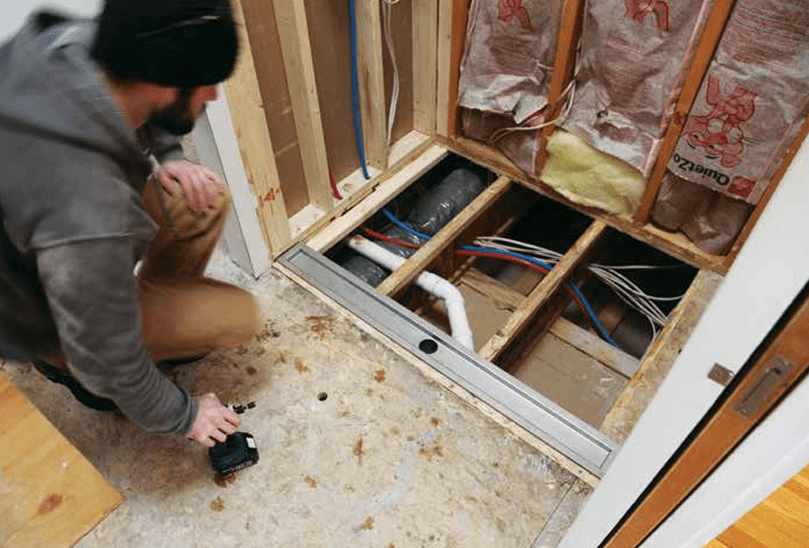
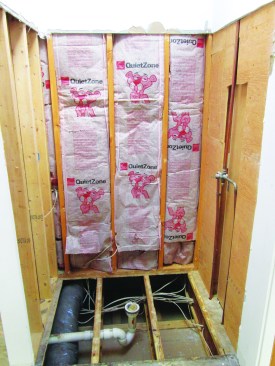
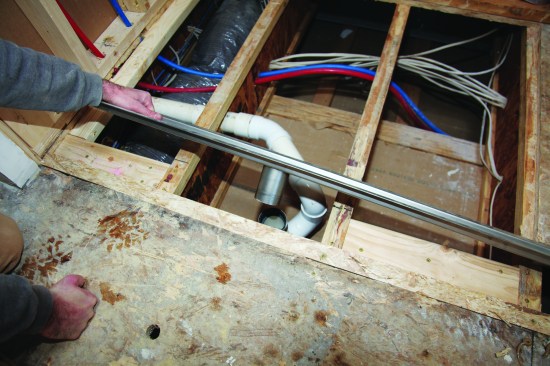
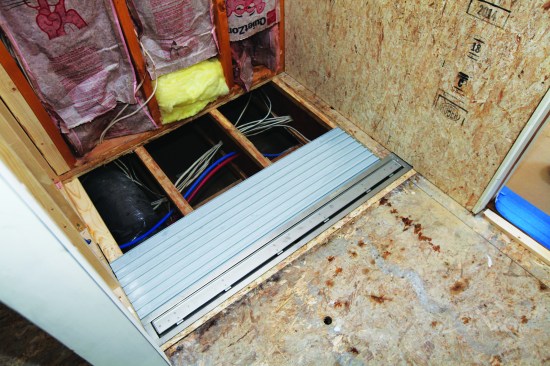
Floor framing. We demolished the original floor tile and underlayment, then cut out the subfloor in the shower areas. In both showers, we were unable to fully cut the subfloor away without also undermining adjacent partitions, so we left an inch or two of subfloor at the back of one shower and at one end of the other. Since these strips were at the edge of the enclosure, well out of the impact zone where a bather would stand, we reasoned this wouldn’t compromise the structural integrity of the base.
During the demo, we found that the joists in the smaller, 3×4 shower ran perpendicular to the linear drain, while in the larger, 3×5 shower they ran parallel. The TI-ProBoard has a structural ribbing and must be installed perpendicular to the framing. Its orientation to the drain is irrelevant, but in both showers, our plumber had to reconfigure the drain lines to connect the linear drains. The rough-in for the smaller shower was straightforward: Leaving the center bay open for the drain stub, we installed 2-by vertical blocking to the web of the joists of the outer bays. These verticals support horizontal blocks between the joist flanges.
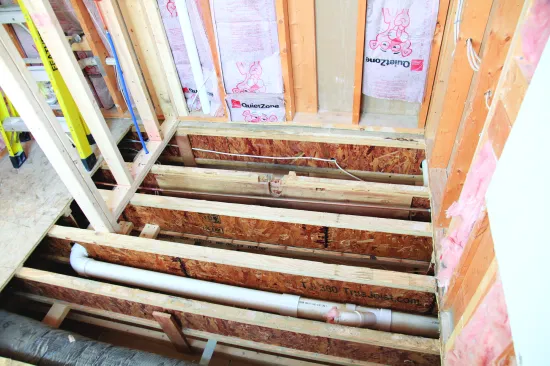
In the larger shower, where the linear drain runs parallel to the joists, the installation was a little trickier. As luck would have it, one of the existing I-joists was centered smack-dab in the middle of the new drain location. With the subfloor removed, we were able to cut out the offending joist and fish in a new one from above. Luckily, there were accessible bearing partitions in the finished basement below to pick up either end of the new joist. Now the old joist (minus a center section) supported only the drain.
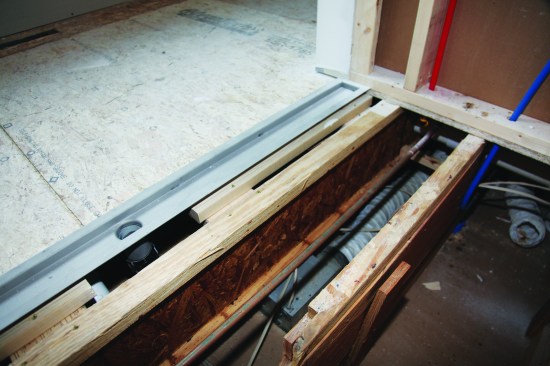
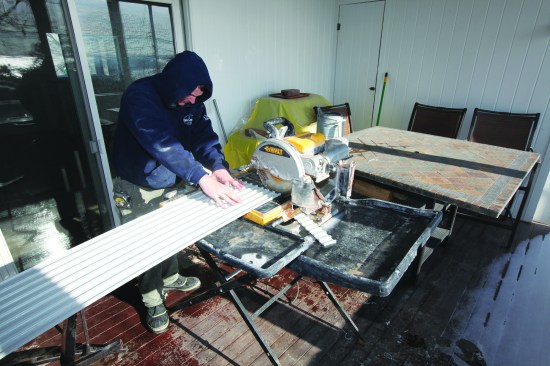
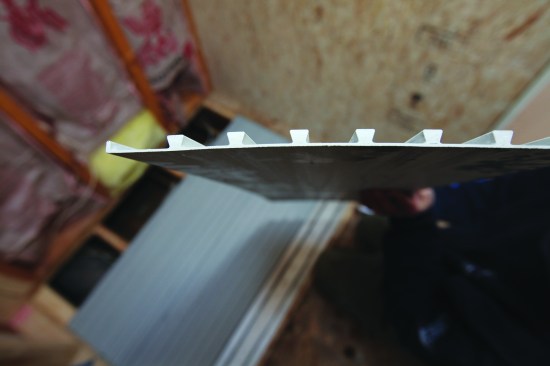
Integrating the Fin Pan. The Fin Pan TI-ProBoard structural underlayment is available in 8- and 12-foot lengths, each 12 inches wide. (It comes in a kit that includes the central drain, which we discarded.) The panels can be cut to length with any type of saw, though the Fin Pan technical reps recommended cutting it with a wet saw to limit the number of glass fibers released in the air. The narrow panels have interlocking edges that slide together—they don’t overlap. The strength of the panels comes from their ribbed profile, which interlocks with the mud base.
To install, we cut the panels to length and trimmed the last panel to width, then slid the assembled pan base under the drain flange and fastened it to the joists. Panels are fastened to the framing with proprietary screws, which are corrosion-resistant and have large, pan heads.
Bathroom floor. Because we couldn’t add thickness to the subfloor, our tile sub, Jean Marino, advocated for installing an uncoupling membrane called Permat, by Blanke Corp. (blankecorp.com), over the subfloor. She had reservations about tiling directly over the existing single layer of Advantech subfloor, and Permat is designed to add stiffness, reducing deflection that can crack a tile job. It’s not a waterproofing membrane, but it’s laid into a bed of thinset, and then its open mesh is filled and floated with more thinset. It only adds about 1/8 inch to the thickness of the tile base, which would still allow her to match the new tile to the existing oak flooring.
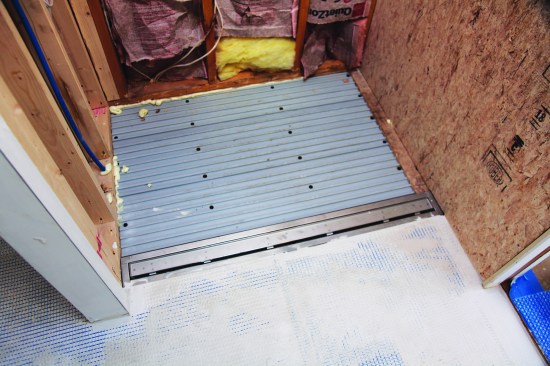
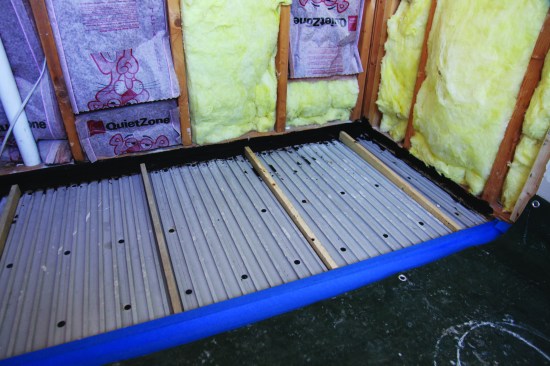
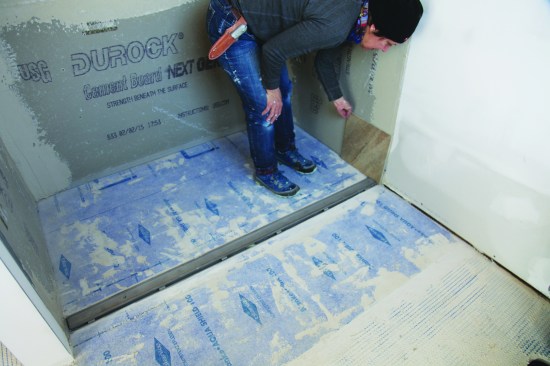
Mortar bed. Jean agreed to work with TI-ProBoard and the linear drain components, but only if she could add reinforcing glass-fiber to her mud base mix. I checked with the Fin Pan rep to see whether this would compromise the system in any way and was given the go-ahead. Jean taped off the linear drain and protected the adjacent floor with a tarp, then sealed the perimeter edge of the shower base with Laticrete 9235, a black, liquid-applied membrane. Next, she made tapered screed sticks to establish the 1/4-inch-per-foot drainage slope. She made a stiff mix of fiber-rich mud, packing it in to interlock with the TI-ProBoard ribs. To finish off, she screeded the mud to the slope of the sticks, then pulled those out and filled in the gaps.
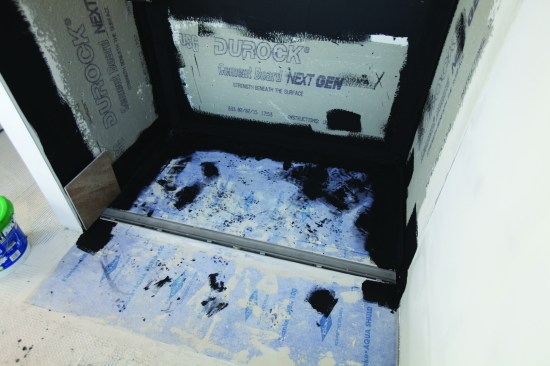
Shower waterproofing. For the shower-bed waterproofing, Jean used Aqua Shield membrane, also made by Blanke. This system includes proprietary inside-corner pieces, which Jean installed before cutting the reinforcing fabric to include a 6-inch vertical leg up the side and back walls. For added moisture protection, we ran the Aqua Shield 24 inches out beyond the shower drain. I would have liked to have done the entire floor areas in both baths with Aqua Shield, but the budget didn’t allow for it.
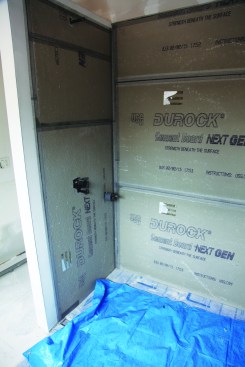
With each floor done, Jean installed Durock backerboard, double-checking as she went to make sure the drop-in tiled drain cap still had proper clearance. To complete the waterproofing in both showers, she applied an approved mesh at the seams with thinset, then began waterproofing the walls with the Laticrete 9235.
Finish Tile and Glass Doors
For the larger-shower walls, the client chose a rough, tessellated tile, which is geared more toward a decorative application than to a heavy-use area like a shower. This was a problematic choice, as it’s impossible to grout or to clean, and its highly irregular surface provided a poor base for mounting the clamps and hinge plates for the glass door. Because we couldn’t guarantee a proper seal at the valve escutcheon, we did persuade the client to use the same 12×24 tile being installed on the floor for the wet wall. For the small-shower walls, the client chose a glass mosaic tile, which looks beautiful but has a tendency to crack when drilled for hinge-plate screws—posing an added challenge for mounting the glass door they chose.
Drain cover. The drain cover comes in two styles, a standard metal top grate or a tile-in cap, and the client chose the latter. It’s a stainless steel tray with fixed metal feet that stand passively in the drain channel, making it easy to remove for occasional cleaning. The cap tray has raised edges to contain the tile, which gets installed in thinset and grouted. Outside the drain, it’s critical to install the tile dead-flush, and eliminate small surface voids that would allow water to seep under the door sweep, which acts as a kind of “squeegee” that must seal tight against the tile.
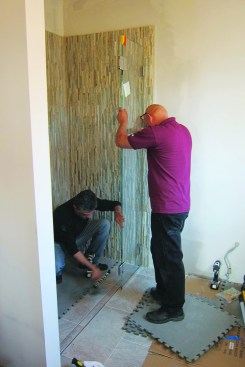
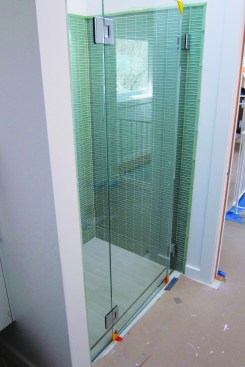
Glass enclosure. With the tile work complete, our glazing sub, Orny Beltrame, of The Glass House, made laser-guided measurements of the two showers. From these, he cut two doors and side panels in 3/8-inch-thick glass, then shipped the pieces out for tempering. This all required about a four-week lead time.
On site, Orny and a helper started with the larger shower, first bedding a stainless steel U-channel in silicone and securing it with stainless steel screws to receive the sidelight at the floor. He then secured each sidelight to the wall with two stainless steel mounting brackets from C.R. Laurence Co. (crlaurence.com). Orny managed to install the mounts plumb and level on the irregular tile with the help of epoxy filler, screwing into the 2-by blocking buried in the wall. Finally, he hung the glass doors on two heavy-duty stainless steel double-acting hinges, also from C.R. Laurence Co..


