Calculating Roof Area
Gable Roof Area
To find the length of a rake on a gable roof, multiply its horizontal distance (the roof’s run) by the slope conversion factor in Slope, Hip/Valley Conversion, below, then multiply by the length of the ridge to find the area.
Rake Length = Run x Slope Factor
Gable Roof Area = Rake Length x Ridge Length
Hip/Valley Length
To find the length of a hip or a valley, multiply its horizontal distance (run) by the hip/valley factor in Slope, Hip/Valley Conversion, below.
Hip or Valley Length = Run x Hip/Valley Factor
Figure: Slope, Hip/Valley Conversion
| Slope (in. per ft.) | Conversion Factor | |
|---|---|---|
| Slope | Hip/Valley | |
| 4:12 | 1.054 | 1.452 |
| 5:12 | 1.083 | 1.474 |
| 6:12 | 1.118 | 1.500 |
| 7:12 | 1.157 | 1.524 |
| 8:12 | 1.202 | 1.564 |
| 9:12 | 1.250 | 1.600 |
| 10:12 | 1.302 | 1.642 |
| 11:12 | 1.356 | 1.684 |
| 12:12 | 1.414 | 1.732 |
Slope and Pitch
Slope is defined as a roof’s vertical rise (in inches) per foot of horizontal run (Slope vs. Pitch, below). For example, a 6:12, or “six-in-twelve,” roof rises 6 in. for every ft. of run.
Slope = Rise/Run
Pitch is different from slope; it’s the ratio of rise to span. For example, a roof sloped at 6:12 has a pitch of 1/4.
Pitch = Rise/Span
Flat Roofs
Even “flat” roofs should have some slope. To prevent pools of standing water, they should slope at least 1/4 in. per ft.
Material Quantity
Most roofing materials are sold by the square.
1 Square = 100 Sq. Ft. Roof Area
Order extra for hips, ridges, valleys, starter -courses, and cutting waste, as described for each material.
Estimating Underlayment
- No. 15 asphalt felt: One roll (144 ft. x 36 in.) covers 4 squares using standard coverage (Standard Underlayment, below) or 2 squares for half-lap applications (Low Slope Underlayment, below).
- No. 30 asphalt felt: One roll (72 ft. x 36 in.) covers 2 squares using standard-coverage, or 1 square in half-lap applications.
For more, see figures Standard Underlayment and Low-Slope Underlayment in Underlayment for Asphalt Shingles, below.
Estimating Asphalt Shingles
Most asphalt shingles are sold three bundles per square (assuming a 5-in. weather exposure). After calculating the appropriate number of squares for the roof field, add the following:
- Add 10% to the total roof area for waste;
- Add one square of shingles for every 100 lin. ft. of hips, valleys, ridges, and starter courses;
- Add up the lengths of all hips and valleys and divide the sum by 20. Then add this many sq. ft. of shingles for additional waste.
Estimating Nails
To estimate nail quantities, see below:
Figure: Fasteners Per Square for Asphalt Shingles
| Roofing Type | Nail Type | Nail Quantity (per square) | New roof | 1 1/4″ galvanized roofing | 2 lbs. |
|---|---|---|
| Reroofing | 1 1/2″–1 3/4″ galvanized roofing | 3 lbs. |
Selecting Asphalt Shingles
Today’s asphalt shingles are built on fiberglass mats. Organic mat shingles were common in the past, but we know of no U.S. manufacturer that still makes them.
Strip-type and laminated styles are available.
- Strip shingles are flat, with a three-tab or no-tab design.
- Laminated “architectural” shingles vary in thickness and shading. They produce irregular patterns similar to wood singles.
Length of warranty is a good measure of quality. Heavier shingles generally carry longer warranties.
Shingle Ratings
Shingles are tested for resistance to wind, fire, impact, tearing and algae growth.
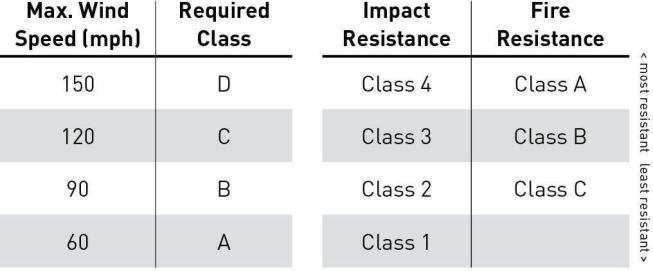
- Wind: ARMA (Asphalt Roofing Manufacturers Association) has developed a classification system for selecting shingles based on the wind zone designation for a specific region.
- Fire: Most laminated asphalt shingles carry a Class A fire rating; most strip shingles carry a Class C rating.
- Impact: UL 2218 ranks shingles in four classes, from least resistant (Class1) to damage from hail and flying debris, to most resistant (Class 4).
- Tear Resistance: Use only ASTM D3462 rated shingles.
- Algae: Shingles with “–AR” appended to the product name resist staining from organic growth for eight to 15 years.
Underlayment for Asphalt Shingles
Building codes and shingle warranties require underlayment. It keeps the house dry until the roof is finished, provides an extra barrier against wind-driven rain and ice dams, and separates shingles from resins in wood sheathing.
Underlayment may consist of felt paper, synthetic sheeting, or self-adhering membranes, used separately or in combination.
Felt Paper
Asphalt roofing felt is classified by what it used to weigh per square.
#15 felt is thinner and easier to apply; #30 is stiff and may telegraph wrinkles.
Although #30 can be used in valleys it rarely is. A better choice is use a self-adhering membrane as a backup watershed in valleys, at roof-to-wall intersections, and along eaves.
Felt paper is prone to tearing and puckering when left exposed and subject to wet/dry cycling.
For better tear-resistance use a fiberglass-reinforced felt or a synthetic underlayment.
Synthetic Underlayment
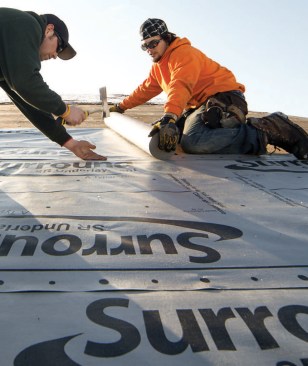
Synthetic underlayments have several advantages over felt: They’re stronger and lighter. They come in wider, longer rolls that cover the roof faster. They don’t soften or wrinkle when exposed to moisture. They’re more tear-resistant. They resist expansion and contraction with temperature cycling, so they wrinkle and buckle less severely than felts, and have less tearing around fasteners. And their UV coating means they can be left exposed to sunlight for up to a year.
Permeability
All underlayments must be impermeable to liquid water, but how about water vapor?
Most synthetic underlayments are impermeable to both water and vapor. By contrast, asphalt felts are semi-permeable — they’re good at shedding water, and at letting vapor pass through.
Some pros argue that if a roof deck were to get wet because of a leak or because of moisture buildup in an unventilated attic, an impermeable underlayment would trap vapor. The potential result: mold, mildew, and rot.
Underlayment Coverage
Proper coverage depends on roof slope.
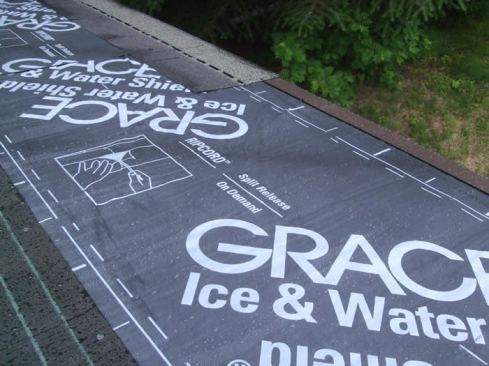
Self-Adhering Membranes
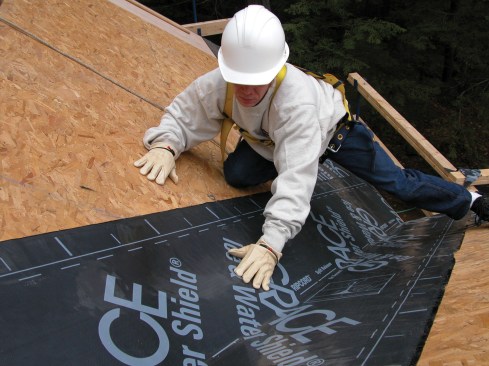
W.R. Grace and Co
Peel-and-stick membranes have a self-healing adhesive backing. Because of their high cost, these products tend to be used mostly in “problem areas,” such as eaves and valleys, and in combination with metal flashing at chimneys, vents, and other roof penetrations. The exception is on roofs with extremely low slopes.
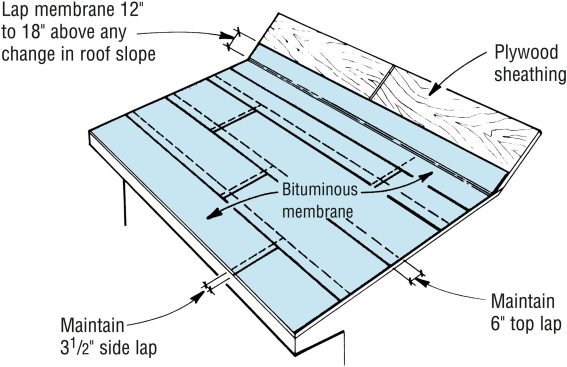
In snowy regions, slopes below 2:12 should be waterproofed with a peel-and-stick bituminous membrane. Horizontal laps (between succeeding courses) should be at least 6 in. wide; vertical laps (those between adjacent pieces in the same course) should be at least 3 1/2 in.Use shingles that are labeled “wind-resistant,” or use standard asphalt shingles and put a dab of asphalt adhesive cement beneath each tab.
Drip Edge
Metal drip edge protects the edge of the sheathing and drains water away from fascia and rake trim.
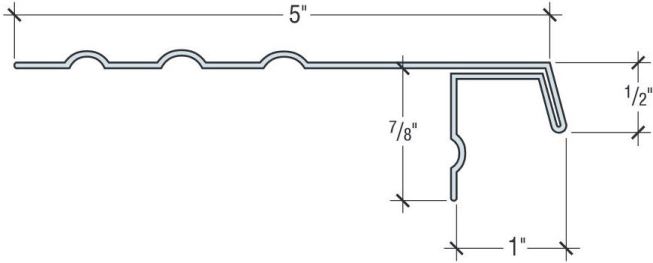
Most drip-edge profiles are successful at directing water away from the fascia during periods of heavy rain. During drizzly weather, though, rainwater is sometimes able to curl under a drip-edge and run down the fascia, especially if the drip-edge has a short lip. The solution is to use a profile with a long lip.
In most areas, best practice is to nail the drip edge directly to the sheathing, apply a self-adhering membrane on top of the drip edge, followed by a compatible underlayment.
Along the rake, apply underlayment first, then put the drip edge over it, making sure it overlaps the drip edge at the eaves.
Fasten drip edge with compatible 1 ½-inch nails spaced 8 to 10 inches apart.
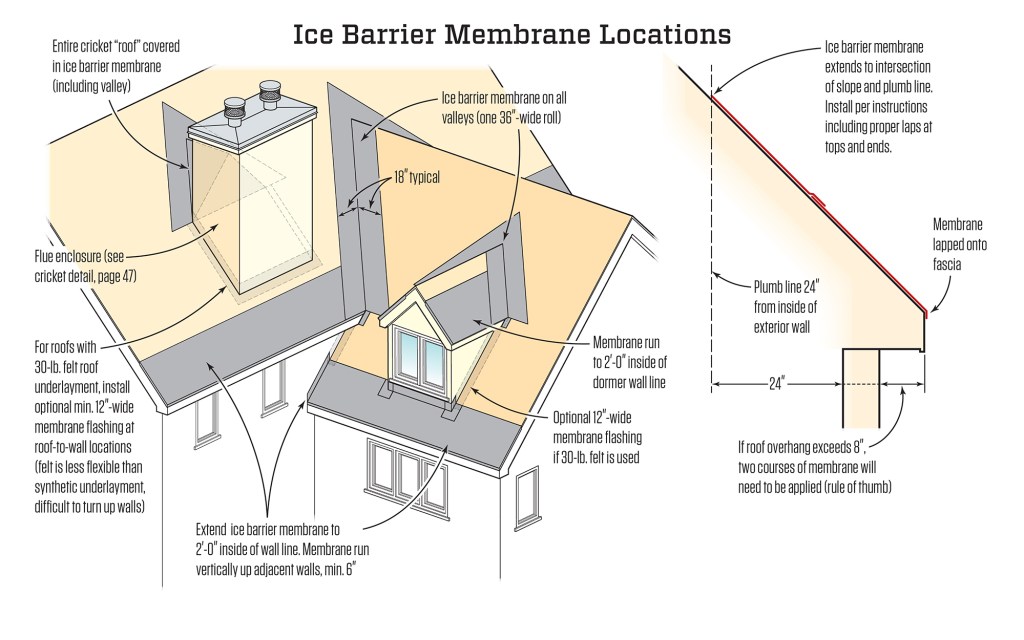
Protection from Ice Dams
Some codes in Northern areas require that the membrane extend from the eave to a point 2-feet inboard of the outer wall, to protect against ice dams.
However, an ice dam can loosen the membrane at the edge of the roof, allowing water to work its way up and under the drip edge. A double membrane creates a backup. Place a 9-inch wide strip of peel-and-stick membrane on the sheathing and lap it over the edge of the roof to the fascia board. Then install the drip edge and place a full-width sheet of membrane over it, followed by the underlayment.
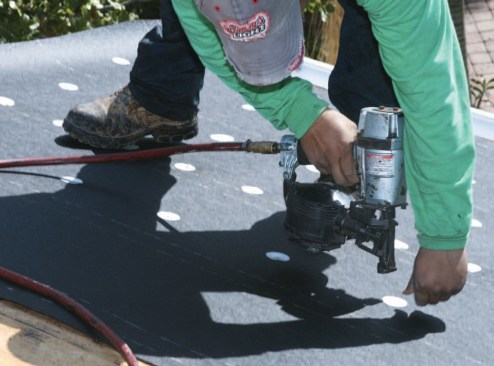
Nailing Asphalt Shingles
Most blow-offs are caused by poorly applied, or badly chosen, fasteners. Nails hold better than staples and are always a better choice.
Nailing
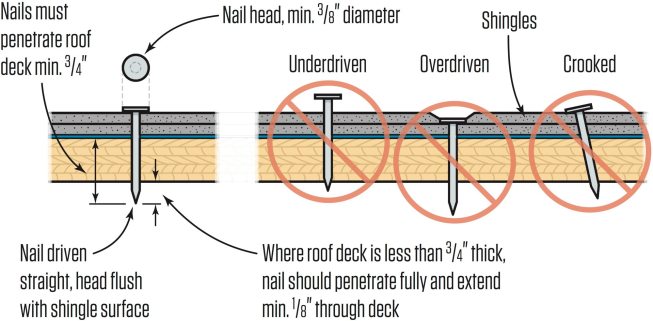
To prevent blow offs use only wide-head roofing nails and drive them straight and flush. The nail head must bear tightly against the shingle without penetrating it – any more or less and it will loosen over time. The nail must also penetrate the roof deck 3/4 in. To prevent blow-offs, drive nails straight and flush. Seal an over-driven nail head with roof cement and drive a new nail next to it. For a mis-driven, angled nail, drive the head flush, then repair it as you would an over-driven nail.
Nailing Patterns

Most installations require four nails per shingle, directly above each cutout and 1/2 in. in from each end. In high-wind zones, use six nails per shingle, as shown, Caution: Do not nail onto or above sealing strip, or shingles may not seal properly. For added wind protection at rakes and around penetrations, bed shingle tabs in a quarter-size dot of roof cement applied at regular intervals about 1 inch in from the edges (to avoid squeeze-out).
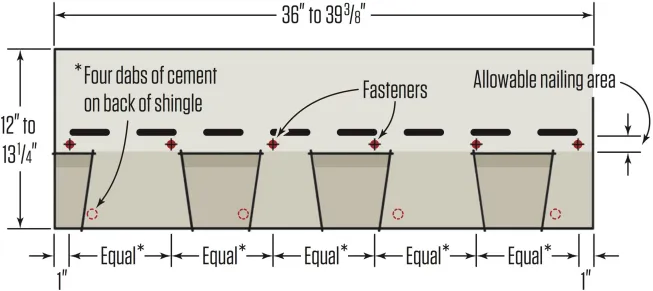
* Verify with shingle manufacturerMost installations require four nails per shingle, directly above each cutout and 1/2 in. in from each end. In high-wind zones, use six nails per shingle, as shown.Caution: Do not nail onto or above sealing strip, or shingles may not seal properly. For added wind protection at rakes and around penetrations, bed shingle tabs in a quarter-size dot of roof cement applied at regular intervals about 1 inch in from the edges (to avoid squeeze-out).
Shingle Installation
General Recommendations
- Lay bundles flat on the roof; don’t drape over the ridge or edges.
- Distribute bundles over roof area to avoid creating concentrated loads.
- Install shingles when temperatures are between 40°F to 80°F. When it’s hotter the shingles will be too soft and easily damaged. When it’s colder they will be brittle and the sealing strips will not properly seal. (The will seal when temperatures warm up.)
Starter Course
The starter course along the eaves sheds water that may migrate through the cutouts and joints of the first full shingle course.
- Manufacturers make starter shingles specifically for this application.
- Starter shingles should overlap the eaves and rake edges 1/4-in. or depending on the shingle manufacturer’s recommendations.
- Nail the starter strip 2 1/2- to 4-in. above the overhanging edge, and 6- to 9-in. o.c. Make sure not to nail within 1-inch of where a seam in the overlapping course will fall.
Offset Patterns
How well three-tab shingles hold up over time depends to some degree on the patterns used to lay them.
Offsets for Three-Tab Shingles
Although many customers prefer to see the cutouts aligned on the roof, this directs runoff into channels that erode the shingle surface.
There are four basic patterns to laying out three-tab shingles: straight-up method, half-pattern, 4-in. offset, and 5-in. offset. The 5-in.-offset pattern provides the best all-around protection.
Alignment Guides. Most shingles include 1/2-in. alignment slits across the top edge and half-slots along the edges. Use these to line up adjacent shingles and successive courses. In addition, shadow marks may run the length of each shingle near the top of the slots. These are meant as an aid to horizontal alignment.
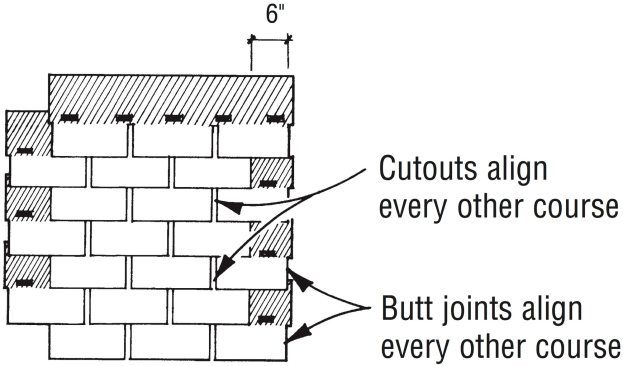
The straight-up method of laying shingles offsets alternating courses 6 in. from a vertical line up the roof (half a tab width for metric shingles). The alignment of butt joints and cutouts in every other course, however, can cause premature weathering of surface granules.
A half pattern (also called half-tab or sixes) staggers each course with a 6-in. offset (half a tab width for metric shingles). Butt joints are better protected from water migrating horizontally, but cutouts still align every other course.
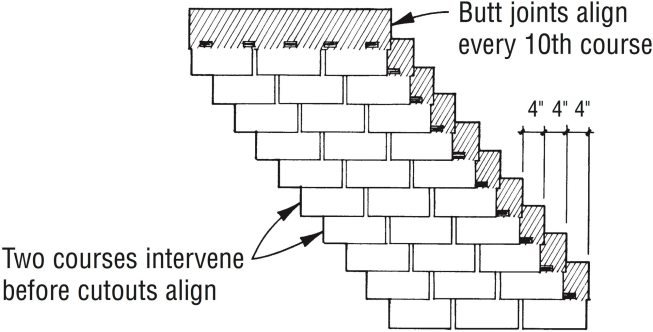
A 4-in. offset keeps cutouts separated by two courses, and butt joints align every ten courses. But the short lap doesn’t provide enough protection in wet climates, or in areas with severe freeze-thaw cycles.
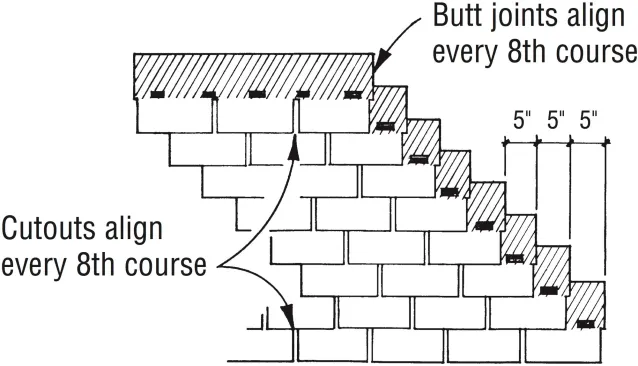
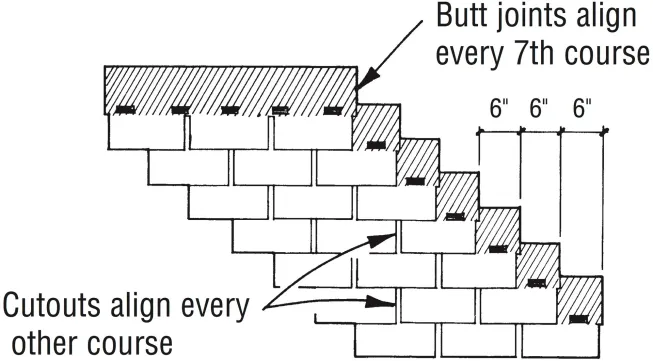
A 5-in. offset provides the best all-around protection. Both the cutouts and the butt joints align only every eight courses, so runoff is less likely to cut channels into the shingle granules. It also hides shingle irregularities as well.
Offsets for Laminated Shingles
Follow manufacturer instructions to determine shingle offset to avoid alignment of joints. Avoid pieces narrower than 6 inches at rakes, and don’t drive nails closer than 3 inches to the roof edge.
Reroofing
When to Strip
As with asphalt shingles, if more than 10% of an old roof needs repair, the best solution is usually a new roof. Avoid roofing over wet or water-damaged wood shingles and wood shakes; they’re too irregular to make a good base.
Nesting Procedure for Reroofing
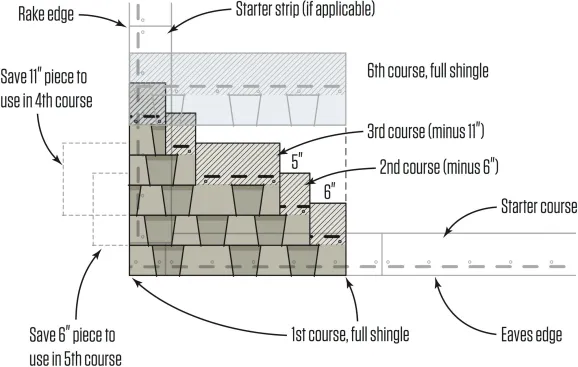
If not using starter shingles, remove tabs from starter strip plus 2-in. to equal existing shingle exposure. Locate factory-applied adhesive along the eaves. When applying new asphalt shingles over existing asphalt shingles, the nesting procedure minimizes unevenness and keeps the new horizontal fastening pattern 2 in. below the old one. Start with a 5-in. wide starter strip, then cut the first shingle course of shingles to a 10 in. width. Apply second and succeeding courses using the half-pattern method.
Starter Strip
- Cut and install the starter strip so that it’s even with the existing roof at the eaves. Do not overlap the existing course.
- Remove 3 in. from the rake end of the first starter strip shingle to ensure that joints between adjacent starter strip shingles will be covered when the first course is applied.
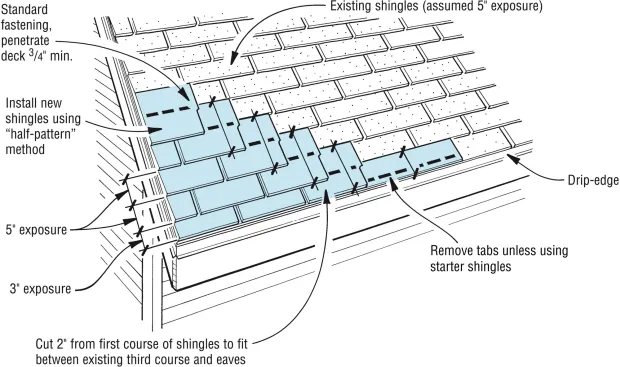
First Course
- Cut 2 in. or more from the butts of the first course of shingles so that the shingles fit between the butts of the existing third course and the eaves edge of the new starter strip.
- Start at the rake with a full-length shingle.
- Use four nails per shingle. Do not nail into or above the adhesive sealing strip.
Second and Succeeding Courses
- Use full-width shingles.
- Remove 6 in. from the rake end of the first shingle in each succeeding course, through the sixth.
- Place the top edge of the new shingles against the butt edge of the old shingles in the course above.
- Repeat the cycle by starting the seventh course with a full-length shingle.


