by Thomas Buckborough
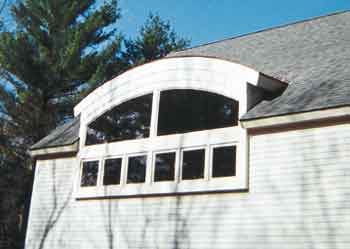
My design-build company recently completed a residential addition that included a 16-foot-wide dormer with an arched roof. Although the construction was challenging, the finished copper-roofed dormer, complete with a curved plaster ceiling, adds a dramatic element to the addition. As I planned the dormer framing, I tried to anticipate the best way to create a crisp edge where the curved dormer ceiling intersects the flat sloping ceiling under the main roof. Clearly, it would be difficult to create the curve of the roof and the curve of the ceiling with the same rafters. The solution was to frame the ceiling separately from the roof. This allowed us to concentrate on getting the proper bearing for the rafters without worrying whether the bottoms of the rafters established the desired ceiling curve. To clarify the design, I drew a section in both directions, as well as a standard framing plan.
Curved Header
Fortunately, my lead carpenter, Kevin St. Onge, had experience building curved structures on previous projects. The first step, just as for any dormer, was to frame a rectangular rough opening in the main roof. The LVL trimmer rafters and the LVL header at the high side of the opening were sized by a structural engineer. When we sheathed the main roof, we allowed the plywood to run wild into the rough dormer opening, to provide a surface for drawing the curve of the dormer roof at the line where it intersected the plane of the main roof. The dormer design included eight windows, all purchased from Eagle Window and Door (800/453-3633; www.eaglewindow.com). The two largest windows were custom units with radiused tops. The window header was assembled from five layers of CDX plywood — four layers of 3/4-inch plywood and one of 1/2-inch. Because the 3 1/2 x 15 1/2-inch header has a post at the midpoint of the 16-foot span, I felt confident that it was generously sized. To draw the curves on the plywood, we made a 19-foot-6-inch trammel from scabbed-together 1-by boards. From the pivot point, we measured two radius lengths — 17 feet 10 1/2 inches and 19 feet 2 inches — corresponding to the inside and outside arcs of the header. After scribing and cutting the plywood pieces, we assembled the header with plenty of nails and construction adhesive, staggering all the plywood joints. We nailed the header into place, and then we turned our attention to the dormer rafters.


