
Mike Guertin
Before feeding the control cable down the flue liner, remove the…
Within a span of two weeks on a whole-house remodel, bats greeted us on three mornings when we arrived for work. We couldn’t find any obvious entry holes, so we were puzzled as to exactly how they might be getting in. When we found a raccoon clawing at a window trying to get out one morning, I knew the only place they could be getting in was through the chimney flue.
The dampers in both fireplaces were closed but the throat damper frame in the downstairs fireplace had rusted out on one side, leaving a hole big enough for our ring-tailed friend to get through. Replacing a throat damper frame in a fireplace is a cramped, dirty, unpleasant, and time-consuming job. So I decided to install a top-sealing damper instead.
Top-sealing dampers take less than two hours to install and seal out uninvited guests. Unlike flue screens that can also keep critters out, top-sealing dampers close down on top of the flue liner to seal out rain and snow. And unlike cast-iron throat dampers, top-sealing dampers keep conditioned air inside, so they often pay for themselves in energy savings within a couple of years after installation.
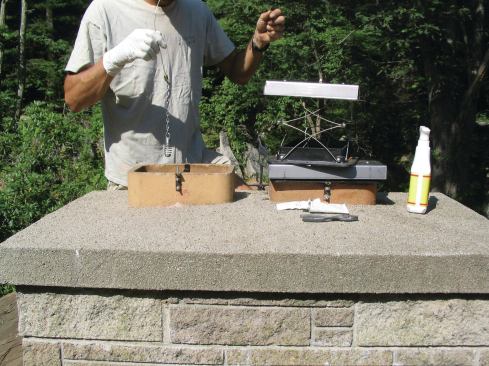
Start on the roof
A top-sealing damper has a metal frame that mounts on the top edge of the flue liner. A stainless steel control cable routes through the flue liner and into the firebox to operate the damper. When the cable is released from a retainer bracket inside the firebox, the damper springs open. When not in use, the damper cap seals shut.
Top-sealing dampers install in a few easy steps: Mount the damper frame on top of the flue liner, thread the cable through the flue, mount the cable retainer in the firebox, and adjust the operation.
There are only a few parts to assemble on a damper: the fusible link, the cable, and the cable pull/handle. The instructions for assembly and installation are clear and easy to follow.
Dampers come sized to fit standard flue liners. But to accommodate regional variations in the finish dimensions of flue liners, the damper frames have wide flanges and may hang slightly inside or outside the flue liner opening.
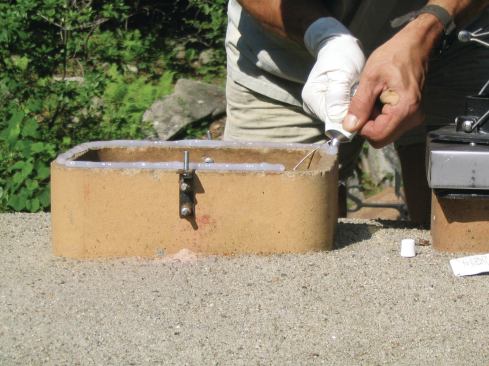
Dry-fit the damper
The damper instructions generally call for the frame to be glued to the top of the flue liner with high-temperature silicone adhesive sealant (usually supplied). Mounting something as large as a top-sealing damper with just adhesive is disconcerting, so I prefer to also bolt the frame to the flue liner using 2-inch or 2 1/2-inch galvanized or stainless steel angle brackets.
I center the damper frame on the flue liner and use the angle brackets to locate and drill the holes on the liner and on the frame. Flue liners fracture easily, especially when you’re drilling close to the exposed edge. So I pilot each hole with a 1/8-inch masonry bit first and then open up the hole with a 1/4-inch or 5/16-inch bit to fit the bolts. A hammer drill can speed up the process, but don’t push too hard on the drill or you’ll crack the liner.
I bolt the brackets to the flue liner with galvanized or stainless steel bolts, taking care not to overtighten the nuts, which could also cause the liner to crack. Thread-lock compound or lock nuts prevent them from coming loose.
I dry-fit the damper to mark and drill the holes through the top legs of the brackets and the damper frame. The top legs of the brackets usually extend past the damper flange, so I trim them off flush.
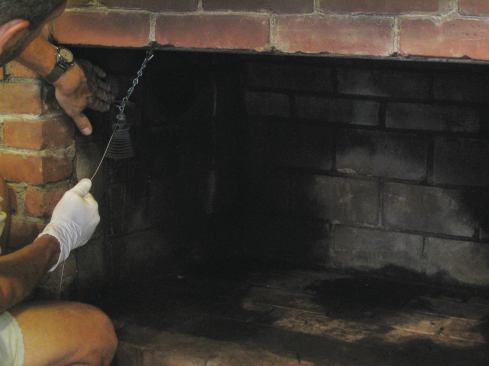
Feed the cable
Before feeding the control cable down the flue liner, remove the old throat damper—it won’t be needed and it will get in the way of the new control cable. If the flue liner is not a straight run to the smoke shelf, I tie a weight (a piece of chain or a fishing sinker) to the end of the cable to help lead it down to the firebox. The cable usually hangs up on the smoke shelf, so feel around to locate it and pull it into the firebox.
Once the end of the cable is fed through to the firebox, I apply a generous bead of adhesive sealant to the top edge of the liner, bed the damper frame, and bolt it to the angle brackets. I make sure that the sealant has filled all the gaps and tool it smooth as needed.
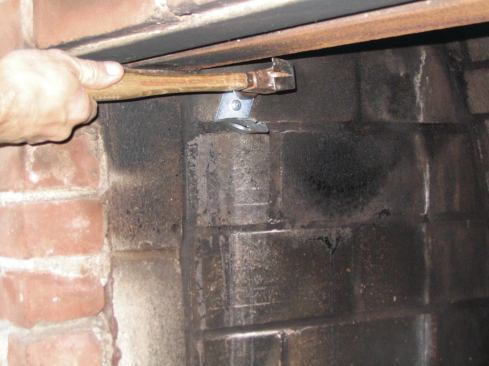
Mount the cable in the firebox
The next step is choosing a location to mount the cable-retainer bracket on the side of the firebox. I prefer to mount it toward the front and just high enough so that it’s not visible from sitting positions in the room, but not so high that the chain handle is hard to reach.
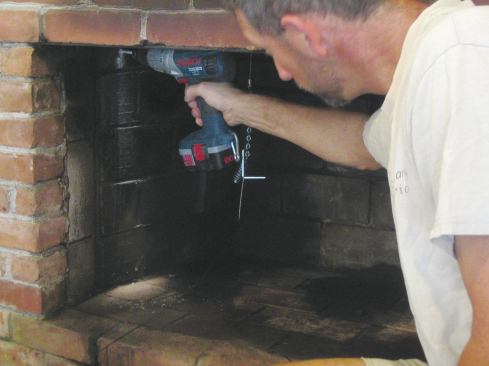
Locate the bracket holes squarely over a firebrick for a solid, reliable connection; avoid mounting the bracket on a mortar joint, which can cause the bracket to loosen over time. Mark and drill holes for the expansion fasteners or concrete screws, which are usually supplied in the kit.
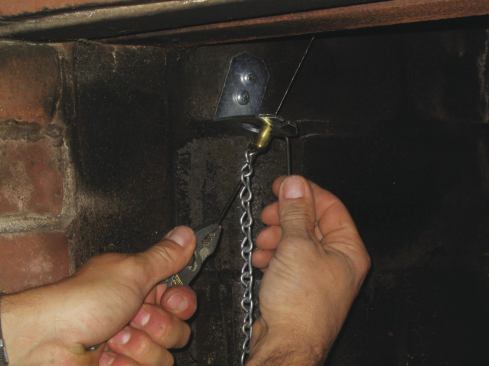
Mount the bracket and adjust the chain handle on the cable so the damper stays closed when the chain locks into the retainer bracket slot. Feed the damper control cable through the large hole in the retainer bracket and pass it through the stop fitting at the end of the handle and chain. Slide the cable into the retainer bracket slot and position the stop fitting against the bracket.
Pull on the cable with pliersuntil the top-sealing damper closes. When it’s shut, tighten the set screw on the stop fitting to lock it on the cable. On some models, there is a spring between the top end of the cable and the damper to give the cable a little extra play. Be careful not to pull too hard on the cable when adjusting the lock or you could overstretch the spring.
Check to make sure that the damper is fully closed and re-adjust the cable length if necessary. Then trim the excess cable, leaving 2 inches to 3 inches past the stop fitting on the chain handle.
Operating the Flue-top damper
To open the top-sealing damper, slide the cable and chain handle into the center of the retainer bracket hole and let the spring-loaded cap pull the cable up the flue. Owners should be instructed to leave the cap open until a fire is completely out and to never close the damper when hot embers are still burning—even if no smoke is visible. As long as a fire is still burning, carbon monoxide is being produced, and closing the damper will let the poisonous gas enter the house. In the event of a chimney fire, the fusible link at the top of the control cable releases automatically to open the damper.
Two kinds of Flue-Top Dampers
There are two styles of flue-top dampers on the market: the pop-up type shown in this article and a hinged type, which has a pivoting cast-metal damper plate hinged to the frame, and has a lower profile so it isn’t as visible from the ground when open. The cable and retaining bracket mount are the same for both types.
Both styles of damper are easy to install and operate, and both are reliable. I’ve used and installed both and have no preference. The dampers on both are spring-loaded for their open position, so if the cable or the fusible link breaks, the damper will open automatically. The stainless-steel cable must be replaced over time. Depending on the amount of use, that could be a couple of years or a couple of decades.
Prices for flue-top dampers run from $150 to $350 depending on flue size, with both types priced comparably. Round flue-top dampers and adapters for square dampers are also available.
Mike Guertin is a builder and remodeler in East Greenwich, R.I., and a presenter at JLC Live.


