Tie-Rod Retrofit Details
The problem with the wall stemmed from a critical oversight on the part of the builder: Though the original plans had called for collar ties, for some reason they were never installed. The result was that the unrestrained cathedral ceiling rafters pushed out, causing the rear exterior wall to lean and the ridge to drop.
Budget constraints made some obvious choices for fixing the problem unacceptable. For instance, any attempt to lift and support the ridge would have required tearing up much of the interior, which the owners were living in at the time. And while installing collar ties on every rafter might have worked, this would have ruined the open effect of the cathedral ceiling, which the clients wanted to preserve. So our engineer, Dick Ludwig of Hatfield, Pa., came up with a creative plan that would do the job structurally while satisfying the owners’ aesthetic requirements.
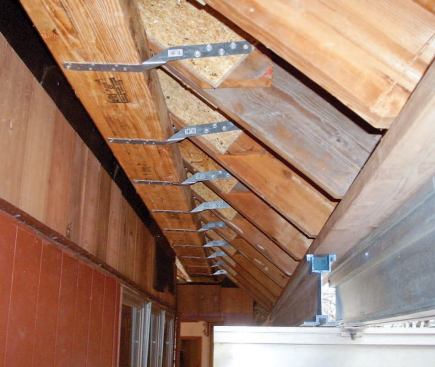
Instead of lumber collar ties, we would install steel tie rods every 7 feet, a total of six rods for the entire length of the house. To pick up the loads from all the rafters, the rods would be connected to a horizontal beam that ran through the soffit (where it would be out of sight) and through the box bay (where it would be enclosed). The beam would be attached to each rafter with metal connectors and, along with the rods, would keep the rafters from spreading any further.
Pulling this off would mean lifting the rafters off of the existing wall, installing the rods and beam, pulling the wall in, then dropping the rafters back onto the wall and fastening everything together. Each piece of the project presented some interesting and unique problems.
Lifting the Roof Edge
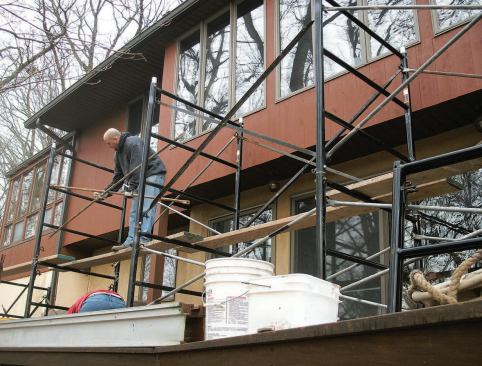
To start with, the weight of the roof would have to be lifted off of the exterior wall before we could pull the wall back into plumb. Again, we considered a number of options – including a temporary exterior wall – but Dick came up with a better idea: Lift and support the wall with a temporary aluminum I-beam supported by heavy-duty steel scaffolding.
The important thing to understand about this technique is that you can’t use a standard scaffold; instead, you need one that’s specifically designed for jacking. We called a scaffold company, which sent someone out to evaluate the job and decide exactly what was needed. The scaffold’s feet consisted of heavy-duty screw jacks – also called shoring jacks – that could be turned to raise the scaffold and lift the rafters. Cradles at the top of the scaffolding, which held short perpendicular I-beams, also had adjustment screws for fine-tuning the lifting process.
We had to place some of the scaffold’s feet on a wood deck, which our engineer determined was plenty strong for the job. To keep the feet from marring the deck and to distribute the load across more than one deck joist, we set the feet on double 2x10s, laid on the flat.
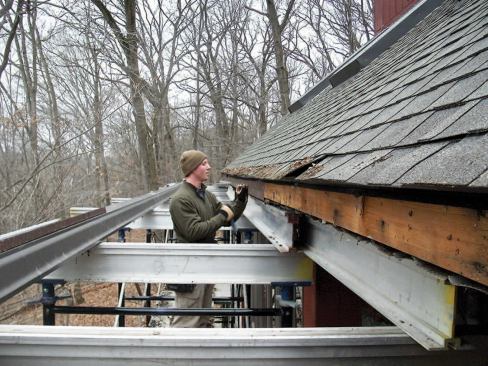
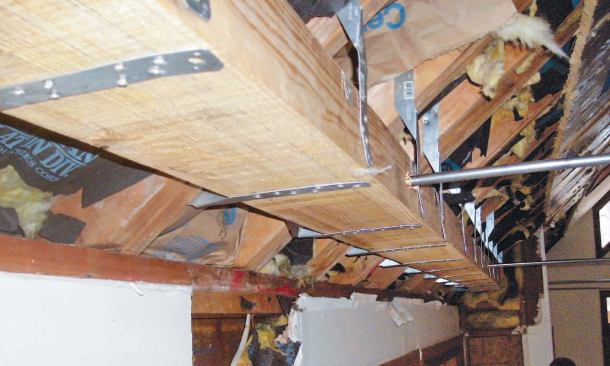
After removing the vented aluminum soffit covering, we lifted the roof just enough to get a Sawzall blade between the rafters and the wall plate – about 1„4 to 1„2 inch – then cut the nails that held them together. We were now ready to install the horizontal beam.
Installing the Beam
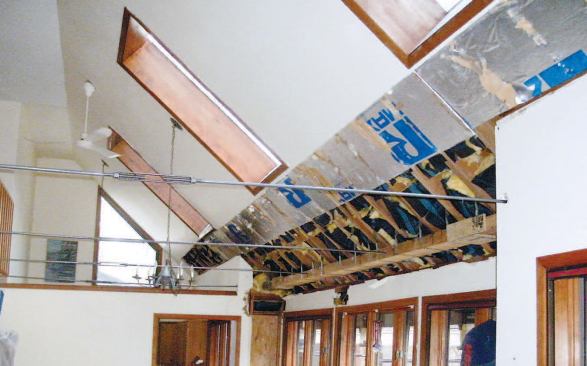
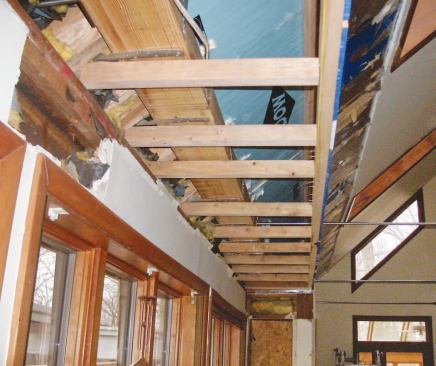
The horizontal beam was a 3 1„2-inch-by-7 1„4-inch stock glulam. (A Parallam would also have been appropriate for this purpose, but would have necessitated a larger beam.) We supported the glulam on its side and secured it horizontally and vertically to every rafter with Simpson twist straps.
The beam was actually installed in three different sections, placed end-to-end and spliced together with 3„4-inch AdvanTech plywood gusset plates. (Our engineer was specific about using strong panel material for the various gussets and splices in this job and recommended against standard OSB, which bends more easily than plywood or AdvanTech.) While important for keeping the ends of the individual glulam members in alignment, the splices didn’t weaken the structure because each of the three sections was designed to handle the rafter forces independently. Beam deflection was limited to L/600. As mentioned above, the plan called for a total of six tie rods, or two rods per glulam section.
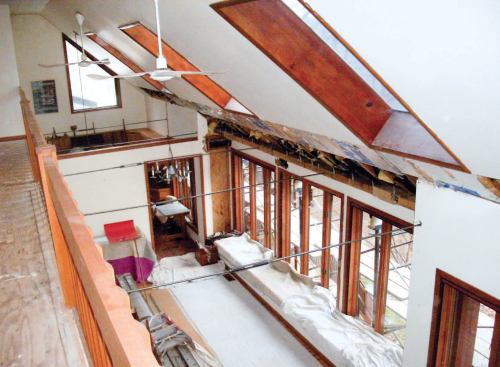
Installing the beam required a bit of disassembly in and around the bump-out. We had to remove the windows along the sides of the bay to keep them from cracking when the wall was pulled in, and we had to remove some of the drywall ceiling so that we could attach the glulam beam to the rafters above the bump-out. Rather than replacing and finishing new drywall, however, we decided to enclose the beam in a soffit. That enclosure and the six steel rods, which would also be enclosed, were the only apparent changes to the home’s architecture at the end of the job.
Tying Everything Together
This structural scheme depended on the tie rods and the beam doing the same job that would normally be done with collar ties or floor joists – that is, structurally connecting the rafters at the back of the house with those at the front, thus preventing the roof from spreading. The question was how to do this without tearing up the intervening walls and without having to install another horizontal beam at the front of the house.
Dick’s solution was to have the 5„8-inch steel tie rods span the 14-foot distance from the exterior wall to the center of the house. To carry the load to the opposite rafters, the second-floor decking would need to be reinforced so that the entire floor acted as a structural plate, or diaphragm, transferring the forces to the rafters supported by the opposite wall.
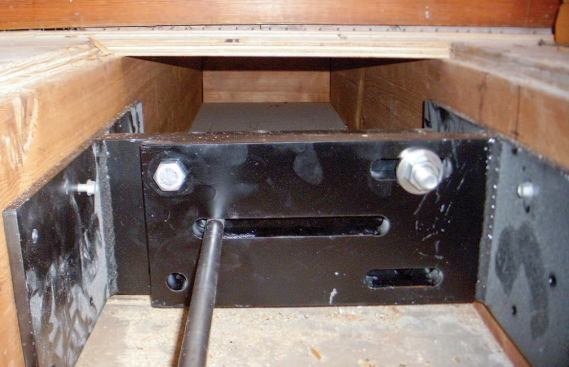
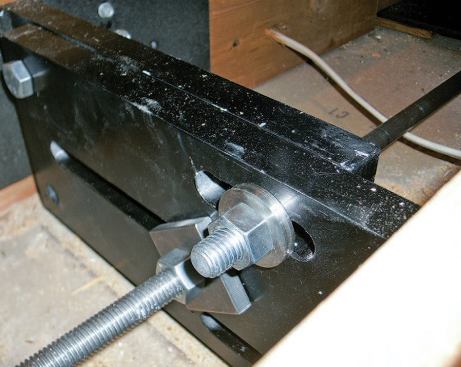
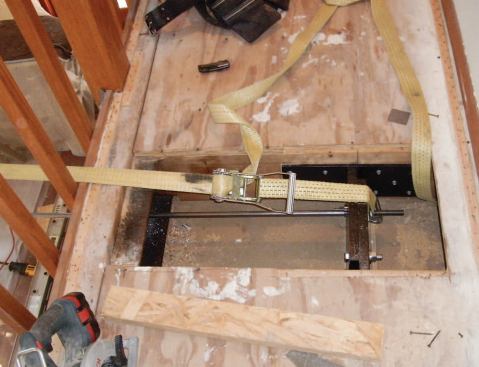
To attach the rods to the beam, we bored horizontal holes through the beam, inserted the rods through these holes, and then fastened them in place with nuts and large washers. At the center of the house, along the balcony, we installed custom-made 1-inch-thick steel H-brackets between the floor joists, and fastened the ends of the rods to these brackets. Some of the joists were twisted or cupped, so in order to get a solid connection we had to shim between the brackets and the joists with thin metal plates. Turnbuckles in the middle of the span would allow us to make final adjustments.
Beefing up the subflooring required a schedule of 8-penny ring-shank nails 5 inches on-center along every floor joist. This meant the carpet on the second floor would have to be pulled up, which the homeowners volunteered to do.
Pulling In the Leaning Wall
With the beam, ties, and hardware in place and the floor nailed off, it was time to pull the wall back into plumb. This proved quite easy with the weight of the roof off the wall: We used a couple of nylon ratchet straps, attaching them to the H-brackets at one end and wrapping them around the wall plate at the other. Once the wall was plumb, we turned the screw jacks on the scaffold to lower the rafters, used the turnbuckles at the center of the rods to make final adjustments to the tension, then fastened the rafters to the wall with hurricane clips.
We also used hurricane straps to secure the ceiling joists above the second-floor bedrooms to the rafters along the front wall of the house. Where necessary we added AdvanTech spacers to bring the rafter bottoms into better alignment with the floor joists. This completed the engineer’s design, effectively tying opposing rafters to one another through the tie rods and the second-floor diaphragm.
Although we finished the structural work in about five weeks, the entire job took about two months, with the remainder of the time spent putting the soffits back together, finishing the bump-out, and trimming out the tie rods with false beams made of 1-by pine.
Dennis Gehman is president of Gehman Custom Remodeling in Harleysville, Pa.


