Veneer plaster provides a hard, smooth finish for walls and ceilings
Skim-coat plastering has replaced traditional plastering in the construction of most residential interior walls and ceilings. It’s also making inroads among builders making the switch from tape-and-finish drywall. If you’re unfamiliar with skim-coat plastering, also called veneer plastering, you’re not alone. I work in southeastern Connecticut, where plastering is seldom seen in new construction. Yet just 20 miles east, in Rhode Island, skim-coat plaster is common. Skim-coat is a thin layer of plaster applied over a special gypsum panel called blueboard. The paper facing is chemically treated to provide a bonding surface for plaster, and the blue color distinguishes it from regular gypsum board. After the board is hung, the entire surface is covered with an even coat of plaster, which is smoothed and polished. This process is significantly less expensive than wire lath plastering, but at an average cost of $1.10 to $1.30 per square foot, it’s somewhat more expensive than joint-compound taping.
Advantages of Skim-Coat
In my opinion, skim-coat plaster resolves the shortcomings of drywall. Veneer plaster is monolithic, so there’s no “tell” from the seams. Low-angle sunlight reveals all of the imperfections of drywall, but plaster has a smooth texture that looks good in any light. Besides, unless joint compound is skim-coated over the entire surface, the differences in texture between the paper and the joint compound tend to “read” through a gloss paint finish. One coat of plaster veneer can double or triple the 1,000-psi compressive strength of a 1/2-inch gypsum panel. A two-coat plaster system can increase the strength to over 4,000 psi, making dents and nail pops highly unlikely. Veneer plastering can be completed faster than drywall. An experienced plasterer can skim about 750 square feet of surface per day, and a typical crew can plaster a 2,000-square-foot house in two days. There is zero sanding, and the finished product can be painted as soon as 24 hours after the plaster application, depending on the room’s temperature and humidity. Plaster is more fire-retardant than exposed paper, and its denser surface is better at minimizing sound transmission. For these reasons, not to mention the dust-free application, my customers are willing to pay the moderately higher cost for skim-coat plaster.
Figure 1. The most commonly used veneer plasters in southern New England are USG’s Diamond and Imperial, and Gold Bond’s Uni-Kal. Base-coat plaster is used in two-coat veneer systems. Imperial contains a fine aggregate that increases its compressive strength, but makes it more difficult to work with. |
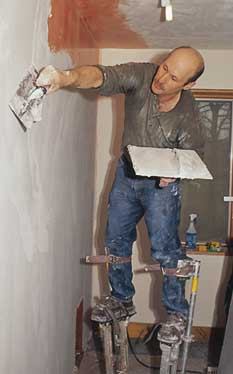
Plaster Choices
We commonly use three kinds of veneer plaster in southern New England: United States Gypsum’s (USG) Imperial, USG’s Diamond, and Gold Bond’s Uni-Kal (see Figure 1). The choice depends on the plasterer’s preference and what the job calls for. For most jobs, I prefer to use Diamond plaster. I find Imperial to be the most difficult to work with and the hardest to get smooth, but it produces a very abrasion-resistant finish, with a reported 3,000-psi compressive strength. Tools of the trade. I have invested thousands of dollars in tools for my remodeling business. But the tool I take the best care of is my $21, 13-inch Marshalltown stainless-steel plastering trowel. It’s the one tool I never leave overnight at a job site, because a nick on any edge will render it useless. After three years of heavy use, it’s broken in real nice and is my most valuable plastering tool. Most plastering trowels are 5 inches wide and vary in length. In theory, I could be more productive with a 16-inch trowel, because it covers more surface per sweep, but I’m more comfortable with the 13-inch. I also have a 4×11-inch trowel for tight spaces. The edge of a trowel gets better over time as it tapers and thins from wear. A corner trowel, also called a butterfly, is used to make crisp 90-degree inside corners.
Figure 2. Tools of the plastering trade include a hawk and assorted trowels, a felt blister brush, miscellaneous paint brushes, and a spray bottle. A cage mixer (right) chucked in a low-speed drill ensures a smooth batch of plaster. |
Besides a few good trowels, you also need hawks, stilts, staging, mixing containers, scoops, and a mixing table (Figure 2). The mixing table is a waist-high surface used to hand-mix traditional plasters. But since veneer plaster is machine-mixed in a container, the table is used solely to hold the batch for easy hawk loading. I find that a non-absorbent plastic laminate surface works well.


