I’m a BPI-certified home-performance contractor, Passive House–certified builder, and remodeler based in Vermont. Over the years, my home-performance consulting services have grown to include commissioning HRV/ERV units for Zehnder (making sure they’re balanced appropriately after installation); helping contractors who aren’t certified do air-leakage testing in new homes (in Vermont, where I work, the new 2020 Residential Building Energy Standards require all newly-built homes to be blower-door-tested for air leakage to certify a maximum building leakage of 3 ACH50); and performing home performance assessments/energy audits for clients over the past 16 years as an Efficiency Excellence Network contractor for Efficiency Vermont.
A year and a half ago, I upgraded to a TEC DG-1000 Pressure and Flow Gauge, manufactured by The Energy Conservatory, which helps calculate a home’s ACH50 rate as well as other functions related to pressure and draft testing HVAC equipment. In that time, I’ve found the newer DG-1000 manometer much more intuitive than the old workhorse TEC DG-700 model I used for years. The new high-resolution touch screen graphically shows items such as what pressure taps to hook the diagnostic tubing to (depending on the airflow-measuring task) and boldly displays channel A (pressure) and channel B (CFM or pressure) numbers. TEC also has an app available that enables syncing a smartphone to the manometer, which allows users to operate the DG-1000 remotely from another part of the home or when running a second blower door set up within the structure—it’s a big step up from the older model.
In this article, I’ll highlight some tips and techniques I’ve discovered over the past 18 months while performing hundreds of blower-door tests (both depressurization and pressurization tests; see “Tracing Air Leaks With a Blower Door,” Nov/Dec/20, for more information on pressurization tests using theatrical smoke) and regular combustion appliance zone or CAZ testing along with draft testing water heaters, furnaces, and boilers.
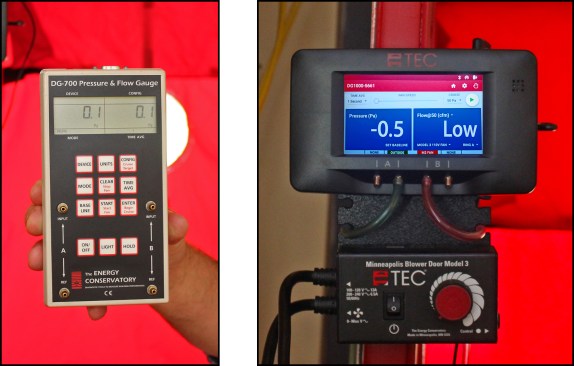
The author switched from using his old workhorse DG-700 model (left) to a DG-1000 (right), though he still uses the DG-700 for tests requiring multiple blower doors.
Updates and resources. Currently, I’m running software version 1.7.0 (35) on my DG-1000 (as shown in the photos). A significant advantage of the product is that The Energy Conservatory continually updates its software and app additions, improving the manometer’s functionality. The company also provides excellent tech support, instructional manuals, and videos online, which help give an overview on how to use the device (though the manuals aren’t always entirely up to date with the latest software versions).
Due to limited space, I am only able to dive into some of the many features of the new DG-1000.
More Intuitive, Better Graphics, Integrated Like a Smartphone
When the unit is powered up, its home screen has five primary apps: the gauge app, updates, settings, power on/off, and the newer tubing assistant, which was a software upgrade sometime after the product’s original launch in 2017.
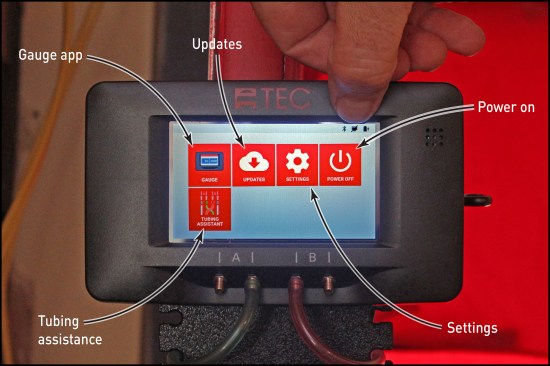
Large pictographs help users set up the manometer for testing. Here, the home screen shows the unit’s five primary apps. Tests can be launched from either the gauge app or the tubing assistance app.
The gauge app screen contains functions such as fan speed, time average, and cruise control mode, in addition to the all-important channel A and channel B displays (more on this below).
The settings screen contains screen brightness, gauge info (when last calibrated), auto time off, and the network configuration (ethernet, WiFi, micro USB). Here, users can create a network; for instance, a media mobile WiFi hot spot on a phone to have better connectivity than just Bluetooth or to avoid relying on the homeowner’s WiFi.
Power on/off powers down the DG-1000. Alternatively, it can be powered down by pressing and holding the recessed power button on top of the unit for a few seconds (the DG-700’s on/off button was not recessed and could be inadvertently switched on in its traveling case and drain the batteries, something that happened to me a number of times).
The tubing assistant is an invaluable tool for someone who is new to the industry or performs tests infrequently. Setup errors are common, and challenges with the diagnostic tubing setup are due largely to user unfamiliarity with the pressure tap orientation. Now, the tubing assistant tool acts as a tutor, walking users through the setup, whereas the DG 700 did not.
Attaching the tubing isn’t always as simple as matching red and green tubes to the channel A and channel B taps. Variables such as test direction and gauge location influence how to set up the tubing. The tubing assistant tool guides the user through a series of pictograph prompts—test type (building tightness, duct tightness, and so on), test direction (pressurize or depressurize), gauge location (inside or out), test device (typically TEC’s Model-3 fan)— eventually arriving at the “tubing connections” screen with a graphic representation of the correct setup. Once the tubing is set up, pressing the green arrow in the bottom right takes the user to the gauge app.

Tubing assistance shows the user which pressure taps to hook the diagnostic tubing to, depending on the airflow-measuring task. Variables such as test direction and gauge location influence how to set up the tubing.
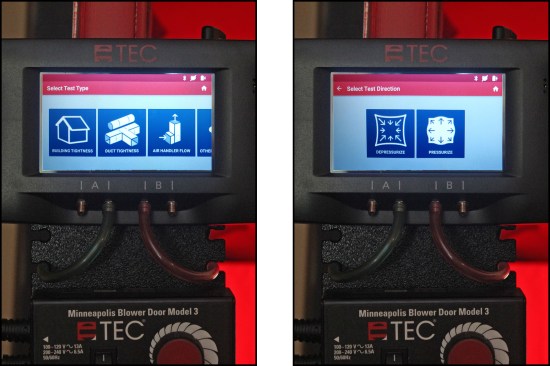
The tubing assistant tool guides the user through a series of pictograph prompts: Test type (left), whether testing for building tightness, duct tightness, and so on; test direction (right), if test requires pressurizing or depressurizing …
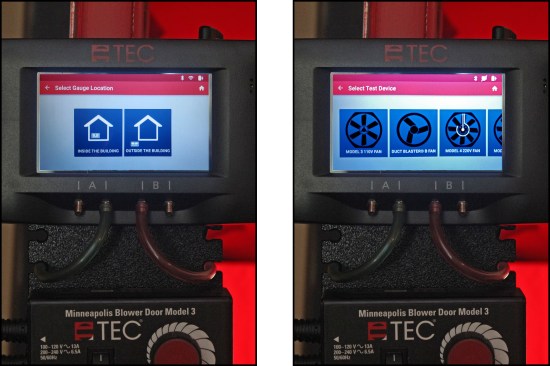
… pressure and flow gauge location (left), whether gauge is located inside or out the building; and test device (right)—typically TEC’s Model-3 fan.

After the pictograph prompts, a “confirm selections” pop-up window appears (left); selecting “continue” reveals a graphic representation of the correct tubing setup (right). Pressing the green arrow button (the “launch with current configuration” button) takes the user to the gauge app.
As an experienced user, I generally bypass the tubing assistant and begin with the gauge app screen. Occasionally, I’ll use it to help set up tests I’m less familiar with, typically HVAC-related ones. Thus, for someone who branches out and expands their business to include additional types of testing, as I have, this tool will continue to pay dividends.
The gauge app is where it’s at. Many of the manometer’s functions can be accessed from the gauge interface app. Familiar channel A pressurization (measured in pascals) and channel B depressurization (in CFM, typically flow @CFM50 for testing homes) graphics are located here. Compared with the DG-700 screen, the DG-1000’s pressure and CFM display numbers are much larger and can be read—and photographed to confirm the blower test results—from farther away.
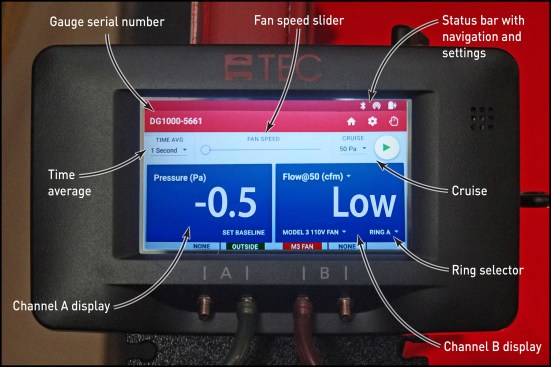
In addition to familiar channel A and channel B displays, the gauge app screen contains functions such as fan speed, time average, and cruise, which automatically starts the blower door fan running to achieve, in this case, ACH50. The unit’s serial number is displayed in the upper left-hand corner, which is useful during calls for tech support or maintenance. The status bar contains navigation and settings.
Within the display box on the right are channel B settings, airflow (CFM or pressure), blower-door fan type (typically TEC’s Model-3 for testing house tightness), and ring size (Open Fan, A, B, C, and others). Ring openings decrease in diameter the further up the alphabet (an A-ring diameter is larger than a B-ring’s and so on).
Ring selection. The DG-1000 is dynamic, but it’s not intuitive enough to determine which ring size to use. Therefore, selecting the ring size is based on experience. For instance, if I’m running a test and I determine, “this seems like a pretty tight house, and they’re trying to achieve high-performance construction or passive house,” I might start with a C or a D ring. However, I may find out that the house is leakier than I thought when the manometer displays “low” on the channel B display window, which would then call for using ring A or B to accommodate for the leakier building. Should I need to change the ring size on the fan unit itself, I can easily update the selection on the DG-1000 gauge screen so they align. So, the gauge isn’t a substitute for a trained technician, who can understand, “OK, I’m getting these readings and this is why.”
With regard to ring size, one pitfall is that the DG-1000 keeps the settings from the last time it was used. It doesn’t zero out by default like the older DG-700 and DG-500 models did, for which a testing configuration needed to be set up every time the unit was powered on. I’ve had a few head-scratching moments due to not zeroing out the settings. (My initial baseline, test-in measurements didn’t jibe with the test-out numbers I took after construction.) Thus, be aware of this; it’ll save time scrambling around looking for photos for what ring was selected during a test and then having to go to a conversion chart to verify the numbers.
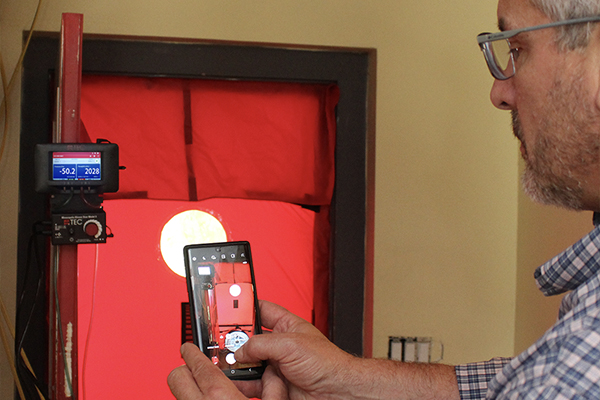
Connectivity. By using the available TEC Gauge app to sync a smartphone to the manometer, I can operate the DG-1000 remotely—when I might be in the basement or the attic while performing a screen capture to save the results of a test. The measurement can also be emailed from the app as an analog record of the same information.
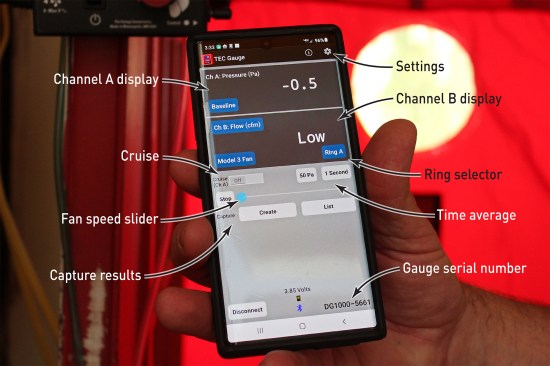
The most substantial upgrade of the DG-1000 over the DG-700 is its connectivity to smartphones and tablets. TEC’s gauge app allows users to operate the DG-1000 remotely and find, say, a leaky spot in the attic. Here, the gauge app screen appears on the author’s smartphone. Once activated, the phone app overrides the unit’s controls.
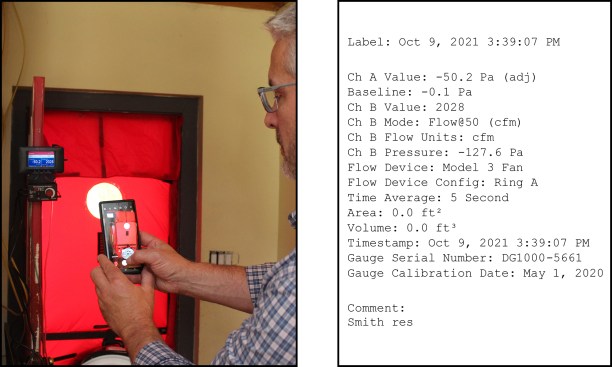
In addition to the standard practice of taking a confirmation photo of the blower test results and the ring size used on the fan (left), the DG-1000 has a capture function that lets the user email a summary report of the test results (right).
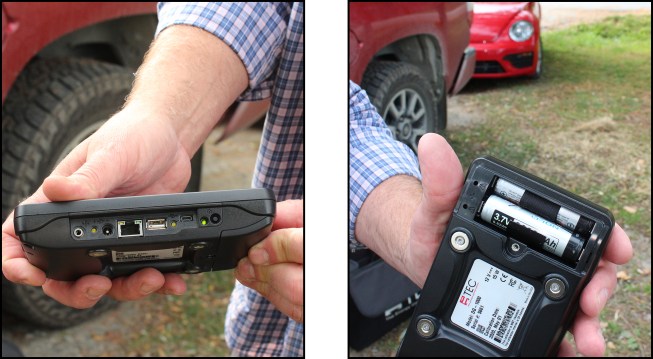
Various charging and interfacing ports are located on the top of the unit—from left to right; fan control jack port, fast charging port, ethernet, USB and micro USB ports, power button and indicator light (left). The DG-1000 uses two lithium-ion rechargeable batteries with a 15-hour runtime (depending on WiFi use and screen brightness). Four strong neodymium magnets (shown here below the batteries) hold the unit to the metal gauge board (right).
Running calcs. Under the Settings tab, users can calculate the area and volume of a structure by using the touch-screen calculator tool. I don’t usually use this; I do my own math later on.
Calibration. The unit’s serial number is displayed in the upper left-hand corner of the gauge app, which is useful when I’m calling for tech support or maintenance (the newer DG-1000 needs to be calibrated every four years, whereas for the DG-700, it was every two years).
Costs. The Energy Conservatory lists the DG-1000 digital pressure and flow gauge for $1,620. The unit comes with batteries, a charger, carrying case, and enough diagnostic tubing to get started. When bundled with a Minneapolis Blower Door System, it costs $3,755.
Photos by Tim Healey and Jim Bradley


