When I formed my acoustical consulting company in 1981, I planned to focus on common residential acoustic problems like plumbing, equipment, and footstep noise, and on ensuring speech privacy.
However, I quickly discovered that few effective and affordable acoustic solutions were suitable for residential settings. And even when solutions were available, I often found that the products we specified were poorly installed.
Therefore, I expanded the original objectives of my company to include doing my own research, specifying the products, and supervising their installation. By managing all aspects of the job, I found I could finally guarantee a solution to my clients’ acoustic problems.
In this article I will present some scientific principles of sound and some of the strategies builders and remodelers can use to solve common acoustic problems in their homes. As modern subdivisions push new homes closer and closer together, and as home-theater systems gain popularity in an increasingly noisy world, the need for these types of acoustic controls becomes ever greater.
Keep in mind that while some of the products and methods shown on these pages are demonstrated in upscale homes, the same principles apply to more modest projects.
Typically, my company offers a “good, better, best” approach to sound-control strategies, as follows:
• “Basic acoustic treatment” is the simplest, lowest-cost approach.
• “Recommended acoustic separation” is used for home theaters and other specialized needs.
• “Acoustic isolation” is used in high-end projects when near total sound control is required.
I’ll explain the specific differences a little later.
Measuring Sound
Sound — or noise — is measured in decibels (dB). As sound increases or decreases, decibels increase or decrease logarithmically. What this means in practical terms is that doubling the volume of a sound shows only a 10-point increase in dB. For example, one TV set at a normal conversational level is about 60 dB, but 10 television sets at the same volume will sound twice as loud and will register at about 70 dB.
Interestingly, even in what one would consider a silent room, there is typically about 30 dB of background or ambient noise. Sensitivity to noise is a personal response, but generally speaking, any noise that exceeds the background noise level by 5 dB or more is perceivable and should be considered a potential disturbance.
An increase of only 10 decibels (dB) translates into sound that’s twice as loud. Any sound more than 5 dB above the background noise level can be distracting or can interfere with sleep. Sound-Transmission Class
One of the more common tasks I perform is acoustically separating media rooms from bedrooms. I start by calculating how much sound is being produced by the TV or audio system, and then I design wall, floor, and ceiling assemblies to handle the decibel levels being produced.
The same concept would apply if you were building a house on a busy street. You would start by measuring the average decibel level produced by traffic noise, and then you’d design a wall assembly that would reduce the outdoor noise to normal indoor background levels, typically about 30 dB.
First, though, we need to know how good a wall, floor, or ceiling is at reducing sound. We use a measurement called the sound-transmission class — STC — to rate the effectiveness with which a material or assembly prevents sound transmission. The STC is a numeric value that quantifies the sound reduction that occurs when airborne sound passes through an object.
Most standard floors and walls — even with sound insulation — have STC values so low that common airborne sounds, such as TV or bathroom noises, are often audible in nearby rooms.
For example, if someone is watching TV or a movie, the sound levels within the room range from 60 dB (quiet conversations) to 80 dB (explosions or loud music). On the other side of the wall, the noise level in the bedroom — where someone might be sleeping — is approximately 30 dB. By doing some simple math, 80 dB – 30 dB = 50 dB, we know that we need a wall with an STC of approximately 50 to reduce the TV noise to an acceptable level in the adjacent room.
With this information and the STC ratings of various wall configurations, we can determine what type of wall assembly will work best.
You can’t find the STC rating — which measures how effectively a material prevents sound transmission — of a wall assembly by adding up the STC values of individual materials. Applying a layer of drywall with an STC of 15 to an STC-36 wall assembly, for example, results in a wall with an STC of about 44 — not 51.
The 80-dB maximum sound in our example is appropriate for the viewing or listening habits of most people. If you are asked to build a practice room for your client’s rock band, you’ll need to know at what volume level they ordinarily practice.
It’s important to remember that STC refers only to airborne sound. Footsteps and other impact-produced noise that travels through the home’s structure are measured with the impact insulation class — IIC — ratings. The lesser-known IIC measurement refers to how well a wall or floor resists this particular kind of sound transmission.
An IIC rating of 50 is generally considered adequate for most residential spaces, but a higher rating may be required for home theaters and other loud areas. Improving the IIC rating of a wall or floor generally involves adding a soft material to the surface or uncoupling the wall, floor, or ceiling surface from the rest of the structure.
We’ll talk more about that later, in the sections on acoustic separation and acoustic isolation.
Basic Acoustic Treatment
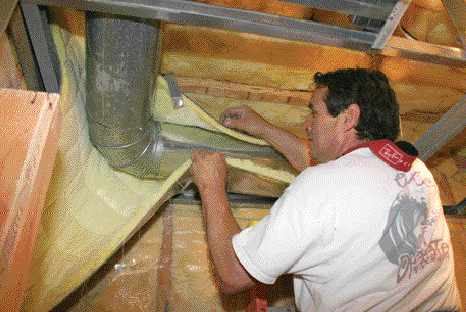
Designing a wall assembly that meets the STC requirement, along with sealing any air leaks that would allow airborne sound to pass from room to room, is what I call basic acoustic treatment. In our example involving the bedroom and TV room, adding 1-pound mass-loaded vinyl to a typical 2×4 wall with sound-control batts and 5/8-inch drywall on both sides would meet our STC requirement of 50.
Mass-loaded vinyl is similar in composition to sheet-vinyl flooring except that it has high-density additives that push its weight from roughly 1/2 pound to 2 pounds per square foot, depending on the thickness — which ranges from about 1/16 to 1/4 inch thick. I generally specify 1/8-inch-thick, 1-pound material; a common 54-inch-by-60-foot roll weighs about 270 pounds. In addition to being used on its own, mass-loaded vinyl is found in many of the other acoustic control products we use.
Mass-loaded vinyl reduces sound transmission to adjacent spaces better than multiple drywall layers and resilient channels do.
The 54-inch-wide rolls are installed over the framing and lapped 6 inches between studs or joists.

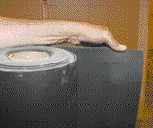
Cuts are made with a hook-blade utility knife.
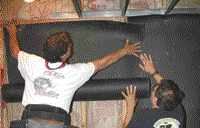
The material is fastened with a pneumatic roofing nailer.
People often ask me how such a thin material can work better than multiple drywall layers and other more-traditional sound-control techniques. Mass-loaded vinyls are effective because they have high density and they’re flexible. When describing how they work, I find that density is easy to explain: Dense materials do a better job of stopping sound waves. Understanding why flexibility is desirable is a little less intuitive, but I advise people to think back to the paper-cup-and-string telephones we all made as kids. When the string was taut, the sound traveled easily from one cup to another. When the string was limp, the spoken word could not be heard on the other end.
Because it is both dense and flexible, lead was once a common material for sound attenuation. However, it’s largely been replaced by mass-loaded vinyl, which is easier to work with and less expensive. One-pound loaded vinyl generally sells to contractors for about $2 per square foot. Not all loaded vinyl products are created equal, so it’s important to review the manufacturer’s specifications — especially the rated transmission loss, which refers to a material’s effectiveness at reducing sound — before installation.
Recommended Acoustic Separation
In cases where the acoustic problem includes structure-borne noise, I typically recommend a higher level of sound control, which I call recommended acoustic separation. This level of acoustic control includes all of the measures taken in basic acoustic control plus an additional emphasis on controlling structure-borne noise, which refers to sound traveling through the house framing or structure. When you hear the house shaking to the beat of a bass drum, you are experiencing low-frequency structure-borne noise.
So, is adding a mass-loaded vinyl barrier the best acoustic solution for a media room? The answer is no, since loaded vinyl mostly addresses airborne sound and has less effect on structure-borne noise.
If a media room will have a subwoofer (most do), it’s important to prevent the low-frequency sounds of the subwoofer from traveling through to the framing, which you can do by using some form of decoupling or a special loaded vinyl. My company started manufacturing its own loaded-vinyl product for this application, NoiseOut 2, after being unable to find anything commercially available.
NoiseOut 2 is similar to 1-pound mass-loaded vinyl, but it can reduce noise in lower frequencies by roughly 10dB more than typical 1-pound mass-loaded vinyl can.
While more effective than the basic acoustic treatment, recommended acoustic separation will not completely eliminate impact-generated, structure-borne sounds like those produced by a subwoofer.
Acoustic Isolation
If you’re trying to eliminate virtually all structure-borne noise, you’ll need to move to the next level of acoustic treatment, acoustic isolation. Acoustic isolation is the most effective and expensive method of sound control. It’s not uncommon for one of my residential clients to spend thousands of dollars acoustically isolating a high-end media room.
In the past, acoustic isolation often meant using the “room in a room” method, which involved attaching the walls to either staggered or double studs. But this was labor-intensive, and a lot of space was sacrificed to accommodate the extra studs and the air space between them.
In modern construction, acoustic isolation is better achieved by decoupling the final layer of drywall from the framing. Depending on the space, I use several methods to accomplish this, all of which outperform the traditional double-stud configuration.
One approach uses spring isolators, which are basically acoustic shock absorbers. They can be mounted on the floor, walls, or ceiling; by cushioning the impact of sound waves, they prevent them from spreading to framing and other rigid materials like pipe and ducts. Some spring isolators can support hundreds (or even thousands) of pounds each, so they can be spaced farther apart than other types of isolation hardware.
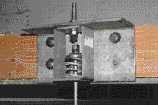
Controlling structure-borne noise requires acoustic isolation or decoupling of the finished space from the framing and other rigid materials. This can be done by using double-stud framing to build a "room within a room" or with specialty products such as these spring isolators.
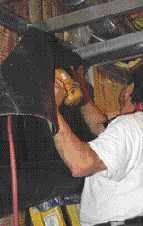
On the ceiling of this room, spring isolators support heavy-gauge steel framing that will ultimately be covered with a layer of 3/4-inch plywood, a layer of mass-loaded vinyl, and then drywall. Multiple pipes and ducts didn't leave a lot of room for regularly spaced mounting hardware in this high-end home theater, so spring isolators — which generally have a higher load capacity than other types of isolation hardware — were a good choice.
While spring isolators have their place, I generally prefer another type of isolator, with rubber pads instead of springs. These come in wall-mounted and ceiling-mounted versions. We commonly use the latter, with a drywall suspension system, but we don’t just attach drywall to the suspension system. We also install a layer of 3/4-inch plywood and mass-loaded vinyl to the assembly before the drywall layer. The final assembly is heavy, so the isolators must be spaced accordingly.
The ceiling mount is typically available in 50- and 100-pound versions. The other model can be wall- or ceiling-mounted and is made to receive hat-shaped resilient channel. As with the ceiling assembly, we usually install plywood and a layer of mass-loaded vinyl under the drywall when we use this model.
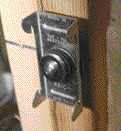
Isolation clips with rubber mounting pads reduce transmission of low-frequency acoustic waves that would otherwise pass into the structure.

These isolation clips are designed to be used with resilient channel.
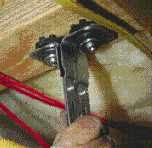
There are other types of isolation clips too. This one is designed for use as an attachment point with dropped ceilings.

Here a worker is attaching the frame of a dropped ceiling to an isolation clip.
Problem Areas
For any type of acoustic treatment to work properly, the wall, ceiling, and floor assemblies need to be continuous. If there are any gaps or holes at room corners or around mechanical penetrations, the sound will pass through and carry to the next room and beyond. These sound leaks, called flanking paths, can seriously degrade acoustic performance and reduce the effective STC rating of a wall to well below the anticipated value.
So before the drywall is installed, we always thoroughly check the following areas.
Electrical boxes. One of the most common sound-leakage points is electrical boxes. A single box is bad enough, but back-to-back outlets in the same stud cavity — often found in partition walls — are even worse. Whenever possible, electric boxes should be placed three stud bays apart. In addition, I always wrap electrical boxes with mass-loaded vinyl or specify site-built enclosures for them to prevent sound from escaping. And once the drywall is hung, I seal around the perimeter of each electrical box with acoustic or silicone sealant.
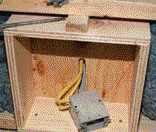
Electrical boxes, a common sound-leakage point, are easy to seal with site-built enclosures or acoustic barriers like mass-loaded-vinyl.
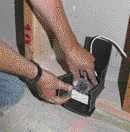
Here, a worker folds and tapes a precut piece of mass-loaded vinyl around a single-gang box. After the drywall is hung, each box should be sealed around the perimeter with acoustic sealant. When possible, outlets on opposite sides of a wall should be offset by at least three stud cavities.
Piping. Plumbing pipes and electrical conduit present yet another problem. Since they’re solid materials, they can carry sound quite a distance. To keep pipes from picking up sound in a media room and carrying it to another room, and to prevent pipe noise from disturbing conversations or media enjoyment, I always wrap pipes with special pipe insulation made from fiberglass with a layer of loaded vinyl inside.

All piping — including water-supply and waste lines, gas lines, and electrical conduits — should be wrapped.

The joints are sealed with silicone.
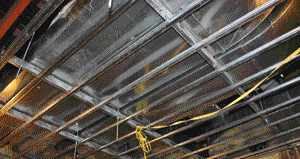
Ductwork. Perhaps the most troublesome spot in any acoustically treated room is the heating and air-conditioning ductwork.
Because their smooth, hard interior tends to amplify sound waves, and because the large openings at either end make it easy for sound to get in at one room and out into the adjacent one, ducts are an ideal conduit for sound.
To reduce sound transmission, I wrap the exterior of ducts with an insulation that’s similar to the product I use on pipes. And I install fire-rated acoustic foam or fiberglass duct liner on their interior.

Preventing ducts from spreading sound throughout the house is a two-step process. First, fire-rated acoustic foam or fiberglass duct liner is installed on the ducts' interior to deaden any sound that gets inside.
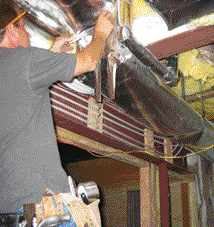
Next, the ducts’ exterior is wrapped, which ensures that very little sound will penetrate in the first place. Both steps are especially important in basement home theaters, which often have many ducts in the ceiling.
Built-in speakers. In-wall or in-ceiling speakers, common in today’s home theaters, should always be backed with an effective, high-density sound barrier. We use quilted fiberglass specifically designed for this purpose. Not only does lining the stud cavity behind the speakers increase the STC of the speaker cavity, but it also prevents low-frequency impact speaker sounds from transferring to the structure and traveling to adjacent rooms.
Doors. Depending on the level of noise reduction required, the acoustic treatment of doors is critical. At a minimum, any door connecting an area that contains a speaker system to another area should have a solid core with a retractable acoustic door sweep.
Recessed lights. Like in-ceiling speakers, recessed lights allow noises to travel easily between floors. I use an acoustic muffler above each recessed light in rooms below acoustically critical rooms — especially in TV rooms and in kitchens below bedrooms. Acoustic mufflers should be used only with can lights approved for insulation contact.
Sealing the Holes
Properly sealing joints, junctures, and cracks is an essential part of acoustically treating a room. Gaps are often covered by molding, but it’s still vital to caulk these invisible openings; the most troublesome leaks occur at the wall/floor junction.
Acoustic sealants must be durable and flexible enough to withstand settlement — along with the expansion and contraction of materials — as the building ages. Acoustic sealants are excellent because they remain flexible forever; dense, high-quality silicone-based sealants are even better.
The importance of sealing cracks can’t be overstated. A 1/16-inch-wide by 16-inch-long crack along the bottom plate of an acoustically treated STC-52 wall effectively reduces its STC rating to 40.
Mechanical Rooms
Finally, there are several additional steps I take to ensure that mechanical rooms are acoustically isolated from the rest of the living space. They include using flexible connections where the ductwork meets the furnace plenum; installing proper machine-base decouplers below any hvac equipment; and installing a Class-A fire-rated noise barrier and noise absorber on the perimeter walls and ceiling.
The wall and ceiling barriers inhibit low-frequency machinery noises from traveling through the foundation walls and ceiling into living areas.
Testing
Once the installation is finished and all the areas have been treated, how can one be certain there haven’t been any oversights or mistakes?
Two simple techniques can help guarantee a successful installation. The first is to shine a bright light on one side of the high STC-rated wall or floor to see if any light passes through. This is a good test, because if light can travel through an acoustic wall or floor, then sound can too, just as easily. Electrical penetrations are generally the biggest problem area.
The second technique, and the only way to test the effectiveness of acoustic treatments for hvac ducts and plumbing, is to use a tone generator and either listen for the noise or measure the decibel level with a special device.
This article discussed only the first part of the acoustic equation: making certain that the sound is controlled or kept in the space where it was intended to be heard.
The second part of acoustic design is making certain that the room has the correct reverberation time so the sound is clear and easily understood. We do this kind of work as well, but it is a subject for another article.


