During my 30 years in the roofing business, I’ve installed many types of roofing and seen a number of products come and go. But one system that never goes out of style is the traditional built-up hot-mop roof. I learned how to do built-up roofing (BUR) during my early years in the trade, and my company continues to do it to this day.
It’s not that we have anything against other types of roofing: We also install wood shingles, asphalt shingles, tile, and slate. But if a roof’s pitch is shallower than 4 in 12, we’re limited to using BUR or some kind of single-ply membrane, and my preference is the built-up roof.
BUR vs. Newer Systems
I’ve installed various kinds of single-ply membranes for previous employers, and until recently my company also did some modified bitumen torch-down roofing. While single-plies typically cost more than BUR, the installed cost for torch-down is about the same. Torch-down became popular with roofers and GCs several years ago because it’s flexible, takes less labor to install than BUR, and doesn’t require the use of liquid asphalt (see “Torch-Down Roofing Basics,” 8/01). The problem was that so many house fires were started with the torch, insurers have made torch-down too expensive for many roofers to install.
Fortunately, we never stopped doing conventional hot-mop roofs. The method has been around for more than 150 years and has a great track record. Depending on the design, a properly installed hot-mop roof will last 15 to 25 years. It’s one of the least expensive low-slope systems out there, so it has a low life-cycle cost.
I like BUR because, unlike single-ply membranes, it has a built-in redundancy, thanks to the multiple layers and substantial laps.
As a GC, it’s unlikely you’ll ever install BUR yourself, but if you are advising the client or supervising the job, it helps to understand how the system works and what it takes to lay up a durable roof.
Components of BUR
My partner, Barry Wilkes, uses the analogy of a layer cake to describe BUR to customers. The base sheet and felts are the cake, and the hot asphalt is the icing that gets spread between the layers and over the top. The aggregate is like the sprinkles that get scattered across everything.
The asphalt fuses the felts together, forming a waterproof membrane. The felts reinforce the asphalt and prevent it from cracking. The aggregate protects the surface of the membrane from fire and mechanical damage — and, even more important, it prevents the asphalt from being degraded by the sun’s ultraviolet rays.
A typical built-up roof has a base sheet, two or three layers of felt, and three or four layers of asphalt. It’s about 1/2 inch thick without the aggregate and about 3/4 inch thick with the crushed stone. A full tar-and-gravel system weighs about 450 pounds per square. If, instead of gravel, you use a cap sheet (an asphalt-impregnated felt covered with a thin coat of aggregate), the roof covering will weigh about 220 pounds per square.
Substrates. We do most of our residential work on existing homes and additions. The process of installing a built-up roof is the same for both, with one difference: On an existing structure, the old roofing has to be removed and the substrate may need to be repaired. BUR can be installed over wood, concrete, steel, or foam insulation — but in residential, it’s nearly always wood.
In newer construction, the roof will be sheathed with plywood or OSB. Houses built before 1950 may have wood board sheathing. The 1/4-inch gaps between boards are not a problem, but if the surface is excessively lumpy it has to be skinned with 1/2-inch plywood or a layer of perlite insulation board.
BUR can be installed on slopes of up to 4 in 12. It can also be installed on dead-flat surfaces, though it’s better to have at least some slope, so the roof will drain. A flat roof can be sloped by covering it with a layer of tapered insulation, but most customers are unwilling to spend the $150 per square it takes to buy and install this material. Sloping a built-up roof does not prevent leaks, but it does reduce the amount of water that gets through if a leak occurs.
Asphalt should not be applied to damp surfaces, because trapped moisture can cause blistering.
Cant strip. The fiberglass felts we use have a memory, meaning they’ll break or try to flatten back out if you bend them into the 90-degree inside corners at parapets, chimneys, and curbs. If the felts lift, this defect, called a fish mouth, weakens the membrane and creates paths for water to get into the building.
To avoid this problem, we install 45-degree cant strips at inside corners. The strips, made from a composition material containing perlite, are nailed 12 inches on-center.
Base Sheet
After the cant strips are installed, we cover the sheathing with a layer of red rosin paper, which functions as a slip sheet for the base sheet to follow. The base sheet is an asphalt-coated “fabric” mat. Years ago, these mats contained asbestos. Manufacturers later switched to organic fibers, which tend to absorb moisture and rot. The mats are now made with synthetic materials like fiberglass.
We normally use a Johns Manville base sheet called PermaPly 28. It’s a heavier version of the felt used to reinforce the hot asphalt. The base sheet needs to be heavy because it’s nailed to the deck and you don’t want fasteners pulling through. It also has to span small gaps in the sheathing.
The base sheets are applied shingle-style up the roof with approximately 2 inches of overlap at the joints. On wood substrates, the base sheet is typically fastened with 6d nails with 1-inch caps spaced 6 to 9 inches on-center at the edges and 12 inches apart in the field. The base sheet runs to the top of the cant strip and is cut or notched to fit around plumbing vents and other penetrations.
Flashings
After the base sheet is down, we install flashings. The project pictured in this article was a reroof, so we had to replace the flashings around vent pipes and at the scuppers. If there hadn’t been a parapet, we would have installed gravel stop flashings at the edge. Flashings come in aluminum or galvanized steel; either type works on a hot-mop roof.
We bed the flashings in plastic roof cement, nail them to the sheathing, and prime them with a spray-on or brush-on asphalt primer. With torch-down, it’s standard procedure to lay up the entire roof, then patch in around scuppers and plumbing vents. It’s possible to do this with hot-mop, too, but installing the flashings before the asphalt and felts are applied leaves fewer seams.
CAUTION The fumes from molten asphalt are a suspected carcinogen and, with repeated heavy exposure, can produce a number of negative health effects. This is primarily an issue only for roofers and people who manufacture roofing products. However, in some jurisdictions there are rules about when, where, and if you can use hot asphalt. In some cases, you can comply by using a low-fuming product or a kettle that’s equipped with a filtration device. In other cases, you may need to switch to a cold-applied bitumen or use a different roofing system. — D.L. |
Asphalt
There are two kinds of asphalt used in residential BUR: standard and modified. Both are made from bitumen, but the modified materials contain additives that increase flexibility and lessen susceptibility to fatigue.
There are also different types of standard asphalt. Some are designed to produce fewer fumes when melted, but the main difference between types has to do with softening points.
Standard asphalt is available in types 1, 2, 3, and 4. The lower the number, the lower the softening point, measured in degrees Fahrenheit. Asphalts with low softening points weather particularly well because they remain more flexible in cold weather. However, high outdoor temperatures can soften asphalt, and if the pitch is steep enough it may begin to slide down the roof.
To prevent that from happening, choose a type of asphalt based on local weather conditions and the slope of the roof. Type 1 works for dead-flat roofs and types 2, 3, and 4 suit respectively steeper pitches.
Where we work, the weather is moderate; temperatures rarely go below freezing or above 85°F. But if we were to do a job 20 miles farther inland, the roof would have to withstand summer temperatures that frequently exceed 100°F. The roof in the photos was made with type 3 asphalt; farther inland, we would have used type 4.
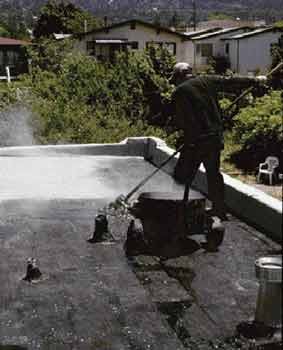
Melting. Most contractors have never been up on the roof while BUR was being installed, but everyone has seen the kettle on the ground, which is built onto a trailer and uses propane to melt the asphalt. My kettle holds up to 350 gallons and is equipped with a pump that moves asphalt to the roof through steel pipes. The asphalt we use comes in 100-pound cylindrical plugs; we break the plugs into smaller pieces with an axe and put them in the kettle to melt.
It’s important to maintain the proper temperature when melting and applying asphalt. If the kettle is too hot, the asphalt could catch fire or be degraded by overheating. If that happens, it won’t perform properly.
We frequently use Trumbull’s type 3 asphalt, which is designed to be applied to the roof at 410°F, plus or minus 25°F. At this temperature, it has the correct viscosity to properly bond the felts. If the asphalt is too hot, it goes on too thin. If it’s too cool, it will go on too thick and will not fully bond the felts, producing a membrane prone to cracking. Of course, the kettle must be hotter than the application temperature because the asphalt will cool on its way to the roof.
Once the hot asphalt gets to the roof, we transfer it to buckets or wheeled carts and haul it to the area where we’re working. Hot asphalt can give you a really nasty burn, so whenever we move it we yell “Hot!” to alert everyone around to be on guard. It’s a bad idea to work below a hot-mop roofing crew: If a bucket is tipped, hot asphalt could slosh over a skylight curb or pour off the edge of the roof.


