In 2000, I moved from Kentucky to Florida to manage Solid Wall Systems, a firm undertaking the construction of thousands of new residences for Mercedes Homes. Instead of conventional framing, these homes would be built using a cast-in-place wall system above a slab-on-grade foundation (see Figure 1). I’d been running a successful foundation business back home, so making the transition to above-grade work was fairly simple.
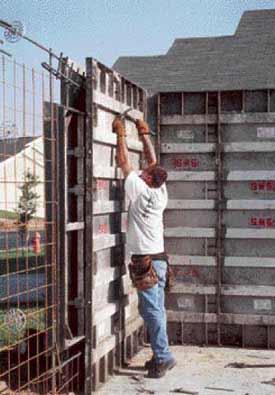
Figure 1.
The author installs cast-in-place walls on the thickened edge of a slab-on-grade building platform. No. 5 rebar “up-rods” are wet-set into the slab and, once cured, wire-tied to the wall reinforcement.
Concrete-block walls began to replace wood framing in Florida’s residential construction many years ago. Between fluctuating lumber prices, voracious tropical termites, and Hurricane Andrew in 1992, the shift was only logical. Concrete prices are historically stable, block is entirely termite proof, and concrete’s mass provides superior wind resistance, as well as an ideal surface for a low-maintenance stucco finish.
The Case for Poured Walls
Even a skilled block mason is limited to a personal output of between 75 and 150 blocks per day, depending on the number of window and door openings and other details. A single 8x8x16-inch block is equal to about 9/10 square foot of wall area, so it typically takes a team of experienced masons several days to complete an average, single-story house. But in Florida’s expanding residential market, the available pool of skilled masonry workers is stretched to its limits.
Cast-in-place walls resolve not only the labor issue, but also the key issues of speed, quality, and economy. The average pay on our jobs is $13 per hour, and it takes only a few weeks to train a new laborer in our methods. Furthermore, poured wall construction, at $4 per square foot (standard) to $6 per square foot (custom), compares favorably with block, which runs around $4 per square foot.
Our current crew of around 50 field personnel is on target to complete a thousand 2,000-square-foot concrete homes in 2003. Obviously, we have to have a rock-solid system to manage that kind of workload.
Blockheads. Although poured house walls are obviously nothing new — in the Caribbean and South America, cast-in-place house walls have been common for decades — the idea is just starting to catch on in the U.S. One likely deterrent is the start-up cost: Although a block mason can go into business with a few thousand dollars per crew for equipment, it costs at least $500,000 and up to $1,000,000 to get a cast-in-place company up and running at our current level. (When we started about a year ago, we were completing one job a day. Today, we’ve got eight crews and are completing four homes a day.) Another issue is unfamiliarity: Tract builders are concerned about losing sales with a different building method. An 8-foot ceiling height is standard in the residential development market, but we work with 9-foot forms. Many builders have trouble swallowing the added interior material costs introduced with 9-foot ceilings. But that extra foot offers some of the drama of a vaulted ceiling without adding framing, drywall, and finishing costs.
Slab Construction
We work hand in glove with local independent slab companies. The mild climate, high water table, and flat land make deep footings unnecessary and impractical. The local soil is referred to as “sugar sand,” a fine, smooth sand that resists compacting. The site is first prepared by placing a trucked-in layer of compacted soil over the sugar sand. The perimeter is then formed and deepened to provide a 12-inch-thick monolithic footing. Once the in-floor plumbing is roughed in and inspected, the slab crew lays a 6-mil vapor barrier over the compacted soil to prevent ground moisture from wicking through the slab. The slab is a 4-inch-thick 3,000-psi fiber-mesh concrete, pumped, spread, and finished inside the formwork. Fiber mesh replaces more costly 6-inch wire mesh and the 300 to 400 plastic chairs in the average 3,000-square-foot home. Pumping costs extra, about $500 to $600 per day, but that cost is more than made up for in labor savings.
To tie the walls to the slab, we use 4-foot-long #5 rebar “up-rods,” bent at right angles and “wet-set” into the freshly poured concrete on 6-foot centers around the slab’s perimeter. The rods are set about 3 inches in from the perimeter forms and stand 3 feet high. The slab is left to cure overnight, for a minimum of 8 to 12 hours.
Reinforcement
The morning after the slab has cured, the steel crew is on it. An 8-foot-10-inch-long #5 reinforcing bar is wire-tied to each perimeter up-rod. The up-rods are connected at the top of the wall to a continuous tie beam formed from single 20-foot lengths of horizontal #5 rebar to outline the exterior wall. Above all door and window openings, the crew ties a double layer of specially designed header reinforcement (Figure 2).
Figure 2.The typical concrete window header is 16 inches deep and is reinforced according to the particular design load.
Next we stand and tie 8×10-foot sheets of 6-inch-square welded wire mesh against the up-rods. We start the panels at the building corners and work toward the middle, overlapping sheets by 1 foot. To avoid conflict with the 1-foot-on-center form ties, the worker sets the mesh by propping the sheet on the toe of his boot, lifting it about 2 inches off the slab. This offsets the wire sufficiently from the ties. Because the mesh is square and stiff, it forces the corner up-rods to stand plumb. The plumb corners prevent problems with centering the mesh between the forms. No leveling is needed as long as the same worker positions the mesh (and doesn’t change his boots). Rebar spacers — 5-inch-diameter spoked plastic disks — clip onto the wire mesh in a 4-foot-square pattern to keep it evenly spaced between forms (Figure 3).
Figure 3.Six-inch-square welded wire mesh is centered between forms with the aid of plastic spacers placed on 4-foot centers. Mesh sheets are started at the building corners, and runs overlap 12 inches.
The crew can tie two to three houses a day by using mechanical rebar tie guns (Max USA, 800/223-4293, www.maxusacorp.com), which take less than a second to throw on a tie. Even at $2,500 per gun, the tool quickly pays for itself; we’ve got seven of them (Figure 4).
Figure 4.A mechanical rebar tie gun can make a secure connection in less than a second.
The Florida building boom keeps local building officials too busy to schedule inspections, so we allocate a full day for steel reinforcement inspection.


